How to Make an OS X Yosemite Boot Installer USB Drive
Now that OS X Yosemite is available, many users may wish to create a bootable installer drive from something like a USB flash thumb drive or another disk. This allows for several things, the ability to upgrade multiple Macs without having to re-download the installer, the ability to perform a clean install, and also the convenience of having a separate bootable reinstallation drive in the event you need it for serving a Mac.
Creating a Yosemite installation drive that is bootable is quite simple, but it’s a multiple step process. Before you begging, make sure you have the following basic requirements met:
Requirements
- A USB Flash Drive
 that is 16GB or larger which you don’t mind formatting
 - The “Install OS X Yosemite.app” launcher in the /Applications/ directory of the Mac (downloaded from the App Store, but not installed)
Of course, we’re assuming the destination Mac(s) that are going to get Yosemite are compatible. Basically, if the Mac is capable of running OS X Mavericks, it is capable of running OS X Yosemite too.
How to Create a Bootable OS X Yosemite Installer Disk in 2 Steps
For the purposes of this walkthrough, we’re going to use a 16GB USB flash thumb drive, but you’re free to use whatever you want, and you could even use an external hard drive if you really wanted to. The convenience of a portable flash drive is undeniable so it’s preferred if you’re going to be updating multiple Macs. Let’s get started:
Step 1: Format the USB Drive to be Bootable
This is going to format the drive so that it will be a bootable installer, without doing this the drive may not be bootable. If you don’t want to erase the drive, find one you don’t mind formatting instead. When you format a fresh drive on a Mac it becomes labeled as “Untitled” so we’re going to assume that the boot destination drive is named Untitled as well. If for some reason you have another drive named Untitled, change the name or don’t use it.
- Connect the USB drive to the Mac and launch Disk Utility, then select that USB drive from the left side drive list (be sure you select the USB drive you want to make the bootable installer from)
- Click on the “Erase” tab and format the drive as “Mac OS Extended (Journaled)”, then choose “Erase” and confirm
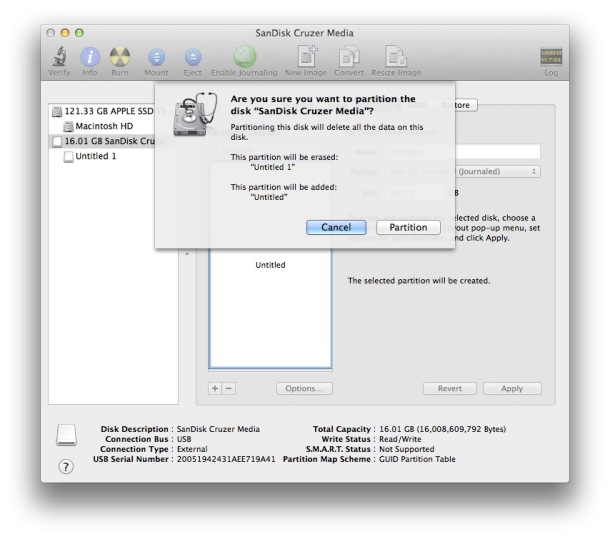
- Next go to the “Partition” tab and under ‘Partition Layout’ click on the pulldown menu, changing it from “Current” to “1 Partition”
- Change the name to “Untitled” from ‘Untitled 1’ then click on the “Options” button
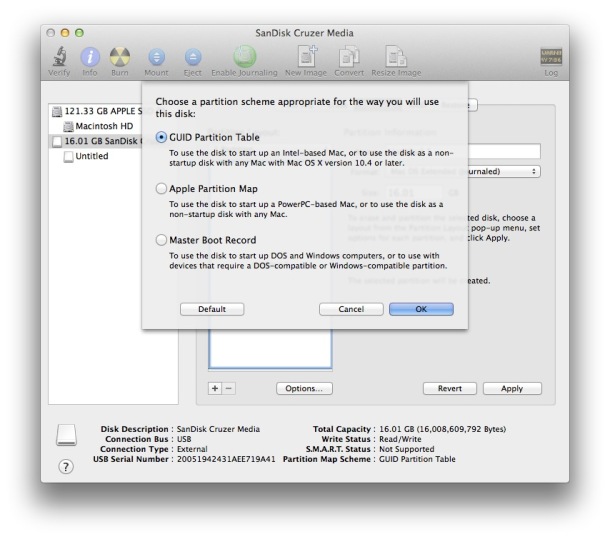
- Choose “GUID Partition Table” as the partition scheme and choose “OK”
- Click “Apply” and confirm the creation of the partition
- Quit out of Disk Utility when finished
Now that the drive is ready, you can move on to making the actual installer.
Step 2: Making the OS X Yosemite Installer Drive
The next step will actually make the installer drive from the previously formatted USB disk. If you already have the OS X Yosemite installer application in the /Applications/ folder on the Mac, you can skip directly to step 3:
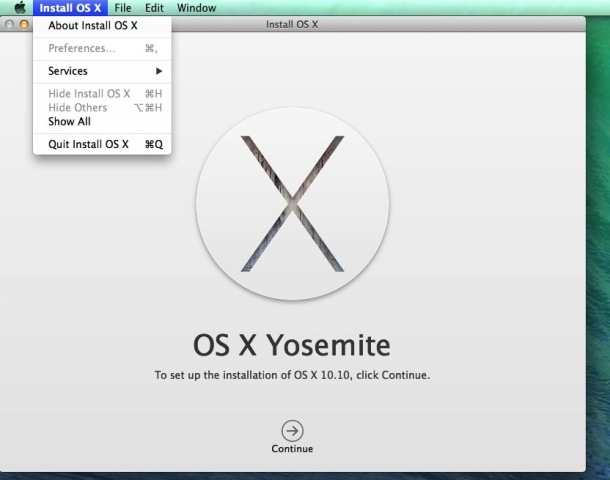
- Download OS X Yosemite from the Mac App Store, it’s free (direct link) – DO NOT INSTALL IT YET
- When the download completes and the “Install OS X Yosemite” app launches, quit out of it immediately
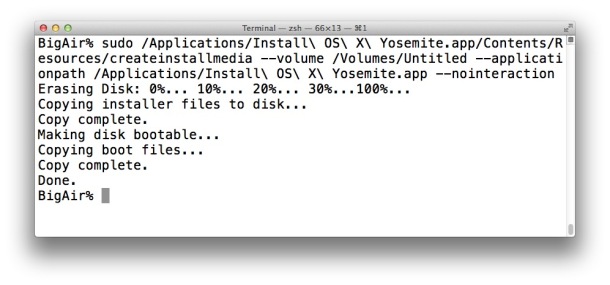
- Launch Terminal app and enter the following command exactly, copy and paste works fine:
- Enter the administrator password when requested (this is required to use the sudo command – the password will not show up and it looks as if you’re not entering anything, that is normal behavior for the command line), then hit the RETURN key to start making the installer
- You’ll see a series of message like the following, let it finish until you see the “Done” message – this may take a while as multiple GB of data have to be transferred:
- When finished and the terminal reads “Done”, exit out of Terminal, you’re ready to use the bootable installer drive
sudo /Applications/Install\ OS\ X\ Yosemite.app/Contents/Resources/createinstallmedia --volume /Volumes/Untitled --applicationpath /Applications/Install\ OS\ X\ Yosemite.app --nointeraction
"Erasing Disk: 0%... 10%... 20%... 30%...100%...

Copying installer files to disk...

Copy complete.

Making disk bootable...

Copying boot files...

Copy complete.

Done."
Sidenote: rarely, you may encounter a “can’t be verified” error, here’s how you can fix that.
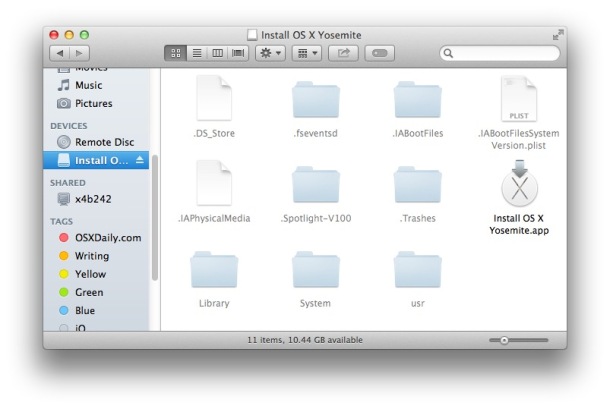
That’s all there is to it. Your freshly made OS X Yosemite install drive will be visible in the Mac Finder:
Now you just need to boot from the freshly made OS X Yosemite drive, do that by rebooting the Mac and holding down the OPTION key and selecting the “Install OS X Yosemite” drive upon boot.
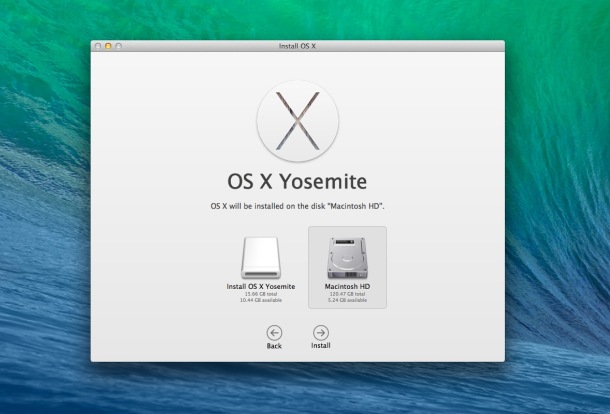
If the drive does not boot, you almost certainly skipped the first step which was to partition the drive as GUID, or perhaps interfered with the syntax in the command. You can go through the process again to be sure.
This allows you to update any version of OS X from Snow Leopard, Lion, Mountain Lion, or Mavericks, directly to OS X Yosemite, with the installer that was just made. You can also perform a clean install (which we separately address in a thorough walkthrough here), or update multiple Macs without having to download it from the App Store again. Be sure to always back up the target Mac before updating OS X, whether to OS X 10.10 or any other version, you can follow detailed instructions on how to prepare a Mac for OS X Yosemite here. Enjoy OS X Yosemite!
The aforementioned steps have been tested repeatedly and are confirmed to work flawlessly with the OS X Yosemite final release. If you have any issues, run through the steps again, or leave a comment with your specific error. If you know of an easier way, let us know in the comments too!

I got to the step where I opened Terminal, typed the command perfectly, but it says No Such Command, it doesn’t even get to the asking for the administrator password, which I’m guessing is just my password when I power on my Mac??? Help please!!
Clueless
This is truly the best written, most complete, and best illustrated how-to on making a bootable USB drive. I followed it exactly and it worked perfectly. I now have a rescued-from-the-trash computer to donate to another student in need. Thanks!
Thank you, you saved my life. My USB was stuck in MBR partition scheme.
How come the macOS installer does not format the USB drive by itself with the correct partition scheme? Or at least tell us that something is wrong?
i download yosemite file from torrent as the link u provide say that yosemite are not available in ur country story,the file is in .dmg format, now what should i do, i extract the same file “os x yosemite” have 9 mb space,but it didnt work,they say that “Applications/Install OS X Yosemite.app does not appear to be a valid OS installer application”.now what should i do plz reply
If you’re seeing the message “You must specify both the volume and install application path” when trying to follow the steps above, check your syntax. Note there are two dashes (–) for the switches –volume –applicationpath and –nointeraction. Depending on how you’re viewing this site or other sites, that may look like a single dash.
i format my macbook pro to windows by changing the mac os x extended to ms doc..i again change the ms doc to os x extended but i cant reinstall..whenever i try to download it takes long then finally is says error download..i want to get mac os x yosemite back..please help to get it back..now im running windows 10 on macbook pro.please help me to get it back…..i will be waiting for your positive reply.
Thanx this helped!
I want upgrade mini mac x.I have “Mac OS X Install DVD.cdr”
also want to create a bootable flash drive fro this.Please help
I did everything right (with a 16 GB flashdrive) exited Terminal, but when i was booting it up from the disk select menu it said needs 3.7 GB more of space to install on this disk.
Can anyone please help me? I am trying to boot up my iMac with it. Thanks
It means your Mac doesn’t have enough free disk space to install OS X, you have too much stuff on the Mac itself. Check your ~/Downloads folder, it often has lots of crud and clutter, clear that out, free up disk space, then try to install again. I’d go for El Capitan over Yosemite, too.
Here is how you can make an El Capitan boot disk for installing OS X El Cap:
https://osxdaily.com/2015/09/30/create-os-x-el-capitan-boot-install-drive/
I am trying to get this to work with El Capitan, but the command is not working. It does not like the name El Capitan no matter how I put it in there. Eel Capitan, ElCapitan, ElCapitan, etc…
I guess I should have read the last post before leaving my first one. :-(
Here is how you can make a bootable USB installer for OS X EL Capitan
https://osxdaily.com/2015/09/30/create-os-x-el-capitan-boot-install-drive/
The command is slightly different due to syntax changes and the installer name.
Hey guys! The command is also applicable to OSX EL Capitan, just follow all the steps given then just use or copy this command line for it to work. :)
sudo /Applications/Install\ OS\ X\ EL\ Capitan.app/Contents/Resources/createinstallmedia –volume /Volumes/Untitled –applicationpath /Applications/Install\ OS\ X\ EL\ Capitan.app –nointeraction
Thanks!!!
Your article has a mistake. Do not rename the newly-formatted USB drive to Untitled 1. The terminal command will tell you it’s not a valid mount point. Renaming the drive to Untitled fixes the problem and allows the process to proceed. Just sayin’
No the article is correct, but you have to use the exact command as stated, if you don’t escape “Untitled\ 1” it will tell you it’s not a valid mount point. You’re experiencing a syntax error which is common if you are less familiar with the command line.
hi
when i was enter this command
” sudo /Applications/Install\ OS\ X\ Yosemite.app/Contents/Resources/createinstallmedia –volume /Volumes/Untitled –applicationpath /Applications/Install\ OS\ X\ Yosemite.app –nointeraction ”
in my terminal i saw this problem
” You must specify both the volume and install application path ”
and i can’t fix my problem.
what i do ???
sudo /Applications/Install\ OS\ X\ Yosemite.app/Contents/Resources/createinstallmedia –volume /Volumes/Untitled\ 2 –applicationpath /Applications/Install\ OS\ X\ Yosemite.app –nointeraction
Thanks a lot buddy! Very clear and helpful instructions. You just helped me save an otherwise perfectly good laptop that was destine for the scrap heap :)
I had the same problem until I realized that there’s no space between “Resources/createinstallmedia”, so if you’re typing it in rather than copy/pasting, it makes a difference.
The article instructions leave your USB drive as “Untitled” do not add a “1”
If you read the article on how to make a USB installer for OS X Yosemite, which you apparently have a hard time doing, it explains exactly why the volume is called “Untitled 1” and not “Untitled”. But whatever, wouldn’t want to bother you with literacy comprehension! Particularly with a technical matter, nah, why read when you can just assume and break something? LOL.
Guys, how long did it take for all the files to be installed on to the disk? Mine has been going on for about 10 minutes now. Is that normal?
How long did it end up taking? Mine has been going for 40 minutes so far, still going.
I followed these instructions exactly – twice – and both times when I option-boot, I just get a black screen and have to restart. Is it because I’m using only a 8GB drive? Everyone else said 8GB worked fine.
I have Mountain Lion installer backed up on another 8GB drive, so I’ll try that one instead, for now.
Somebody please send me the “Yosemite setup app” I cant download mine. It keeps giving me an error message.
you download yosemite from the app store, its 8gb nobody can send it to you
What is the problem with Yosemite?? I get the (error code 112) too and the cannot be verified every time…
Testing is obviously not done properly.. I will forgo installing.
Tried and got this error message. Any suggestions?
Couldn’t mount dmg /Volumes/Install OS X Yosemite/Install OS X Yosemite.app/Contents/SharedSupport/InstallESD.dmg (error code 112)Mount of outer dmg failed.
Done.
Hi,
Thanks for sharing this great solution.
I wanted clean fresh installation of Yosemite 10.10 on my macbook pro (16 GB Ram, 512 SSD, i7). so, I erased old installation. Followed exact steps you mentioned (on other iMac) to create bootable usb. It boot the system up start installing Yosemite, but in the middle, it is failing with following message :
“an error occurred while extracting files from the package essentials.pkg”
It ask to try again but every time it fails with same error me message.
Please help me. Thanks in advance.
Regards
Harpreet Gill
Yay! I did it. I started over, formatted and partitioned the memory stick, renamed it to Untitled again and started over and this time it worked. Thank you soooo much!!!
I got as far as the terminal, cut and pasted the commands, and at first it asked for pw. I didnt read the part where you indicated that I wouldnt see the pw being entered. I did the same command again and this time it says:
“/Volumes/Untitled is not a valid volume mount point.”
Now what?
There is an introduced syntax error in the instructions provided here, specifically the script that will not work when cut and praised into terminal.
These instructions are not valid for many people, even when followed exactly.
Use the instructions:
sudo /Applications/Install\ OS\ X\ Yosemite.app/Contents/Resources/createinstallmedia --volume /Volumes/Untitled --applicationpath /Applications/Install\ OS\ X\ Yosemite.app --nointeractionIt worked perfectly for me the first time.
Actually, the command is identical. You pasting not following instructions is probably your problem.
sudo /Applications/Install\ OS\ X\ Yosemite.app/Contents/Resources/createinstallmedia –volume /Volumes/Untitled –applicationpath /Applications/Install\ OS\ X\ Yosemite.app –nointeraction
sudo /Applications/Install\ OS\ X\ Yosemite.app/Contents/Resources/createinstallmedia –volume /Volumes/Untitled –applicationpath /Applications/Install\ OS\ X\ Yosemite.app –nointeraction
Same commands, identical.
Very cool. Thanks for the article, it worked as stated. Mac noob here lol
Most people who are not Terminal savvy (like me) will neglect to delete both the “1” in “untitled 1” AND the space preceding it, as was my problem. This will result in Terminal reporting that “untitled is not a valid mount point”. There are several other comments to this effect, and it’s pretty much an essential step.
Is it natural for a 16GB SanDisk to take days to format. I have done it the way you explain says, but is taken forever? I cant move on yet to partition tab, as this has been going on for about a day. I didn’t expect that it took this long to format, I have “Mac OS Extended (Journaled)” highlighted, and it is done about half so far. Any ideas? If this is natural then cool, but was wondering
Mine took 5 seconds. I would put in a different machine and give it a different format like fat 32 then go back to the Mac to format properly.
Hello guys. Im a newbie to mac and ive got a real problem on my hands. I have a 2009 white macbook im trying to upgrade to Yosemite. However, I cannot boot into the macbook because I mistakenly erased my startup disk. Now I just made a bootable usb disk from a windows tool called TransMac but my macbook doesnt show this bootable disc when I try to install from it. Any help please?
did a copy and paste, entered password and got
command not found
So basically you did something wrong, or entered something wrong. The command works if it’s entered correctly, and if the installer is in place.
I get the error of…
Mount point
OMG… I am a double E who thinks he can provide this level of help to others…. but…. I think I have done died and gone to heaven…. THIS IS the way you do it up right…. all of the “issues’ that pop up are outliers that can be addressed in chat and comments as they are being done here. I followed it exactly and it worked flawlessly. Whoever the hell you are…. well done… and you have my complete respect. Good gawd!!!!!!!! Kudos.
Has anyone operating with Mavericks attempted to make a Yosemite installer USB drive using the Yosemite installer download?
Apple HT201372 indicates the createinstallmedia command is to work only with the version of the OS X Installer app it came with. Does this mean to create Yosemite media the system must be running Yosemite?
Wingle. Considering that users update to OS X Yosemite from OS X Mavericks, hmm I suspect you did not even read the article here, describing how to make a USB installer drive for OS X Yosemite, from OS X Mavericks or OS X Yosemite, as long as you have the Yosemite installer downloaded. This article answers your questions and shows you how to create the installer drive with a USB disk of your choice.
https://osxdaily.com/2014/10/16/make-os-x-yosemite-boot-install-drive/
I would suggest reading the article and then following the steps precisely, if you can not do that, then you should not try to make a USB installer and you should probably not install OS X Yosemite either. Maybe wait for the OS X El Capitan installer and use that in September.
Fixing up my wifey’s Mac and ran into several issues because I used a Samsung 850 as replacement for the old drive. What I then realized was that I could use the net installer, open Disc Utilities and initialize that bad boy. From Lion I went ahead and used this tip and it is nothing but smooth sailing from here. Thanks a bunch for this guide! You rock.
A big, big, BIG Thank You!! I used an SD Card instead of a thumb drive, and your method worked flawlessly!! My old HD had frozen, so I went with a new SSD, but Apple’s “free” method wouldn’t allow me to download “Lion” for upgrading to “Yosemite”. It’s all good now, thanks to you!!
Wow I love this, at least I will now do my stuff de way I want it to be,a big thank you to you guyz
I am referring to
2 dashes.
I got it!!!! the whole problem is that when you copy directly from this page you don’t get the —
only –
I manually typed it in and made sure to make the —
worked like a charm!!!!
thanks ya’ll!
Thank you for such in insight, it work for me though i have to change somethings like my Flash Drive name, my OS location
I have read all of the comments others have left who had the same problem and I have tried ALL of them; none work. I still have this message:
“You must specify both the volume and install application path.”
HELP?
I did this with my external hd that had stuff on it and it looked like it was deleting my drive so I pulled the plug and now my drive seems messed up was it gonna erase my drive or is there away to reverse this action.
Hi,
The command does indeed format the drive and then place the installer files.
If you used your external, this would have formatted the drive. Not the end of the world. You have an arduous task ahead to recover your files.
Good luck.
I am trying to install a fresh copy of OS X Yosemite on my MacBook Pro, 13-inch, Mid-2012 and the instructions given above are quite what I need. The only thing I have to ask is, does all my Data and Applications stay? Or do they get deleted since a fresh copy of OS X is being installed?
These instructions are much easier to follow:
https://osxdaily.com/2014/10/16/make-os-x-yosemite-boot-install-drive/
The install onto the USB drive had only one glitch and that may have caused a problem. At the reboot time the machine just sat there – and I could see the USB drive wasn’t powered, as if it had not been seen by the mac as a bootable volume.
So I powered down and powered up the mac forcing reboot
That seemed to work fine, the external drive was powered and recognized immediately and the install proceeded. Everything works great (though slow) from the external drive.
HOWEVER
When I shut down and disconnected the external drive to boot back into the original system, it booted up into the installer, trying to install Yosemite on my laptop hard drive. I made the mistake of halting that install and went back to the external, and rebooted into Yosemite, then found the app on the old drive “installYosemite.app” and deleted it.
I think that was my big error.
When I tried to reboot the original disk it clearly wants to find something that is missing now – and it won’t boot, and it won’t go into any part of the install. I get a kernel level error, then the multi-language “There was a problem” message, but no successful progress.
Anyone have any idea how to repair that?
Great It’s worked
Hi,
I have been copying installer files to disk for 1 hour now. And it has still not finished. Is it normal ? Do you think there is any problem?
HELP
Thanks,
Lana
I can’t seem to post this in the forum but I got this? “This copy of the Install OS X Yosemite application Can’t be verified. It may have been tampered with during downloading”
Any Ideas?
Yes, if you get the “can’t be verified” error, you can fix it with this: https://osxdaily.com/2015/01/19/fix-os-x-install-errors-cant-be-verified-error-occurred-preparing-mac/
I get an error saying “This copy of the Install OS X Yosemite application Can’t be verified. It may have been tampered with during downloading”
Any Ideas?
I know this is an older post, But I am using it to wipe/clean install a mid 2010 Mac Mini. I’ve tried a handful of times and after a long wait with the initial step (before rebooting) I get an error that says “The Copy Of the install OS X Yosemite application can’t be verified, It may have been tampered with during downloading” Any Ideas?
Dumb question but are there blank character spaces in the command line?
As in after the slashes before “OS” and before “X” and before “Yosemite”
ns/Install\ OS\ X\ Yosemite.app –nointeraction
I ran the terminal message and put in my pswd then got a message that says:-bash: wonderwoman1: command not found
SusieEsevessMBP:~ suzesteves$
Hello,
What can i do if i by mistake installed Yosemite and now I can’t find it anywhere. I tried downloading it again from the app store (waited 4 hours) and still cannot find the OS X Yosemite.app. Is tehre another way of saving Yosemite on a USB ?
You can re-download OS X Mavericks or OS X Yosemite from the OS X Yosemite App Store like this: https://osxdaily.com/2014/12/30/re-download-os-x-mavericks-installer-from-os-x-yosemite-app-store/
It will be in your Purchases tab to re-download, then end up in the /Applications/ folder
I followed directions exactly but upon using Terminal.app the data wouldn’t load bringing back an error:
/Volumes/Untitled is not a valid volume mount point
I did some Googling and figured out naming the USB volume “Untitled” was the issue. I changed the name of the USB stick to YosemiteInstaller and exchanged that name for “Untitled” in the code typed into Terminal.app and it worked flawlessly.
Something else must be named Untitled on my machine causing the prob.
I must note that, pertaining to “Ahmed Abunuwara”‘s post, a new drive got rid of the “Mount of outer dmg failed” problem. I was using a Toshiba 512GB SSD which was having that problem, I switched to a Western Digital 250GB (non-SSD), and it worked with no error. Yay! Hope this helps other’s with the same issue. Now.. what the hell is up with this Toshiba drive!?
I followed your directions very carefully, copying and pasting the sudo command, 3 times with 2 different downloads from Apple and 2 different USB sticks. I get the following error every time.
Any suggestions?
Copy complete.
Making disk bootable…
Couldn’t mount dmg /Volumes/Install OS X Yosemite/Install OS X Yosemite.app/Contents/SharedSupport/InstallESD.dmg (error code 112)Mount of outer dmg failed.
Done.
Close the “Disk Utility.app” and the “Finder” before execute the command on the terminal. It works for me.
Does this specific command work for a reinstall as well? I’d like to do a clean reinstall of the Yosemite.
Will the terminal command work for Mavericks if I just substitute that for Yosemite and leave everything else the same?
Thanks for the info.
Is there a way to partition the USB so that the OS X installer only takes up the space it requires?
I have a 16GB usb drive, but would like to put both the OS X installer and a Windows OS installer on that usb drive in two different bootable partition. Is that achievable?
On installing Yosemite, I also replaced the battery on my old Mac and also received an error, “This copy of the Install OS X Yosemite application can’t be verified. It may have been corrupted or tampered with during downloading.”.
I found that I had to change the system date in Terminal. The site below helped me out immensely.
https://bensmann.no/changing-system-date-from-terminal-os-x-recovery/
THANK YOU VERY MUCH! <3 <3
good info thanks
“IT TOOK 3 DAYS to find these instructions.”
Three days? It took me .62 seconds using Google. :)
Was glad to find the instructions, too, although I also had problem with the copy/paste. As I’m making a Mavericks bootable USB, I had to replace “Yosemite.app” with “Mavericks.app”. Would have been nice to have it as unformatted text. But after typing in the command (twice) it appears to be working.
It’s been more than 35 minutes, and I’m still waiting to find out if it will work. Would also be good to replace “this may take a while” with an estimate.
IT TOOK 3 DAYS to find these instructions. I found lots of instructions as to how to do this but they were so filled with crap I had no need for and extraneous other info and junk and poor graphics, I gave up. THANK YOU TO WHOEVER put this together – for your STRAIGHTFORWARD just simply put the instructions down way. Why is it so f’king difficult for mostly men to set aside their egos and just write the damn instructions and find some other way to boost their egos or get attention. THANK YOU again for posting this.
I had problems at first using this to create a bootable USB installer but after I copy/paste the commands it went smooth after that I must have been typing something in wrong. None the less it’s copying installer files now and done!!!
Awesome thanks for the help
*cant perform a clean install
Well I have had to revert back to my snow leopard DVD to get back up and running.
Have now successfully upgraded to Yosemite (again!) but for some unknown reason I can perform a fresh clean install with Yosemite on my late 2007 MacBook pro 17inch.
unfortunately it seems my MacBook pro does not support Internet restore as I only get a flashing folder icon with a question mark inside?
As I don’t have another Mac or a hard copy of any os x, is there a way I can use my windows 7 machine to make another bootable os x USB or DVD?
Reboot and use Command+Option+R instead, you will need to connect to a wi-fi router and it will download the restore partition to begin recovery from the internet.
Otherwise use the boot volume you made and choose to Re-install OS X from there. You can not install OS X from Windows, no.
Hi, I have completed your guide correctly and all went well, except when I tried to select install osx yosemite after boot from usb i get the following error…
“os x full marketing name cannot be installed on this computer”
Can someone please help as my mac is now formatted and out of action with no way of restoring if I can’t get this to work?
Thanks.
Use Internet Recovery to re-install OS X if you screwed up and tried to install the wrong version, thsi will reinstall a version which works on your Mac: https://osxdaily.com/2014/12/14/reinstall-os-x-mac-internet-recovery/
Or better yet, use the BACKUPS you made. You did make backups like you are supposed to, right?
If it’s telling you the computer can not run OS X Yosemite, then it can not run OS X Yosemite and there is no about of magic you can do to change that. System requirements are set system requirements.
@Don, thanks for the prompt reply Don.
My macbook pro can run yosemite as I had it running for over 6 months after performing an upgrade from mavericks, but the system had started to act up a little probably due to subsequent upgrades over the years so I thought I would perform a clean install but then I got the error listed above…?
Don has a good recommendation with System Restore. Reboot the Mac and hold down Command+R or Command+Option+R to start the system recovery process would be your best bet if your Yosemite install drive does not work.
Hi there,
Thanks for such a descriptive method to achieve this. I am new to using a mac and was wondering if you could guide me with a question. I read in the steps described by you above that in order to boot from the freshly made OS X Yosemite drive, one has to reboot the Mac and holding down the OPTION key, select the “Install OS X Yosemite” drive upon boot.
So my question is that when we select the “Install OS X Yosemite” drive upon boot, and boot from there, does it delete the data which is right now on my unbootable internal drive? I am concerned about loosing data from my internal hdd and at the moment, i can’t even take backups. So any clarity on this is really appreciated…
Thanks,
Anna
tried several times and keep getting this:
unrecognized option `–volume/Volumes/Untitled’
Usage: createinstallmedia –volume –applicationpath [–force]
Arguments–volume, A path to a volume that can be unmounted and erased to create the install media.
–applicationpath, A path to copy of the OS installer application to create the bootable media from.
–nointeraction, Erase the disk pointed to by volume without prompting for confirmation.
Example: createinstallmedia –volume /Volumes/Untitled –applicationpath “/Applications/Install OS X Yosemite.app”
Please help!!
You could specify the drive name with quotes and remove the need to rename.
Example: –volume “/Volumes/Untitled 1”
I wanted to test Yosemite on an external drive before taking the plunge to upgrade my MacBook Pro from Maverick to Yosemite. I followed the instructions exactly and ended up with (what looked like) a nice bootable Yosemite installer on a 16GB thumb drive labelled “Install OS X Yosemite”. After re-booting my Mac and choosing the installer drive, I chose to install the Yosemite on a suitably prepared external drive (Mac journaled, GUID partition etc.). Everything worked fine until the progress bar showed “About a second remaining,” Then all progress stopped and I didn’t get the promised ‘reboot’.
However, as instructed in your other excellent post (https://osxdaily.com/2014/10/17/os-x-yosemite-installation-stuck/) I waited—and waited. After about 4-5 hours of this a dialog pops up saying, “This copy of the install OS X Yosemite application can’t be verified. It may have been corrupted or tampered with during downloading.” When I click the dialog’s OK button it simply reboots my MacBook Pro into its current system (which is Maverick).
I’ve tried to do the install on two separate external drives with the same result.
Guess something went awry with the original download from Apple and I have to try downloading another copy. What is this “verification” that’s so important at the very end of an install?
Anyone else had this problem? And is there any fix other than going through the hassle of a second download from Apple?
I had a similar problem. My issue turned out to be that I had a slightly older version of the Yosemite installer. I had created it a while back, and it was version 1.65. As of today (12/26) the version is 1.67. Somehow the installer knows to check to see if you have the latest version. My suggestion to you is to download a fresh copy, and do it all over again. I was eventually able to get mine installed, and am using it to reply to you now. Happy Holidays.
Hiya.
got to the below step
sudo /Applications/Install\ OS\ X\ Yosemite.app/Contents/Resources/createinstallmedia –volume /Volumes/Untitled –applicationpath /Applications/Install\ OS\ X\ Yosemite.app –nointeraction
WARNING: Improper use of the sudo command could lead to data loss
or the deletion of important system files. Please double-check your
typing when using sudo. Type “man sudo” for more information.
To proceed, enter your password, or type Ctrl-C to abort.
Password:
/Volumes/Untitled is not a valid volume mount point.
please comment what I’ve done wrong?
I find it smarter to just install Yosemite with the installer to an external hdd or stick (dont know the required size of the stick) then boot up the recovery partition on the external device and install/update from that, no need to use terminal, and you will have an external OSX to boot for diagnostic use as well (very usefull to recover data from an unbootable internal drive, test software before installing or simply just have your own OS with you whithout having your to bring your Mac ).
POSSIBLE SOLUTION TO: You must specify both the volume and install application path
Ok, I’m kind of a noob at this, but I was getting the same error. However, after repeating all the steps again, I realized I may not have erased the space after renaming the partition Untitled. I erased the number 1, but not the space. Make sure there isn’t a hidden space after “Untitled”
I didn’t read every comment, so my apologies if this was already covered.
Hi,
I can’t open old backup dvds in Yosemite, anyone with same problem?
When inserting dvds come in emty.
Lars
You should probably add in the article that you shouldn’t have another drive named “Untitled” also plugged in or partioned off from your main HDD. I blindly copy and pasted the terminal entry and it formated the wrong drive. Not a big hassle for me, but wasted a few minutes.
Disk Utility automatically labels formatted drives as “Untitled”, who names a hard drive Untitled by choice? And run who on earth runs a command line code snip without checking syntax to make sure it applies to them?
Frankly if someone doesn’t know how to change a hard drive name they should not be trying to use the command line let alone making a boot installer or doing anything complex. Use the App Store and update that way, this is way over their head. Reminds me of the people with Windows who deleted Internet Explorer and think the internet is gone, good grief people, this is not for everyone.
I did the above but still got the error message
‘This copy of install OS X Yosemite application can’t be verified. It may have been corrupted or tampered with during downloading’
Can anyone help?! This keeps happening…
Thanks…
Help! same problem here trying to create a flash drive installer. It gives me error
Failed to start erase of disk due to error (-9999, 0).
A error occurred erasing the disk.
I am on a Mac Pro (early 2008) running 10.6.8. I have already downloaded Yosemite and I need to have it installed in both my Mac Pro’s (early 2008) running 10.6.8.
Juan,
Creating the flash start-up drive may be futile in this case. I can’t boot up a Mac Pro (early 2008) from a working flash drive created on a new mac. aaricus above posted that these earlier Mac Pros lack some facility that prevents them from recognising the flash boot drive. I am now resorting to clean-installing Snow Leopard, then updating to 10.6.8 (required), and then updating to Yosemite from the flash drive (no clean install). I trust that this will work, albeit cumbersome.
I’m a loser :D
Erasing Disk: 0%… 10%… 20%… 30%…100%…
Copying installer files to disk…
The copy of the installer app failed.
What can be wrong?
Hi all
Anybody can help me… It appears allways the same error
Failed to start erase of disk due to error (-9999, 0).
A error occurred erasing the disk.
Thank you all
Double-check your command syntax and make sure you are pointing at the proper EXTERNAL USB drive you want to use, it must be 16GB in size, not locked, and formatted for GUID. Error -9999 usually means the drive is locked or in use.
You should probably just update with the App Store.
For me, the “Copying Installer files” step took a very long time. I thought it had hung. But you can open Activity Monitor, go to the Disk tab, and find createinstallmedia in the list. If Bytes Written is still going up, then it’s still working.
Thanks Matt,
This was super helpful and reduced my stress greatly!
After 20 minutes or so of nothing after “Copying installer files…”, I checked “bytes written” in Activity Monitor, and they were _not_ going up—in fact, none of the figures were changing—but I decided to leave it alone anyway. Lo and behold, after about 40 minutes with no apparent activity that I could determine, it finally performed the rest of the steps! So don’t panic, even if you don’t see “bytes written” increasing.
Hello
Followed all the instructions above but It’s not working.
At first I had the issue “Volumes/Untitled is not a valid volume mount point” and now “You must specify both the volume and install application path” and the syntax is correct..i copy and paste: sudo /Applications/Install\ OS\ X\ Yosemite.app/Contents/Resources/createinstallmedia –volume /Volumes/Untitled\ 1\ –applicationpath /Applications/Install\ OS\ X\ Yosemite.app –nointeraction..from Kermop and I have the same message again..have you got any ideas?
Thank you in advance!
Strange problem.
I made the boot drive. It worked. However I messed up some transferring of files from my old user and want to start over with a clean install again. This time the boot drive does not work. I tried to make another and no dice. Nothing boots, just sits on a black screen.
Help, second time I post this. Anyone have an idea what went wrong and how to solve it.
Thanks!
Couldn’t mount dmg /Volumes/Install OS X Yosemite/Install OS X Yosemite.app/Contents/SharedSupport/InstallESD.dmg (error code 112)Mount of outer dmg failed
After I’m finished with the creation instructions and I view the Thumb Drive in “Finder” all I see is the “Install OS X Yosemite.app” file.
Is there a trick to seeing the hidden/system files in the “That’s all there is to it. Your freshly made OS X Yosemite install drive will be visible in the Mac Finder:” screenshot above?
It’s the 5th screenshot I believe.
You’d have to enable hidden files visibility to see this, it’s not practical for most users:
https://osxdaily.com/2009/02/25/show-hidden-files-in-os-x/
I get this reply on terminal:
/Volumes/Untitled is not a valid volume mount point
what do I do?
thanks
Mario, you should update to OS X Yosemite from the App Store. That’s what you should do. This is for advanced users with command line experience. If you can’t correct the syntax for your situation, and follow instructions step by step, you most certainly should not use this, you could break something.
Back up your hard drive and update with the App Store.
+1
I get to the Terminal part and it doesn’t work. says:
Failed to start erase of disk due to error (-9999, 0).
A error occurred erasing the disk.
any ideas?
I’ve created a Yosemite install disk using this method with no problems but now want to do the same with Mountain Lion.
In the terminal string what should I change “Yosemite.app” to?
Is there a way to see what the system name for the installer is?
After entering the first command in Terminal, I enter my password in described in this site’s instructions, and I get the following error message:
sudo: /Applications/Install OS X Yosemite.app/Contents/Resources/createinstallmedia: command not found
when trying to open the partition layout tab it will not give me the option to open it! Why is this?
Try booting into a rescure environment and running fdisk against your drive. Delete all of the partitions and reboot.
Made the installer on USB stick, however contents of the drive only has the Install OS X Yosemite on it, none of the other elements these instructions show. (System, Library, Usr, etc). Did I do this incorrectly?
I’ve downloaded the installer 3 times now. Once at home, once at work and once on a different machine and with all of them I get the “Failed to copy kernel cache” error
OK, here’s a question I don’t think has been asked yet… what if I want to use my USB drive for something else now, until that “someday” when I may need to use this installer? Can I select this volume “Install OS X Yosemite” in the Disk Utility sidebar and then click New Image to make a .dmg of the entire contents of the USB drive and then reformat the USB drive, use it as normal, then (someday) re-image the USB drive from the .dmg just as it was? I’m not sure about the re-imaging part.
Here’s another one: Can I add another partition to this USB drive and use that other partition for storage, or will it interfere with the installer?
Well when i make my USB stick and name it Untitled 1 i get this error on Terminal.
sudo /Applications/Install\ OS\ X\ Yosemite.app/Contents/Resources/createinstallmedia –volume /Volumes/Untitled –applicationpath /Applications/Install\ OS\ X\ Yosemite.app –nointeraction
/Volumes/Untitled is not a valid volume mount point.
But when i name just Untitled everything is ok.
Any ideas why this happened or solutions for it >
Couldn’t mount dmg /Volumes/Install OS X Yosemite/Install OS X Yosemite.app/Contents/SharedSupport/InstallESD.dmg (error code 112)Mount of outer dmg failed.
I have a similar error with different code:
Couldn’t mount dmg /Volumes/Install OS X Yosemite/Install OS X Yosemite.app/Contents/SharedSupport/InstallESD.dmg (error code -4960)Mount of outer dmg failed
The USB is now titled Install OS X Yosemite and the file is the correct size, but I don’t want to move forward if it won’t mount. Help please?
I am in mid way redownload OS X after erasing the HD. Now my friend told me to skip that and create bootable USB. Can I boot up my macbook air and create bootable USB then redownload OSX?Instead of redownload OSX and create bootable disk?
Doesn’t Work For Me, This Is What I Get:
wireless-152-13-40-199:~ SupremeTheGreat$ sudo /Applications/Install\ OS\ X\ Yosemite.app/Contents/Resources/createinstallmedia –volume /Volumes/Untitled –applicationpath /Applications/Install\ OS\ X\ Yosemite.app –nointeraction
Erasing Disk: 0%…
Error erasing disk error number (-69888, 0)
A error occurred erasing the disk.
The target disk is probably locked or corrupt, try a different USB flash drive. Also make sure the target USB volume is named “Untitled” and not something else.
I had the same error when trying after a failure.
After getting the error I did a “ls /Volumes” and could that in addition to having Untitled I also had a OS X Install ESD mounted. I ejected the USB. Plugged it back in and did a “ls /Volumes” again and OS X Install ESD was gone. I then ran the command again and it worked.
Ok, i have a problem. 1st time i did everything following the instruction and i had downloading process in my terminal: Erasing Disk: 0%… 10%… 20%… 30%…100%…
Copying installer files to disk…
The copy of the installer app failed.
BUT
right now i can’t format and erase my usb and try again because it’s called “Install OS X Yosemite”. I’m trying to do Partition again and again using name Untitled but it’s showing “Partition failed with the error:
Couldn’t unmount disk.”
Then i’m trying to erase volume but: Volume Erase failed with the error:
Couldn’t unmount disk.
Can you help me please?
So select the USB drive and format that, rather than the partition.
You may have corrupted the installer file if you see copy errors, or the destination drive may be bad.
It was good before I followed the instruction. Well I downloaded an update from app store. Have no idea. Will try to format it. But how?)
WTF… that termial command formatted my exernal hdd that also named ‘untitled’…
This would not happened if you used other names.. (WHY USE UNTITLED??? it’s so common name-_-)
Agreed! Why did you use Untitled (for your external HDD)… it’s such a common name.
The author of this article and you both – had the option of choosing a different name.
Nobody enjoys losing data and I do empathize. But in all fairness you share half of the accountability in this case. :-/
When you format a drive it names itself to UNTITLED, thus the name UNTITLED is used here. Change the name if you want to, but if you can’t follow instructions or know how to check for proper syntax you should not be using the command line at all. Install OS X Yosemite from the App Store instead.
If I have already installed OS Yosemite, can I still do a clean install, and wipe my hard drive and have OS Yosemite installed after wiping hard drive?
Yes, you can. Just follow the same procedure stated in the article.
An 8 GB USB stick is enough to make the bootable Yosemite installer. (I just made one). No need for 16 GB stick.
PEACE
C/P string into terminal, asks for password, and then won’t accept admin password (Admin password known and correctly typed in on multiple occasions). Suggestions?
It says right on there, the password won’t show up in Terminal. You type it and hit Return anyway to execute the command. Hiding the admin password typed into the Terminal is a security feature.
I entered in terminal as described in the article:
sudo /Applications/Install\ OS\ X\ Yosemite.app/Contents/Resources/createinstallmedia –volume /Volumes/Untitled –applicationpath /Applications/Install\ OS\ X\ Yosemite.app –nointeraction
I have an error:
/Volumes/Untitled is not a valid volume mount point.
Can some one help me?
Just use the Installer from the Mac App Store, that is what you should do to upgrade to Yosemite. Back up your Mac first.
Thanks for the reply but perhaps you didn’t get my point. I want to do a clean install of Yosemite therefore I need to create a bootable stick. I know I can just upgrade off of the app store if I wanted to.
Any help on the message from Terminal is greatly appreciated, I really need create a bootable USB stick.
Abe, you just need to add the following after the word “Untitled”:
\ 1
[There’s a space between the forward slash and the one]
Last login: Thu Oct 23 09:40:17 on ttys000
DRs-MacBook-Air:~ sreedhar$ sudo /Applications/Install\ OS\ X\ Yosemite.app/Contents/Resources/createinstallmedia –volume /Volumes/Untitled –applicationpath /Applications/Install\ OS\ X\ Yosemite.app –nointeraction
/Volumes/Untitled is not a valid volume mount point.
DRs-MacBook-Air:~ sreedhar$
i got this after enter what is the cause
Hi, Great description.
Will the same command work to create the recovery partition by just changing the volume name?
Thanks
Helge
After I created a boot drive of OS X Yosemite, is it enough for a clean install of old hard drive/OS of new hard drive? or do i need to install the previous mavericks first then use the Yosemite boot drive?
Thank You
Can I still use the free space of USB as a normal storage device after this procedure without loosing the bootable benefit ??
this may be a stupid question. but I have already upgraded to Yosemite from Mavericks, and now I realize I would like to do a Clean Install. Do I follow the same instructions? Do I need to (or can I even) re-download the Yosemite Installer from the App Store? Or is it already on my system and ready to go? Just need to know if I have to do something else because I definitely want to do a clean install. Thank you so much, awesome tutorials/articles here, I will definitely keep coming back!
If you already updated to Yosemite on the Mac, which deletes the installer when OS X finishes updating, you would need to download the installer again from the App Store.
Paul, thank you, much appreciated!
Not sure what I’m doing wrong, but when a copy and paste into terminal, then enter my password this is the output
/Volumes/Untitled is not a valid volume mount point.
Any ideas what would be causing this?
I’m going to guess: either not having made a volume with a single partition named Untitled -or- for some reason the partition you made is unable to be mounted. I would re-read the instructions carefully, and if you’re sure you’ve followed them correctly, maybe eject and re-mount your USB drive and try again.
What is going wrong with my mac mini :-(
When I’m trying update it it always goes wrong = Last time it ended @apple store
pc1:~ fabrice$ sudo /Applications/Install OS X Yosemite.app/Contents/Resources/createinstallmedia –volume /Volumes/Untitled –applicationpath /Applications/Install OS X Yosemite.app –nointeraction
WARNING: Improper use of the sudo command could lead to data loss
or the deletion of important system files. Please double-check your
typing when using sudo. Type “man sudo” for more information.
To proceed, enter your password, or type Ctrl-C to abort.
Password:
Erasing Disk: 0%… 10%… 20%… 30%…100%…
Copying installer files to disk…
Copy complete.
Making disk bootable…
Copying boot files…
Failed to copy kernelcache, “kernelcache” couldn’t be copied to “.IABootFiles”.
Done.
Your Installer may not have finished downloading. Get it from the App Store and install it the normal way.
I have got message in first go. But Did format again and ran command. It worked.
I am experiencing problems, as always, trying to update my Mac Pro. I think it’s a mid 2010, only 4 years old and very well spec’d that should give me years and years of use still with nearly 20 ghz in total.
But each and every time they release a new OS X, I have problems!
The crux of the issue is that the mid 2010 Mac Pro does not have the boot from Internet feature, which exists in newer Macs and allows them to re-download a fresh copy of OS X straight from the ‘bios’ so to speak and off you go.
Well as Apple had not released this feature when my Mac Pro was released (they took forever to release a new Mac Pro and so now I am locked into this older model, needless to say within weeks of my purchase they released a new model), I have to either do the upgrade through a working OS X install & Apple have ceased to provide installation media, such as a DVD or USB even if you want to pay for it (which I think is stupid, it should be provided for free to Apple Care customers as a minimum!, we did PAY for better level of care after all!).
So I have to go through this process and try to make my own USB install every single time and every single time there is problems. I’m trying to make the install for the second time now. Because the first time didn’t work.
OK, it *finally* finished after about 45 minutes, most of them stuck on 1.22 GB. Now apparently is all there, at 5.17 GB.
Wouldn’t have been stressful if the file size would change every now and then.
Followed all the instructions and now waiting on Terminal to do its thing. It says “copying files” but it’s been stuck on 1.22 GB of file size on the USB drive, which is a 16GB file. I know it takes a long time to transfer, but it’s just saying 1.22 GB for at least 20 minutes. Do I need to be more patient or start all over?
Instead of “16GB file” I meant “16GB drive.”
I followed the steps exactly and this is the error I’m getting:
Error erasing disk error number (-69888, 0)
A error occurred erasing the disk.
What should I do?
Why 16GB or more stick? 8GB is more than enough: i made several already.
Lex
That was perfect !
I knew about this but i couldn’t remember some switches
Thank you !
I’m creating my usb flash stick right now cause i need a freshly installed system.
Also i want express a complaint about how apple install its software to new devices.
When i bought my mac mini and booted it was slow then i made a fresh install and was performing very good. Don’t know what was the problem ? maybe something wrong about apple’s installation of osx ? not sure
Figured it out, this is what I used:
sudo /Applications/Install\ OS\ X\ Yosemite.app/Contents/Resources/createinstallmedia –volume /Volumes/Untitled –applicationpath /Applications/Install\ OS\ X\ Yosemite.app
Wow wtf! How about a little bit more explanation of what that terminal command does and what to watch out for… This just formatted one of my windows harddrives! If you’re going to do a step by step article than fing warn people before you tell them to do a step. Unbelievable.
You had Windows running on the same USB drive that you expected to make a bootable installer from, really? How would that be possible? Could you drink a glass of milk from a block of cheese? Or did you name your Windows drive “Untitled”?? Didn’t read the instructions? Why is reading comprehension so bad in America now? One of the requirements even says that you need a drive you don’t mind formatting. Reading is important. Backups are important too.
What he’s saying is he had a Windows partition (probably from Bootcamp) called “Untitled” and it wiped it.
You’re a moron.
If you don’t understand Terminal commands, don’t play with them.
It’s *you* that’s unbelievable.
Moron.
This is what I get still:
user$ sudo /Applications/Install\ OS\ X\ Yosemite.app/Contents/Resources/createinstallmedia –volume /Volumes/Untitled\ 1\ –applicationpath /Applications/Install\ OS\ X\ Yosemite.app –nointeraction
You must specify both the volume and install application path.
I am going to use this on a different internal HD.
I did as instructed and got:
…
Erasing Disk: 0%… 10%… 20%… 30%…100%…
Copying installer files to disk…
Copy complete.
Making disk bootable…
Couldn’t mount dmg /Volumes/OS X Install ESD/BaseSystem.dmg (error code 112)Copying boot files…
Failed to copy kernelcache, The file “kernelcache” couldn’t be opened because there is no such file.
Done.
Any advice?
Re-download the OS X Yosemite installer from the Mac App Store, something is probably wrong with the installer app if it is missing files.
please help i have done all of the above instruction and it went great but when i reboot my laptop to boot the installer ,there is no boot on the usb
Here is how you can make an OS X Yosemite boot installer, and boot from that installer USB. Don’t skip any steps, if you skip any steps it won’t work:
https://osxdaily.com/2014/10/16/make-os-x-yosemite-boot-install-drive/
This approach worked great. Thank you.
Can I take a 125GB drive partition it with say 5 different partitions and install different installers on each? And then from the boot menu chose which install I’d like – Yosemite, Mavericks, Mountain Lion etc?
Also, a related question, can I partition a larger 1TB drive and install different operating systems on each partition? So I could have one partition with Mountain Lion installed and another with Mavericks (for legacy purposes)?
Cheers!
yes
Thank you. So in the terminal text I only change “Untitled” to “Untitled1”, “Untitled2” etc?
Many thanks!
It worked with 5.5GB. I had a 32Gb USB drive and did not want to waste space. I originally used a 16GB slot but after installation, I noticed that it only took 5.25GB of space, so I figured 5.5 is safe.
I followed the steps to create the usb drive, but now I am having trouble just loading the old os. How would I go about loading the old OS? Running yosemite from the usb is slow. I want to just stick with the old os. Thank you.
Take the USB stick out of the Mac and reboot without installing it, that will boot back into OS X Mavericks, assuming you didn’t upgrade the old version of OS X anyway. And yes, running anything from USB would be slow, it belongs on the main hard disk.
For anyone having the issue I had above. Find a way to open terminal and you can set the date by entering the line:
Date 101818132014
That’s october 18 6:13 pm 2014 and now it’s working!! :)
I have the same issue. SoI just set todays date/time in terminal?
Setting the date worked a charm to fix this error for me as well. I’m doing a clean install onto a new SSD, and I’d disconnected the battery while upgrading the disk and RAM hence the date had reset to 2000.
Mac packages are signed, so the date has to be correct and within the validity period of the signing cert.
Ludo, you are a genius. I’ve been struggling to re-install the OS for more than a week on a MacBook Pro where I replaced the HD (and unplugged the battery while I did it). Thanks!
+1
I was banging my head on the mainframe over this one. Just setting the date fixed it.
Same for me. Ludo’s solution worked fine. Thanks
You are the best man! Change the date and be happy!
Ludo! You’re Brilliant! Thank You very much.
Thanks!!! Worked for me.
Hey I’m getting an error when I try to tun the install. It goes “This copy of the Install OS X Yosemite application can’t be verified. It may have been corrupted or tampered with during downloading.” Anyone have a solution this this problem? Using a late 2009 MacBook pro
Wow that’s a curious error. Did you get the OS X Yosemite Installer from the Mac App Store? If not, you may want to check the MD5 hash of the Yosemite Installer.DMG file to be sure it’s intact as how it arrives from Apple. Easy way to do that is with the openssl command:
% openssl md5 /Applications/Install\ OS\ X\ Yosemite.app/Contents/SharedSupport/InstallESD.dmg
MD5(/Applications/Install OS X Yosemite.app/Contents/SharedSupport/InstallESD.dmg)= 8d3187fa7699366e1723c28abd78acc8
So, does the OS X Yosemite InstallESD.dmg file has a different MD5 sum?
You can learn more about checking MD5 sum here: https://osxdaily.com/2009/10/13/check-md5-hash-on-your-mac/
I have the same problem as Ludo, I got the Yosemite installer from App store. MD5 is different though
MD5(/Applications/Install OS X Yosemite.app/Contents/SharedSupport/InstallESD.dmg)= 45990cf5738de8e329ebf2652564689d
At least this solution did not help -> http://support.apple.com/kb/TS5307
I have an iMac 2009 and when I installed Yosemite it spit out an error. Asked me to reboot. I rebooted and it would not boot. No recovery boot option either. Just a kernel panic each time I try to boot.
My only other backup is my girlfriend’s old Late 2006 Macbook Pro (not compatible with Yosemite). First I had trouble obtaining the Yosemite install media. Found it on the net because the App Store won’t even let you download it with a system that is not compatible. Then I got to step 2 in the post above. I received an error basically stating that you needed to have OS X 10.9 Mavericks installed. Great, I’m on 10.6 on this MacBook Pro.
End of the story. Download Liondiskmaker.com and it saved my ass a ton of headaches and trouble. Check it out
http://liondiskmaker.com/
Worked perfectly here.
On an 8GB USB stick.
Creating the stick after pasting the terminal command took around 25 mins. (15″ rMBP late 2013).
Failed to start erase of disk due to error (-9999, 0).
A error occurred erasing the disk.
tired it on two different USB drives.. same error message
what am I doing wrong?
You need to be on Mavericks to make the USB installer disk.
Try http://liondiskmaker.com/ instead.
Getting same error, any suggestions, tried different USB? Than ks
Thanks for the succinct write up!
I too had this issue:
—
Failed to start erase of disk due to error (-9999, 0).
A error occurred erasing the disk.
—
This is because I was using an older system (10.6.8 Snow Leopard Mac). Which won’t work.
Try using a newer Mac OS. I got it to work, using another computer that already had Yosemite on it.
It might be worth noting this in the article for those that find this in the future.
Thanks,
TJ
Make sure the command line current directory is not in the flash drive (/Volumes/Untitled or your flash drive name). It will fail to lock the drive. in my case this was the issue. I created the flash installer for Yosemite using a Mountain Lion (10.8) with createinstallmedia.
and also other application using the flash drive.
Would be cool if you could run an article on how to go from Yosemite (the ugliest OS Apple has ever released) back to Mavericks. That’s the problem I and many others have been facing … and I used your excellent instructions for making a bootable USB drive with Mavericks OS … and then use that to install over Yosemite, to return my Mac to its former glory.
work for me :) legit….,
You can use 8 GB USB drive, too. Works without problems.
Thank you , just what i needed, its now copying to USB drive, will install later tonight once i made backups.
Great step by step guide!
Followed the instructions to a tee and it worked like a charm.
This old lady is overjoyed by learning something I considered to be foreign, thanks for that! :)
Diskmaker X App worked like a charm.
I typed this into terminal
sudo /Applications/Install\ OS\ X\ Yosemite.app/Contents/Resources/createinstallmedia –volume /Volumes/Untitled\ 1 –applicationpath /Applications/Install\ OS\ X\ Yosemite.app –nointeraction
I get a message saying: You must specify both the volume and install application path
What have I done wrong?
You’re using the wrong command and not the one provided. Check your syntax, you are not escaping the 1 and you are not using a double-dash. This is just one small example of why it’s important to use proper syntax.
sudo /Applications/Install\ OS\ X\ Yosemite.app/Contents/Resources/createinstallmedia –volume /Volumes/Untitled\ 1\ –applicationpath /Applications/Install\ OS\ X\ Yosemite.app –nointeraction
Follow instructions for best results, don’t deviate from recommended advice.
wtf it still says cant specify loction and i have the\1 and everytrhing this is pissing me off I put the write command
Having the same problem :(
will it kill the windows installation beside the osx maverick if I upgrade to yosemite? I have installed windows 8 with bootcamp.
No not unless you overwrite Windows 8
Tried this twice and both time this is the result.
Scotts-MacPro:~ Twitchy$ sudo /Applications/Install\ OS\ X\ Yosemite.app/Contents/Resources/createinstallmedia –volume /Volumes/Untitled –applicationpath /Applications/Install\ OS\ X\ Yosemite.app –nointeraction
Password:
Erasing Disk: 0%… 10%… 20%… 30%…100%…
Copying installer files to disk…
The copy of the installer app failed.
Interesting, try reformatting the destination drive, HFS+ Journaled, set to GUID, try command again. Or try another drive.
Has worked flawlessly for me with multiple attempts on multiple USB flash drives, all have been 16GB or greater though. Perhaps the destination disk does not have adequate storage? Some say 8GB works… but it failed for me a long time ago with ML so I went to 16GB only for installers.
Tried the above procedure all over again this morning using a Kingston 32gb flash, worked fine. Go figure!
I had the same error. Unfortunately, my mac now does not detect my pen drive. :(
Is Yosemite installer dose install HD Recovery Partition?
coz i deleted accidentally
Thanks
I got an (Error code 112)
Erasing Disk: 0%… 10%… 20%… 30%…100%…
Copying installer files to disk…
Copy complete.
Making disk bootable…
Couldn’t mount dmg /Volumes/Install OS X Yosemite/Install OS X Yosemite.app/Contents/SharedSupport/InstallESD.dmg (error code 112)Mount of outer dmg failed.
Done.
Thank you guys for fast update on your site. ;)
I followed the instructions and never did see anything after “Copying installer files to disk” in Terminal. I exited Terminal and looked at the USB Drive and it appeared all required files were there, and it did boot without any problem.
Another utilitarian tip.
Glad I found this website.
sudo /Applications/Install\ OS\ X\ Yosemite.app/Contents/Resources/createinstallmedia –volume /Volumes/Untitled\ 1 –applicationpath /Applications/Install\ OS\ X\ Yosemite.app –nointeraction
This worked. THANK YOUUUU :-)
sudo /Applications/Install\ OS\ X\ Yosemite.app/Contents/Resources/createinstallmedia –volume /Volumes/Untitled\ 1 –applicationpath /Applications/Install\ OS\ X\ Yosemite.app –nointeraction
I just copied your command and I get the same message:
You must specify both the volume and install application path.
Any help?
I past this:
sudo /Applications/Install\ OS\ X\ Yosemite.app/Contents/Resources/createinstallmedia –volume /Volumes/Untitled\1 –applicationpath /Applications/Install\ OS\ X\ Yosemite.app –nointeraction
Not worked :-(
“You must specify both the volume and install application path. ” ????
Correct, you need to rename the drive to “Untitled” (the default when it is formatted) as outlined in Step 1.4, then use the proper command for that name. Or if you’re going to continue to keep the drive as Untitled 1, escape the character properly:
sudo /Applications/Install\ OS\ X\ Yosemite.app/Contents/Resources/createinstallmedia –volume /Volumes/Untitled\ 1 –applicationpath /Applications/Install\ OS\ X\ Yosemite.app –nointeraction
Mine is still showing:
You must specify both the volume and install application path.
Any suggestions?
Go to the App Store > Updates > look next to OS X Yosemite and click on the “Upgrade” button
That’s what you should do, this is too complex this is way advanced technical stuff, most users are not fit for this making of a USB boot installer.
Are you like me?
You can use DriveMaker X (downloading the corresponding version depending on you version of OS X. It’s a donation ware free but you can donate) and it will do the job for your. But doing the thing yourself teaches your more and anyway you’ll still have to learn how to properly format a usb drive for Yosemite.
i solved my by renaming the Untitled 1 from patition 1 to “Untitled” in Disk Utility then apply. after this, i quit the Disk Utility and copy the code as stated in the instruction and it worked….:)
sudo /Applications/Install\ OS\ X\ Yosemite.app/Contents/Resources/createinstallmedia –volume /Volumes/Untitled –applicationpath /Applications/Install\ OS\ X\ Yosemite.app –nointeraction
Erasing Disk: 0%… 10%… 20%… 30%…100%…
Copying installer files to disk…
Copy complete.
Making disk bootable…
Copying boot files…
Copy complete.
Done.
Hi, I got as far as “Copying installer files to disk…” ,but it is taking a good while. Is it just slow or is it frozen? How long might I need to wait?
I was getting the same error until i used this code:
sudo /Applications/Install\ OS\ X\ Yosemite.app/Contents/Resources/createinstallmedia –volume /Volumes/Untitled –applicationpath /Applications/Install\ OS\ X\ Yosemite.app –nointeraction
try that it should work
hi everyone
it’s ok i did this change and it works.
sudo /Applications/Install\ OS\ X\ Yosemite.app/Contents/Resources/createinstallmedia –volume /Volumes/Untitled –applicationpath /Applications/Install\ OS\ X\ Yosemite.app –nointeraction
In a line of command, even the spaces are important. Many people forget that. It worked perfectly for me thanks to OS X Daily.And depending on your keyboard, typing — may have a different outcome.
sudo /DDMac/Applications/Installer\ OS\ X\ Yosemite.app/Contents/Resources/createinstallmedia –volume /Volumes/Yosemite –applicationpath /Applications/Install\ OS\ X\ Yosemite.app –nointeraction
Commande not found
what is rong ?
This is the command:
sudo /Applications/Install\ OS\ X\ Yosemite.app/Contents/Resources/createinstallmedia –volume /Volumes/Untitled –applicationpath /Applications/Install\ OS\ X\ Yosemite.app –nointeraction
sudo: /Applications/Install OS X Yosemite.app/Contents/Resources/createinstallmedia: command not found
this is what showing when i tried
please help
thanks
It says “command not found” because you are not using the proper command, or you don’t have the Installer in the /Applications folder
This is the command:
sudo /Applications/Install\ OS\ X\ Yosemite.app/Contents/Resources/createinstallmedia –volume /Volumes/Untitled\ 1 –applicationpath /Applications/Install\ OS\ X\ Yosemite.app –nointeraction
Here are the instructions. You should read the instructions:
https://osxdaily.com/2014/10/16/make-os-x-yosemite-boot-install-drive/
I followed the instructions to the point and after I copy and paste the command in terminal this is what I get:
/Volumes/Untitled is not a valid volume mount point.
Can you help?
I am very thank full to osxdaily ….thank you very mooch love u gyz…
much
If I just copy the Yosemite.app into a USB drive and then copy it on to the target mac’s application folder, then run it from there, will this also work?
Yes, copying the Install OS X Yosemite app to Applications will work, but you’ll need to change the security settings to allow installing apps from everyone.
It will
Worked for me…you just can’t boot from the USB drive…copy it to the desktop or run from the USB…
Yes that will work as well, however it would not be bootable. But to perform a simple update rather than a clean install, that would be sufficient.
I think so.
Mine has been copying the installer files for the last 8-10 minutes… still doing it. How long did it take for you other guys?
It took about an hour for me.
16 minutes
I think this will depend on the version of the USB port on your pendrive.
Here took 15 minutes: (USB 3.0).
I think USB2.0 will take a little longer.
thanks for asking about the timeframe… thought mine was in a time warp.
Thank you. You made this so easy and it works like a charm.
If anyone has problems like “can’t find mountpoint” simply edit the terminal command ensuring to include a \ before each space.
So for example:
sudo /Applications/Install\ OS\ X\ Yosemite.app/Contents/Resources/createinstallmedia –volume /Volumes/Untitled –applicationpath /Applications/Install\ OS\ X\ Yosemite.app –nointeraction
I would change /Volumes/Untitled to /Volumes/Untitled\ 1
Thanks dude :*
Can you help me?
This is what I get after I copy and paste into terminal from the original article:
/Volumes/Untitled is not a valid volume mount point.
Abe,
Maybe your volume is named “Untitled 1”? If its the case, then you need to type as Anonymous said above:
“If anyone has problems like “can’t find mountpoint” simply edit the terminal command ensuring to include a \ before each space.
So for example:
sudo /Applications/Install\ OS\ X\ Yosemite.app/Contents/Resources/createinstallmedia –volume /Volumes/Untitled\ 1 –applicationpath /Applications/Install\ OS\ X\ Yosemite.app –nointeraction”
I was having the same problem. Make sure your main HD is not titled “Untitled” as well. Mine was so I redid everything in this tutorial but named the partition in my thumdrive “Myyosemitedrive” instead. I also edited the command for terminal to this:
sudo /Applications/Install\ OS\ X\ Yosemite.app/Contents/Resources/createinstallmedia –volume /Volumes/Myyosemitedrive –applicationpath /Applications/Install\ OS\ X\ Yosemite.app –nointeraction
That should get you going.
“You must specify both the volume and install application path.”
Great – thanks
Awesome thanks, just made a bootable UsB disk out of a spare 16GB drive!!
Piece of cake!!
If you have an old boot drive you can rename it to Untitled and then run command line syntax too. Boot with Option key and select Yosemite from the options of three
Yosemite!!!!! Yo. Sem. Uh. Tee!
BTW: Diskmaker X App has just been updated to support 10.10, it’s even easier that way to make a OS X bootable disk.
Can you share the URL for the Diskmaker X app that works with the released Yosemite?
I used the Terminal command to create a bootable installer for Yosemite on an 8GB flash thumb drive and it worked nicely, but I’d like to have the Diskmaker X app also.
Not to be a dick, but…
http://lmgtfy.com/?q=Diskmaker+X
“Not to be a dick, but lemme just be a dick”
Lol!
Nice advise. DiskMaker is the answer!!!
Solved all problems like “You must specify both the volume and install application path.” and ” Failed to start erase of disk due to error (-9999, 0)”. Yes I met both.
Thank you!
This will happen if the machine you are attempting to create the install media on is not compatible with Yosemite. I ran into the same problem trying to do this on my old Mini that topped on out 10.6.8… once I attempted on my 2012 MBP it ran fine.
I was getting the same error until i used this code:
sudo /Applications/Install\ OS\ X\ Yosemite.app/Contents/Resources/createinstallmedia –volume /Volumes/Untitled –applicationpath /Applications/Install\ OS\ X\ Yosemite.app –nointeraction
try that
A question about the order of the first steps: isn’t creating a new partition layout already erasing everything on the disk? Wouldn’t it be less steps (well… one actually) if you select 1 partition, with options for GUID and then apply?
Or is this a old, old remnant of the Windows era-thinking….? 😳
i go through all the steps and it copies the data but the drive does not show up for me to boot from it
Same problem. All I see is my bootcamp drive, my main mac os drive (mountain Lion) and my recovery disk. No Yosemite installl disk. I am holding the option key (obviously, because I see the other disks)
I ran into the same issue. I am, by no means, an expert when it comes to this stuff. I read as much as I can on these sites and discover things about my machine through careful trial and error.
That said, my USB drive did not appear as an option to boot from. I unplugged my external and plugged it back in, which my Mac then recognized.
I was concerned this might corrupt the files on my external, but everything turned out fine. Not sure why it was not recognized upon restarting, but simply unplugging and plugging it back in did the trick.
If someone with more knowledge than me thinks that’s a terrible idea, please respond. This method worked for me so I figured I’d share, but I’d hate to ruin someone’s day with bad advice. Just trying to help!
You may want / need to revisit the first step in the article, and double check that you are using a **GUID** Partition when erasing/partitioning your drive. I am not trying to insult intelligence, and you have probably already done this, however, this is a frequently overlooked step for MANY people, and is also the easiest fix. Your Mac won’t boot from a Master Boot Record (MBR) drive without significant work on your part. I only managed this once, but I am by no means a pro with Mac. I tend to be a little better with Windows.
I experienced a problem when I followed the directions with an eight GB drive. I saw that others said that it worked, so I tried it; it installed to the drive properly, but I had trouble booting on one of the computers we have for interns (2010 MBP, 2.4GHz, 16 GB RAM). Although it doesn’t seem like a big change, when I used a 16 GB drive, it worked first shot. It will also work with an SD card on every one I tried.
If you, or anyone else, is having trouble and would like to double check that you have a GUID Partition Table, open your Disk Utility tool –> Click the drive name — NOT the partition on the drive — but the one which is left-aligned. (ex. (mine is: 16.04 GB APPLE SD Card…)) –> Partition will be the center option in the main window for the drive, but will not appear if you are in the partition. –> Change “Partition Layout” from “Current” to “1 Partition”. –> Below the lower-right corner of the graphical depiction of your disk, click on “Options…,” and select the first option “GUID Partition Table.”
If one of the other two options is checked, click the top (GUID) option, make sure you select “Mac OS Extended (Journalized)” as the format, and change the name from “Untitled 1” to “Untitled.” When you click “Apply” your disk will be wiped clean, and you can copy / paste the information from the first box (sudo through nointeraction) under the second step. Wait for it to copy again, and give it a shot.
i have a simple problem
,my hard drive jus got damaged and had to change it and my imac is when i bought it used to run on os lion ( the old version ) and now i changed the drive but i cant download the lion cause its not available on app and i cant run another installer like yoso or other versions of macintosh what can i do ?
well i have only one imac and no more laptop to download or make bootable usb
what should i do ?
Make sure your HD partition isn’t called Untitled – as mine was
LOL – thanks for the tip and thats unlucky ;)
I suspect my HD partition is called untitled as I am getting error after running the script saying Volume/untitled is not the mounted volume ??
what do you do to fix this
Did you receive a reply Chris?
What I did was to find –volume /Volumes/Untitled segment of the command and change it to (putting the quotes in) –volume “/Volumes/Untitled 1”. The reason for the 1 and the quotes is that the mount table sees /Volumes/Untitled 1 as the mount point.
HTH
I have tried the 1 and the quotes and its not working for me….any other idea someone?
Note: when you change the name to Untitled from Untitled 1 make sure to erase both the “1” and the preceding space.
I am not sure how the application handles this and new the volume name may contain the trailing space creating the “unknown volume error”.
Awesome. This tip just worked for me, thanks!
THANK YOU! I have made bootable USB’s so many different ways but this route with Yosemite seems the best way with the “createinstallmedia” tool / terminal command. Ive been having problems fully executing the process and DELETING THE _ (space) as well when erasing the “1” in Untitled 1 was my problem as well. Had to say thanks and try to hi light your fix for me in case other may have the problem.
The quotes are not required, simple escape the space as such:
/Volumes/Volume\ 1
Yup, did the same, renamed mine from UNTITLED to Untitled and got the error /Volumes/Untitled is not a valid volume mount point.
Leave it in capitals….
The name in the command must match the destination drive name exactly
Thanks =D
You can also use a drive that’s only 8GB. I just did it and it’s installing now.
Oops, looks like someone else said the same thing.
I just have done the same, before this was posted and it worked with an 8Gb drive just as well.
This is exactly the information I would have expected OSX daily to provide. Thank you for the info and this was my only question.
i have a simple problem
,my hard drive jus got damaged and had to change it and my imac is when i bought it used to run on os lion ( the old version ) and now i changed the drive but i cant download the lion cause its not available on app and i cant run another installer like yoso or other versions of macintosh what can i do ?
do a google search on ‘kick sass torrents’ and/or ‘priatebay’ and search to see if you can find a copy there.