How to Find Process Locking a Port on Mac
Jun 29, 2023 - 1 Comment
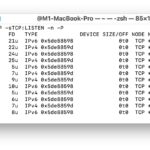
Mac users may occasionally come across a situation where a process is locking a port, preventing another app or process from using that port. If you come across such a situation, for example maybe you’re trying to use React.js and find out that something is already running on port 3000, you can easily track down … Read More