How to Check Disk Health on Mac with smartctl
Apr 10, 2024 - 1 Comment
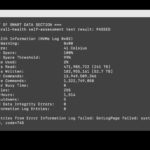
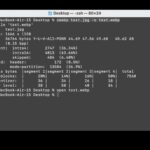
There are various ways to check the health of a hard disk drive (HDD) and solid state drive (SSD) that is used on a Mac with drives that support SMART, which stands for Self-Monitoring Analysis Reporting Technology. These options range from fairly simple using Disk Utility to check the SMART status of a drive, to … Read More