Compress & Optimize Images Easily with ImageOptim for Mac OS X
If you’re at all concerned about the file size of images you should grab ImageOptim, a free image compression tool that is so ridiculously simple it’s basically foolproof, while still being extremely effective. The app works to compress images without reducing image quality, which is achieved by bundling several compression tools, including the popular PNGCrush, PNGOUT, AdvPNG, Zopfli extended OptiPNG, JPEGrescan, jpegtran, JPEGOptim, and gifsicle, and using those tools to find the optimum compression parameters, in addition to stripping color profile information, EXIF, and other metadata out from the raw files. ImageOptim supports a variety of file formats, including PNG, GIF, JPG, and animated GIFs, here’s a quick look at the interface:

The simplicity is deceptive in that it doesn’t demonstrate just how handy this app is, or just how effective the optimization is. Let’s cover usage and a few tricks to get the most out of it…
Optimizing Image Files with ImageOptim for Mac
- Head over to the developer website and grab ImageOptim (free) and uncompress the archive, if you intend on using it often, drag the ImageOptim.app into your /Applications/ directory
- Launch ImageOptim and have the window somewhere visible from the Finder windows
- Start compressing image files with a drag & drop into the apps window to begin compression, or use the “Open” option from the File menu to select files manually
Any image opened within the ImageOptim app will immediately shrink down losslessly, this is done by stripping the exif data and other useless details that (should) have no impact on the image quality, while reducing file size. No additional steps are needed, though if you’re looking beyond a single file compression you can use a few tricks to speed up the process of groups of pictures.
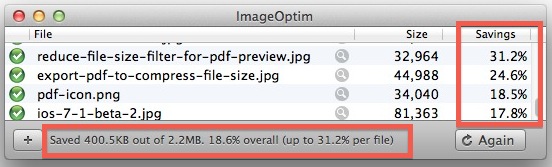
How well does it work? That varies, but on average the image size savings are about 15-35%, making it a useful and must-have tool for web designers, developers, publishers, bloggers, app developers, or anyone else that wants to reduce image file size and bandwidth requirements. Some files can be dramatically compressed though, and there are instances where poorly optimized original files can be squeezed down as much as 50-60%, depending on what is actually causing the file to be unnecessarily large. ImageOptim is particularly effective for uncompressed files, but you should have success with just about any image document you throw at it. The app will report savings for each individual image, and also show you the net compression if you toss a bunch of files at it:
For easy compression right from the Finder, there is also a separate system service available to download that lets you right-click on images to compress them directly from the OS X Finder. This becomes accessible from the Contextual Menu, but it’s really not necessary considering the ease of the apps interaction.
Bulk Compress Images with Drag & Drop
You can bulk optimize images by using a large drag & drop. The best way I’ve found to do this is to launch the ImageOptim app first and have the icon sitting in your Dock while it’s active, then navigate to the folder containing images you want to compress, select them all, then use a drag and drop onto the icon to start the process. JPG and GIF files will compress extremely fast, but PNG files can take quite a bit longer to optimize, and in all cases the amount of time it takes to compress the image varies depending on the picture resolution and the total file size to begin with. For huge batch compressions, this really is one of the easiest ways, other than using the wildcard command line trick we’ll discuss next for Terminal users.
Using Wildcards to Batch Compress from the Command Line
For command line users, use the “open” command to pass wildcards to ImageOptim for easy scripting and bulk image compression like so:
open -a ImageOptim.app ~/Pictures/SaveToWeb/*.jpg
Of course, compressing a single file is possible using this trick too:
open -a ImageOptim.app ~/FileName.PNG
It’s possible to use a vary wide wildcard to compress every single image file on a drive, but that is really not recommended unless you know exactly what you’re doing and why.
ImageOptim is an excellent tool for web workers and for those wanting to compress images, but remember that just because ImageOptim should be lossless doesn’t mean that it always is. Additionally, many users find the EXIF data that is attached to image files to be useful, whether for it’s GPS coordinates, camera shooting details like manufacturer and camera settings, or for a variety of other reasons. Using the optimization tricks through ImageOptim strips all EXIF data, making a file effectively blank beyond the raw photo data itself, which can also be the intention for many users.
Great find from @MacGeekPro on Twitter, don’t forget to follow @OSXDaily too!

[…] data is really easy to remove with the help of ImageOptim, a free Mac tool we’ve discussed before that compresses and optimizes images. In that process of optimizing a photo, ImageOptim also strips […]
We’ve made a bunch of games for iPads and based on reading the docs made all of our images PNGs. But that resulted in huge file sizes, especially for games that use photos. So we switched to JPEGs for the content. Buttons are still PNGs.
In our first batch of games we used PhotoShop at 30% quality setting. The pictures are OK looking but you can see some artifacts, especially when there are large areas of the same color, like skies. For our current game, we experimented with ImageOptim. The compressed images are virtually indistinguishable from the originals. Unfortunately, ImageOptim only has an 80% setting and running two passes gets you as small as you are going to get. This is significantly smaller than Photoshop—but not as small as you can get with a lower quality setting in Photoshop. Since there are no sounds in this game, we’ll probably go with ImageOptim.
Here are some stats for 3673 pictures at 644×498.
Originals:            1,140.0 MB

ImageOptim 80%          249.6 MB

ImageOptim 2nd Pass     238.9 MB
Photoshop 80% 323.9 MB
Photoshop 50% 249.8 MB
50% with ImageOptim 241.3 MB
Photoshop 30% 166.7 MB
The guy says on his site that Apple won’t put it on the App Store because they forbid free apps. Really? Is that why there’s thousands and thousands of free apps on The App Store. Thanks, but no thanks, wacko. I have a feeling they rejected it for other reasons.
Why do you think it was rejected? Daringfireball wrote about this app like 2 weeks ago.
He can’t put it on the App Store because the software in it is GPL’d. The terms of the GPL basically forbid you from distributing binaries under the limitations of the App store. So when he says “Free”, he means free as in speech, not free as in beer.
Wow, you completely missed the mark — and revealed yourself to be a bit of a jerk. At least the “wacko” wrote something useful. :)
I need help installing this. Please help me.