How to Mount a Windows PC Shared Folder On a Mac
Love it or hate it, but we live in a multi-platform world with multiple operating systems. Sure we prefer Mac’s, but the chances are high that at some point you’ll have to interface your Mac with a PC to share files between the two machines, particularly if you are in an office environment or school. Heck, even at home, many of us have old PC’s around still with tons of files on them, even if they’re mostly collecting dust. This begs the question; “can you easily mount a Windows PC shared folder to your Mac?” – the answer is; you bet, and it’s quicker than you might think!
Sharing files between Mac OS X and Windows is much easier than it used to be thanks largely to Samba technology. Samba (shortened to SMB often) is built right into OS X, so if you’re on a Mac and already have a Windows PC with sharing enabled to connect to, you just have to do the following quick 4 step process. Yes, this works in all versions of OS X, and to connect to all versions of Windows.
Mount Windows Shares on Mac OS X
This will mount a specified Windows computer share to the Mac as an accessible file server:
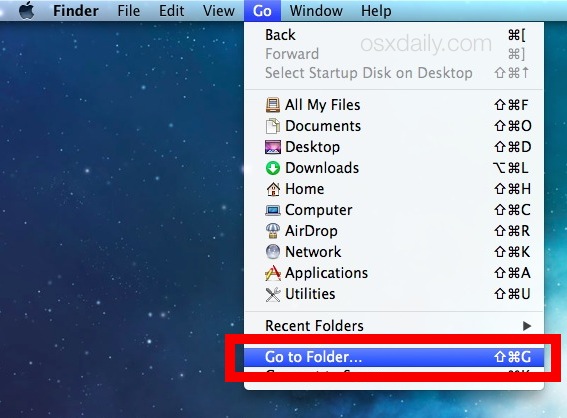
- From the Mac Finder (the file system), choose the “Go” menu and select ‘Connect to Server’
- Enter the IP of the Windows PC prefixed with smb:// as shown in the screen shot*
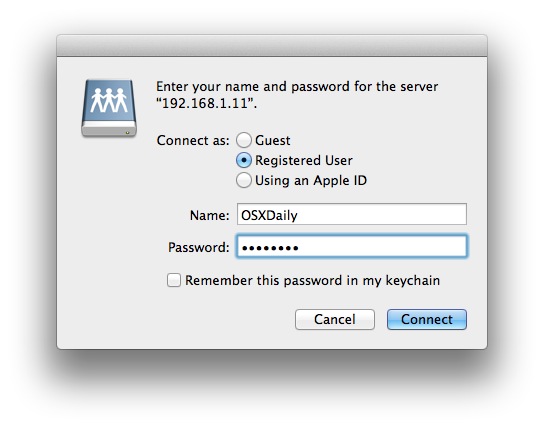
- Connect to that server and log in using the appropriate Windows login credentials
- Select the available volumes / shares you want to mount (this may be folders, devices, drives, networked shares, the credentialed user directory, etc)
- You can now browse the mounted Windows file system and share files, drop anything into the window to copy it over – the mounted PC share works just like a folder on your Mac would
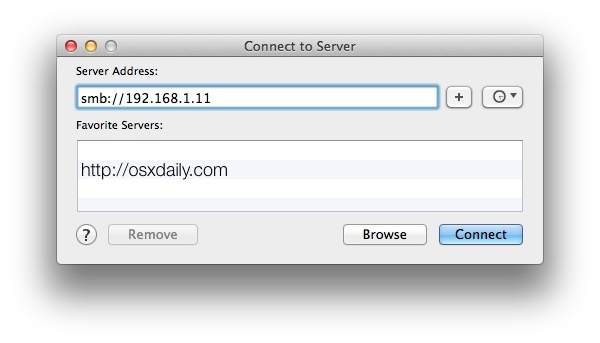
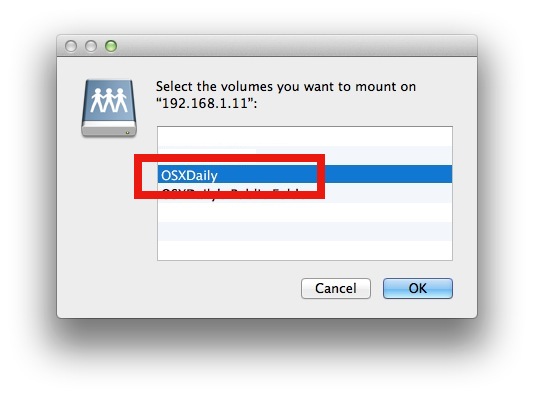
* For example, to mount the Windows PC located at “192.168.1.11” you would enter the following URL with smb prefix: smb://192.168.1.11
You’ll find the connected PC in your “Shared” sidebar item list, and also in the Network directory at the root of the Mac. Apple has a bit of a sense of humor, and shows Windows PC’s as an old fashioned beige box CRT monitor with a blue screen of death, making a PC easy to identify:
![]()
If it’s desired you can also do the Mac equivalent of mapping the network drive so that it maintains on the desktop or upon boot, but that’s a matter of user preference.
Of course, if you don’t have sharing setup yet, this is a step ahead of where you are – not to worry, we have a few super easy guides to follow that will get you there. This article on setting up and sharing Files from Mac to Windows is a great place to start. These days, networking is certainly not rocket science, so even if it sounds somewhat complicated don’t shy away from setting up your own network, because you’ll be able to quickly share stuff between whatever OS versions you have in use. All you need is a local network which most users do these days thanks to a wi-fi router, your Mac, and a Windows PC.
You can get additional details on Mac OS X & Windows networking from the following sources and walkthroughs:
- Share files from a Mac to Windows PC – our own guide covers enabling file sharing on the Mac and then connecting to the Mac from a Windows PC. Works with OS X 10.6 and 10.7, OS X 10.8 Mountain Lion, OS X Mavericks, Yosemite, and Windows Xp, Vista, 7, Windows 8.
- LifeHacker: How to mount a Windows PC – the Lifehacker guide is intended for Mac users looking to mount a Windows PC on their own computer, this is also possible in our own guide, but lifehacker handles things slightly differently.
We’re partial to recommend the OSXDaily edition, but the LH approach of only mounting a server is useful too if you don’t need as much of an indepth tutorial, a complete walkthrough of the setup, and a general overview for Samba and Windows to OS X sharing. Let us know if you have any questions or comments!


this is awesome.
thanks for sharing!
saved me so much time
This is reaaaally easy to do I am surprised they are getting plastered around the social web… go figure
I guess there’s no iSharePC app so most Mac users dont know eh??