Use a Zoom Window in Mac OS X

Another option when enabling zoom in OS X Lion and other newer Mac OS X versions is to use a smaller floating zoom window, rather than zooming into the entire screen. This allows you to zoom into screen elements using a small zoom window that hovers over screen elements, kind of like a virtual magnifying glass.
This is an accessibility feature but it’s useful for many Mac users. Additionally, some users may prefer this to the full-screen enlargement offered in the broader zoom trick, we’ll show you how to enable this feature in MacOS and Mac OS X.
How to Use Zoom Window on Mac
This is how to enable the hovering zoom window in Mac OS X:
- Open “System Preferences” from the Apple menu, and click on “Accessibility” (note that prior versions of OS X will list this as a “Universal Access” preference panel)
- Click on the “Zoom” section (again, prior versions will show this as a “Seeing” tab and then choose “Zoom”)
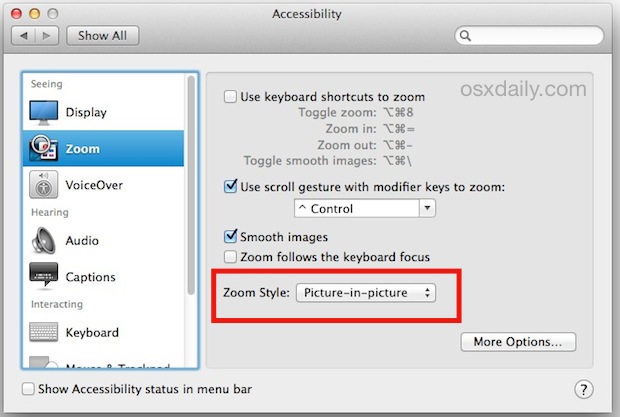
- Mac OS 10.12 +, Mac OS X 10.9 and newer: Check the box for “Use scroll gesture with modifier keys to zoom”, then under the “Zoom Style” menu pull down select “Picture-in-Picture”
- OS X 10.8 and before: Choose the “On” button, and then click the checkbox next to “Zoom in window”
This is what the appropriate picture-in-picture and Zoom settings panel looks like in the latest versions of Mac OS X, including macOS 10.12, 10.11, OS X 10.9 and OS X 10.10:

This little zoom box appears on screen in a little rectangular floating window that zooms in on whatever elements it’s hovered over.
For those with older versions of Mac OS system software, here’s what this zoom box setting looks like in OS X 10.8 and prior versions:

The default zoom shortcut is Control+Scrolling, but this and other aspects can be adjusted by clicking on the “Options” button under the Zoom section of the Universal Access panel.
Think of it like a virtual magnifying glass, similar to what is in the Preview.app but for everything shown on screen.

