How to Fix Blurry Fonts in MacOS Mojave for Non-Retina Displays

Do you think fonts and screen text looks fuzzy, blurry, or excessively thin in macOS Mojave? If so, it may be due to changes in anti-aliasing in Mojave, particularly for users with non-retina displays. If you are running macOS Mojave on a Mac without a retina display, or with an external monitor that does not have an ultra-high resolution screen, you may have noticed that some fonts and text can appear as fuzzy, blurry, or excessively thin and difficult to read. Fortunately, with a little effort you can make some adjustments to how MacOS Mojave handles font smoothing and anti-aliasing which may improve the appearance of text and fonts on your Mac screen.
We’ll show you a few tips on how to adjust font smoothing in MacOS to attempt to remedy any problematic font rendering or blurry text in macOS Mojave for non-retina displays.
These font smoothing settings are not recommended to change on a Retina display Mac, though if you feel like doing so you certainly can experiment with the settings on a Retina Mac as well, if you do then please report your experiences in the comments below.
3 Ways to Adjust Font & Text Anti-Aliasing in MacOS Mojave
We’ll cover three different methods of adjusting font smoothing and text anti-aliasing settings in macOS Mojave. The first is quite simple through a preference panel, but the latter options are more advanced and require using the Terminal. You can use any or all of them, and how each appears will differ depending on your particular Mac and the screens you use (and your personal preferences and perhaps eyesight).
How to Enable Font Smoothing in MacOS Mojave
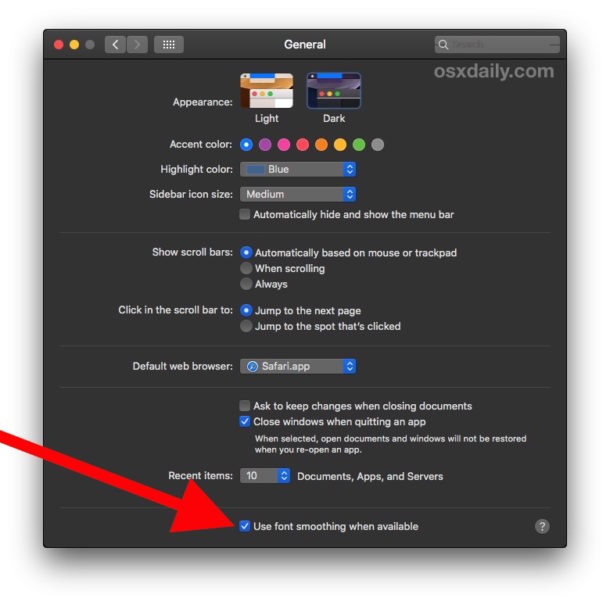
- First, go to the Apple menu and choose “System Preferences”
- Choose “General” preference panel and check the box for “Use font smoothing when available” to that is enabled (or disabled)

You might instantly see a difference in simply toggling that setting on or off, and that alone may resolve the issues you are experiencing with fonts in Mojave.
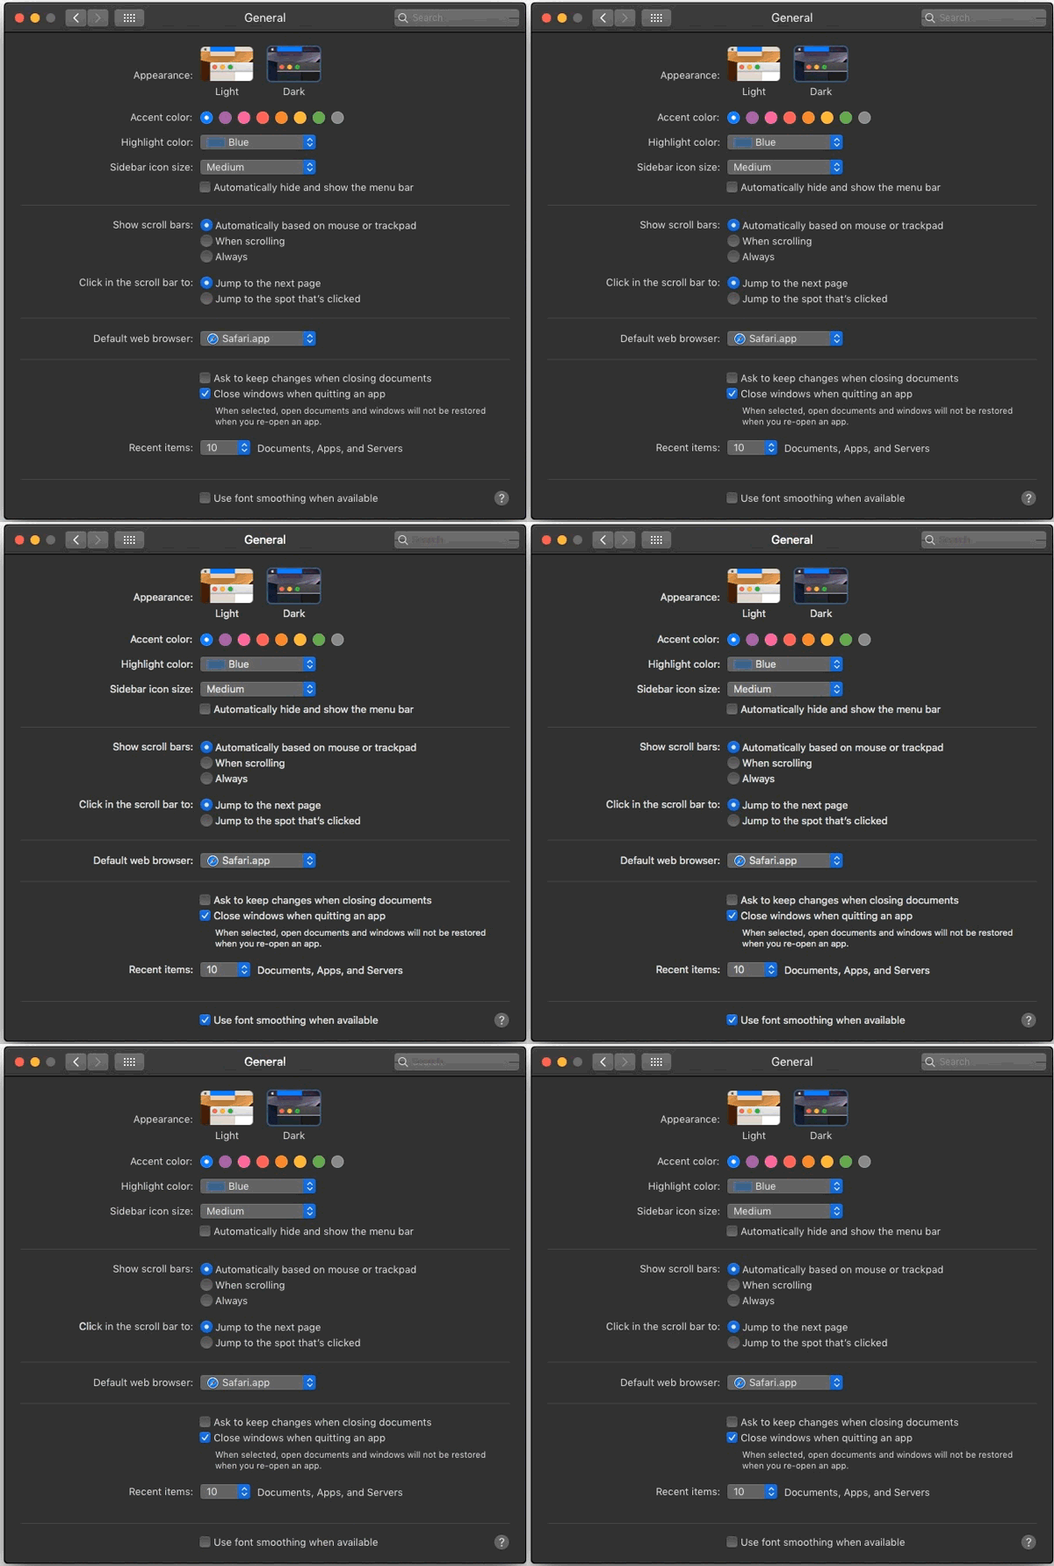
The animated GIF below shows the before and after effect of simply toggling this setting, which looks better to you depends on your particular screen and individual preferences, but in this animation you can see the ‘enabled’ setting has a slightly bolder font that includes more anti-aliasing:

If that settings adjustment is sufficient you likely won’t want to proceed further, however there are more tweaks and adjustments you can make to how macOS Mojave handles font smoothing and text anti-aliasing.
How to Enable Font Smoothing in macOS Mojave by Terminal
If the above trick doesn’t resolve your blurry fuzzy fonts issue, then proceed with the more advanced tips further below to adjust how font smoothing works further.
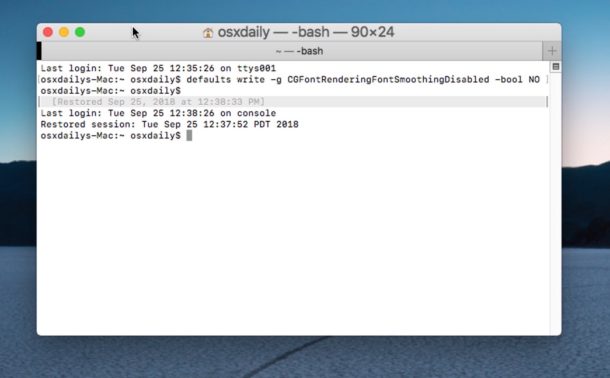
- Open the “Terminal” application, found in /Applications/Utilities/
- Enter the following command syntax exactly:
- Hit Return, then log out and log back in (or reboot the Mac) for the font smoothing settings to change and take effect
defaults write -g CGFontRenderingFontSmoothingDisabled -bool NO
This particular change was extremely subtle for my particular Mac, screen shots in animated GIF form attempt to capture the difference with the thicker bolder font the result after the defaults command was issued and the thinner version before:

Again some Mac users may notice this change alone is sufficient to remedy any complaints they have about font blurriness, fuzziness, font weight or text being too thin or hard to read.
But for some Mac users they still may have complaints, in which case you can also go further to manually adjust anti-aliasing settings in Mac OS.
How to Adjust Mac Font Smoothing Settings via Defaults
Next you can also manually attempt to change the strength of font smoothing settings (anti-aliasing) in Mac OS, this also relies on defaults commands entered into the Terminal.
Strong font smoothing defaults command:
defaults -currentHost write -globalDomain AppleFontSmoothing -int 3
Medium font smoothing defaults command:
defaults -currentHost write -globalDomain AppleFontSmoothing -int 2
Light font smoothing defaults command:
defaults -currentHost write -globalDomain AppleFontSmoothing -int 1
You will want to log out and back in again, or reboot the Mac, for the changes to take effect.
How obvious or subtle the changes will be for you depends on your Mac, the display in use, and perhaps even individual preference and eyesight. Thus if you have any issue with the way fonts appear in macOS Mojave you might want to try each of the settings individually to find what works best for you.
Remove all adjustments to font smoothing in Mac OS and return to default settings
This command will remove any custom font smoothing setting:
defaults -currentHost delete -globalDomain AppleFontSmoothing
This command will revert the change to rendering font smoothing settings back to the default in macOS Mojave:
defaults write -g CGFontRenderingFontSmoothingDisabled -bool YES
Again, restart the Mac or log out and back in again for the change to take effect.
All of this may or may not apply to you and your particular Mac, screen, and display, but the cause (if this does apply to you) is apparently due to a change in how macOS Mojave handles font rendering and anti-aliasing.
Variations of this tip have been covered here at OSXDaily.com many times before, in fact many users originally noticed way back in Snow Leopard that font smoothing settings had changed in Mac OS X then, and again later (and still relevant today) when a Mac screen sometimes looks blurry or fonts appear fuzzy, and yet again in Yosemite where font smoothing became an issue too, and here we are with macOS Mojave with a similar round of issues with fonts not looking quite right.
These changes to font smoothing were first noticed during the beta period of Mojave, but persist today. Thanks to dev.to for the Mojave specific reference to this tip and the CGFontRenderingFontSmoothingDisabled defaults command string.


I tried all the settings even a third party solution. Mostly I felt nothing made much of a difference. I also tried HDMI and DisplayPort to see if that made any difference and it did not. Even a FHD monitor I have with 120Hz refresh did not improve clarity. Actually my Intel Mac mini seems to dislike that 120Hz anyway, seems to revert back to 60Hz.
Sharpness was set to maximum (100) on my Samsung screen, causing really ugly fonts! Reduced this to 50 made things much better. I had already used the cli commands here to enable font smoothing.
Seems this setting went away in Big Sur. The changes in Big Sur makes smaller fonts look really bad on a non retina display. I guess Apple expects everyone to use a retina display?
Thanks so much for these amazing tips.
I bought an Acer 27″ Nitro QG1 Series – QG271 and although your advice helped smoothing a little the jagged text, it wasn’t good enough for me to do design jobs –texts were still jagged– so I am sadly returning it and will continue with a Phillips 24” that works well.
It’s strange that I got the same issue with a Dell 27”.
Thank you for your kind support.
When I got my new MacBook Pro, I was surprised to see that the screen was blurry. The computer had a retina screen while my old MacBook Pro did not have a retina screen. I saw this article on updating Mojave as a fix for the blurry screen. I went back to the store, and it was recommended that I update to Catalina from Mojave. This did nothing to fix the blurry screen. Can Ii follow the recommendations to fix the blurry screen as noted in this article now that I have Catalina, or are there other steps to take given the update to Catalina. Thank you in advance!!
Yes you can adjust the font smoothing settings in MacOS Catalina. Make sure your Mac display is also set to the proper screen resolution as well.
A new MacBook Pro screen should not show blurry fonts but some users find anti-aliasing to look blurry which is where these adjustments can be helpful.
thanks
Now a naive question. How do I check via terminal if the font smoothing is already enabled? I entered the command but I cannot really see any obvioud difference on my FHD 27″ (mac mini 2012 / Mojave).
Hi :-)
After upgrading to OSX Catalina, the font smoothing was gone again and the Terminal line did not work for me anymore.
I inverted it to:
defaults write -g CGFontRenderingFontSmoothingEnabled -bool YES
That did the trick! Hope it helps others. :-)
Thanks Patrick! That did the trick!
I got font smoothing working in MacOS Catalina!
defaults write -g CGFontRenderingFontSmoothingEnabled -bool YESHelpful for external displays for me!
Having followed all the above steps, and still discovering no smooth font joy, I discovered that the monitor settings were at least partly to blame.
My fancy new “Samsung 34-Inch CJ791 Thunderbolt 3 Curved QLED Widescreen Monitor” wants to apply a Sharpness setting by default, defeating subpixel antialiasing! Settings for this monitor that work well for OS X Mojave are
Picture->Brightness 100
Picture->Contrast 100
Picture->Sharpness 20
Hi Michael,
Did you ever get to the bottom of this for the Samsung 34-Inch CJ791. I just got one of those and first day I’m reading these posts. Fun fun :-)
I just set the settings like you set above but system font still really sucks such as in Safari bookmarks bar, Mail app, etc. Part of a letter will be prominent and the other part of a letter will be very faint. Just looks awful.
If I disable font smoothing the system font starts looking a little better but some other fonts degrade. What a pain..
Looking forward to hearing what your subsequent experience with that monitor has been.
Thanks,
Mete
Thank you! The fonts on my external screen made my eyes hurt, light smoothing option has made it so much better.
thanks for this! Thought I was going blind. BTW in my general tab under preferences, there was no choice for font smoothing. But the second tip did the trick. I’m having problems keeping my computer from uploading everything to the cloud and not leaving it on the computer.
Thanks
the new update make the old macbook air’s screen flurry.
I guess the best way is roll back to macos High Sierria..
the text is clear on that os version..
Thanks, the first terminal option fixed it.
I was finding reading system font in mail app and news app on my MacBook Air. Used the terminal input suggested and what a huge difference. Thank you.
There is a side effect at least in Safari. For example, if you refresh this page https://laravel.com/docs/5.7/contributions few times you would see partially blurry fonts: https://imgur.com/a/bowFIYk
My Dell U3415W display now renders text much more clearly with Mojave after I ran the first command you suggest:
defaults write -g CGFontRenderingFontSmoothingDisabled -bool NO
I already had “Use font smoothing when available” selected.
Thanks for a really great tip!
I have a Thunderbolt Display and “defaults write -g CGFontRenderingFontSmoothingDisabled -bool NO” did such a good job I think it looks better than OS X 10.13!
Great fix thanks!
Thank you very much :)
I use an Asus monitor on my Mac mini Late 2012. Now everything looks much better.
Asus monitor on Mac ? How it is?
I personally use an ASUS 24″ monitor connected to a MacBook Pro and it looks great. 1920×1080 resolution.
But one thing I have found to be helpful is to use a slightly darker display gamma to increase the contrast of fonts on the screen, which works for me but may not be doable for users who require perfect color accuracy.
You should read (sic) “write” NOT “read” ;-)
defaults -currentHost write -globalDomain AppleFontSmoothing -int 1
Typo in the original article…
Not sure how that happened, thanks for the correction! They have been fixed. You’re correct, the use of ‘read’ is to see the value, while ‘write’ is used to change the value, and ‘delete’ is used to remove it.
The commands to adjust the amount of font smoothing aren’t working for me. When I enter this into Terminal…
defaults -currentHost read -globalDomain AppleFontSmoothing -int 1
I get the following error:
The domain/default pair of (kCFPreferencesAnyApplication, AppleFontSmoothing) does not exist
Update: Used the first command (defaults write -g CGFontRenderingFontSmoothingDisabled -bool NO) and text looks significantly better. Thanks again.
Excellent tip!
I used this command (and confirmed that enabled Font Smoothing in settings, it was already enabled for me) and logged out and in and the fonts look much better:
defaults write -g CGFontRenderingFontSmoothingDisabled -bool NOThanks! I guess this means Apple will soon only sell retina displays for Mac? I use an external monitor so even if that is the case I will continue to have several great HD external monitors to use moving forward, these tips will be handy then too.
Yes! This worked perfect for me as well. I am running a retina MacBook Pro through an Apple Thunderbolt display and everything is nice n’ crisp. Thank you!!!
Same! Back to the same setting as on High Sierra (on Apple Thunderbolt Display).
Thanks!
The OS X fonts on a Sony Triluminous LCD TV panel always look fuzzy due to the pixel element layout and use. If I use font-smoothing the fonts look better on a white background, if I turn it off they look better on a dark one. Windows used to have a font optimizer that one can run and be presented with various font rendering options, so they can pick the one that looks best on the particular display. OS X needs something like that.
Thanks. I just updated to Mojave and noticed that Times New Roman 12 pt. in Scrivener looks thicker and blacker, almost bold. It’s pretty ugly. I’m using an HP2511x monitor, so I’ll give some of the terminal commands a try. Turning off font smoothing in preferences looks slightly better, but a bit fuzzy.