How to Password Protect Pages, Keynote & Numbers Documents on iPhone & iPad

Want to password protect your important Pages, Keynote, and Numbers documents, right from your iPhone or iPad? Thanks to a handy feature in the iWork productivity suite, you can easily encrypt your documents, right from iOS or iPadOS (or Mac), requiring the proper password to be entered before the documents can be opened by anyone.
Apple’s iWork productivity suite includes Pages, Numbers, and Keynote, and is widely used by tons of iPhone, iPad, and Mac users to create and manage documents on their devices. By default, the files that you share from these apps can be opened by anyone who can see them, since they’re not encrypted. However, there’s a hidden option in each of these apps that allow users to set a custom password and protect their documents from random users opening the documents. No password means not opening the file.
Here we will take a look at encrypting your iWork documents with a password to protect them from prying eyes, and you’ll be doing this directly from your iPhone or iPad.
How to Password Protect Pages, Keynote & Numbers Documents from iPhone & iPad
We’ll be focusing on the steps for Apple’s Pages app here, everything is the same in Keynote and Numbers too. Here’s what you need to do:
- First, launch the Pages/Keynote/Numbers app on iPhone or iPad and open the document that you want to encrypt.

- Typically, you’ll be in the reading view. You need to enter editing mode. This can be done by simply tapping on the “Edit” option at the top-right corner.

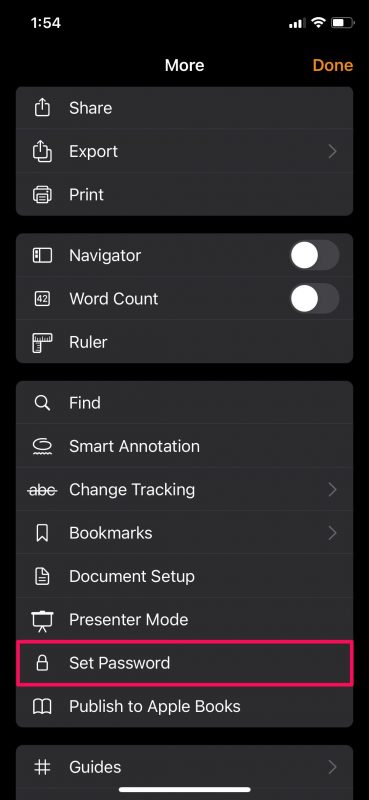
- Next, tap on the triple-dot icon from the top menu to access more options for the selected document.

- Here, scroll down below and you’ll see the option to password protect the password. Tap on “Set Password” to proceed.

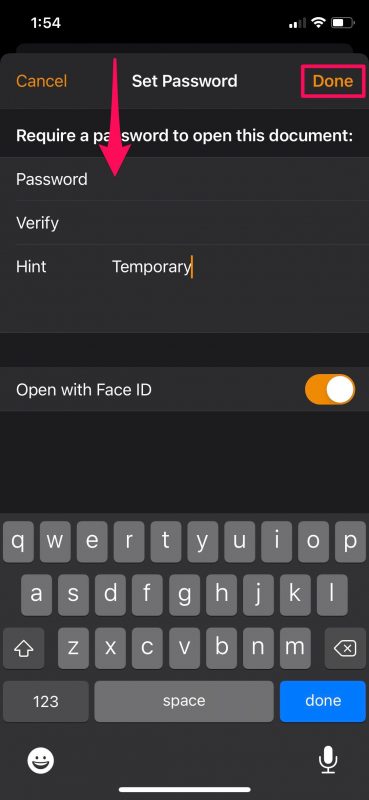
- Now, type in your preferred password and set a hint. Face ID unlock is enabled for the document by default, but if you’re going to be sharing this document with someone else, it’s best to disable it. Tap on “Done” to save your changes.

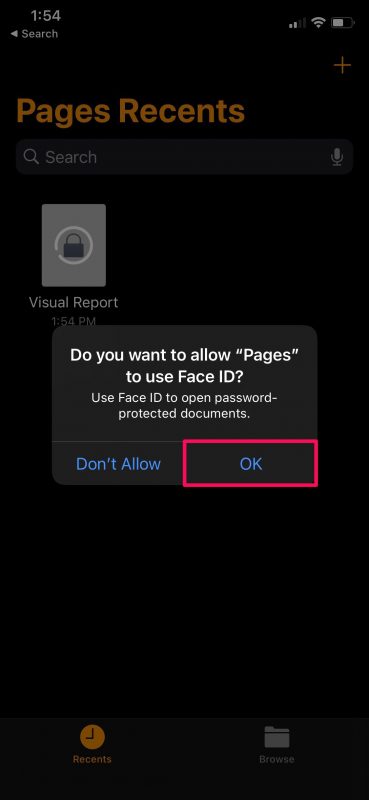
- Now, you’ll see a lock icon on the encrypted document rather than the usual preview. When you tap on it, you’ll be prompted to use Face ID to unlock the document (if enabled). If Face ID authentication fails, you’ll get the option to type in the password.

There you go. You’ve successfully password protected your Pages document from iPhone or iPad.
As mentioned earlier, you can follow the exact procedure to password protect your Numbers and Keynote files too. Regardless of the iWork app you use, the options that you see on your screen will be exactly the same.
Before you can use Face ID to unlock your encrypted document on your iPhone or iPad, you’ll need to first give app permissions for Face ID regardless of whether you’re using Pages, Numbers, or Keynote. Note that Face ID unlock is only helpful when you want to quickly view your documents on your device. However, if you’re trying to limit the people who have access to your document after you share it, Face ID just gets in the way of other users.
Similarly, if you own a Mac and work on iWork documents on it, you may also be interested in learning how to password protect your Pages, Keynote, and Numbers files in macOS. All you need to do is open the file that you want to encrypt in the respective app and then click on File -> Set Password from the menu bar.
This feature has been around a while, and if you have a much older iPhone or iPad running a near ancient iOS release, you can still password lock documents in those versions too.
Were you able to password protect your Pages, Numbers, and Keynote files from your iPhone or iPad? How do you feel about this encryption feature? Let us know your thoughts and experiences in the comments.


What type of encryption does this use?