How to Create a New User Account on Mac OS X
Creating a new user account in Mac OS X either for yourself or for another person who may use your Mac is often a good idea.
For another computer user, a separate user account insures that your data and their data is separate, effectively sharing the same computer but not the same files. For yourself, a new user account used exclusively for work or play is an excellent way to increase your productivity by reducing distractions. This makes it very easy to use and carry just a single Mac to serve as both a work and personal computer, and can be a real lifesaver for those of us who are either workaholics or just easily distracted by all the stuff that resides on the computer.
We’ll show you how to create a new user account in Mac OS X that you can use for whatever usage is necessary, either for your own needs or for a separate person.
Creating a New User Account in Mac OS X
The process below walks through how to create a new user account in Mac OS X, it’s the same on all versions of OS X whether it’s Mavericks, Yosemite, El Capitan, or otherwise. If you’re already familiar with how to do this then skip through it and just take the general advice of separating users and distinct activites here:
- Open System Preferences from the Apple menu
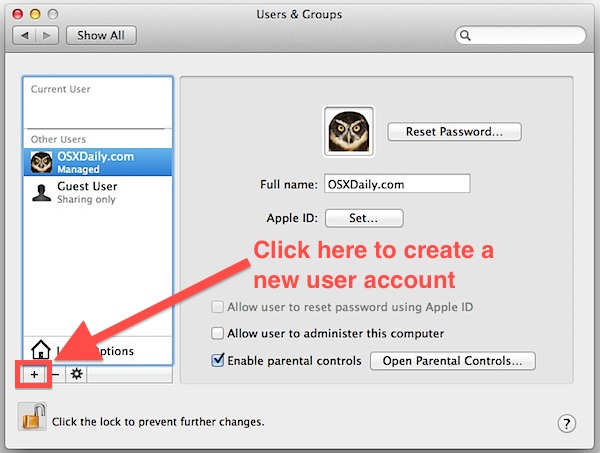
- Choose “Users & Groups” and click the lock icon in the corner to make changes, enter the password when requested
- Click the [+] plus button to add a new user
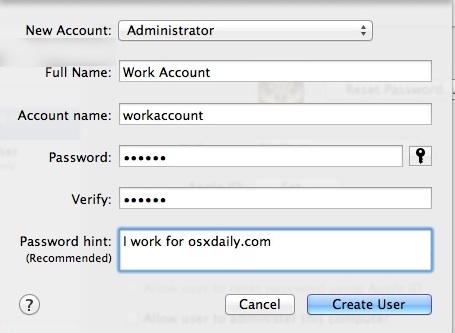
- Make the new account type Administrator or Standard depending on your security preferences, fill in the rest of the information then click “Create User”
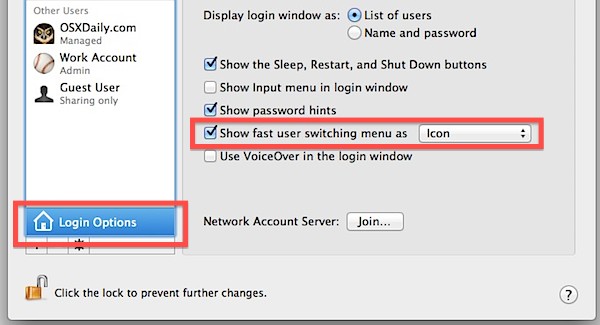
- Now enable Fast User Switching by clicking on “Login Options” and checking the box next to “Show fast user switching menu”, this lets you easily switch between accounts by pulling down a menu bar
You’re now ready to go with the new account, whether it’s for yourself as a “work” account (or “play” account), or for another user you want to have access to the Mac without touching your own personal stuff.
Using Multiple User Accounts in Mac OS X
Get in the habit of only using this account for it’s given purpose, so if it’s for another person, have them only use that account and not yours. If it’s for yourself, use the new user login for your work or play, and use Fast User Switching to switch back and forth between the work and play accounts when needed, though there’s no harm in logging out of the other account either since OS X now can reopen your prior session with all of its windows and apps.
![]() The new user account will have access to all the same apps as your primary account so long as they are stored in the primary /Applications/ folder, which is the default setting for anything installed in OS X be it from a DMG, PKG, or the App Store. If you want to go a step further, you can use Parental Controls to restrict app usage and prevent yourself from playing games, opening Facebook, and otherwise wasting your time with unproductive apps and websites. You can really get strict with yourself by creating standalone apps of websites you absolutely must access, then block everything else, but we’re assuming you have more self control than that.
The new user account will have access to all the same apps as your primary account so long as they are stored in the primary /Applications/ folder, which is the default setting for anything installed in OS X be it from a DMG, PKG, or the App Store. If you want to go a step further, you can use Parental Controls to restrict app usage and prevent yourself from playing games, opening Facebook, and otherwise wasting your time with unproductive apps and websites. You can really get strict with yourself by creating standalone apps of websites you absolutely must access, then block everything else, but we’re assuming you have more self control than that.
Thanks for the tip idea Ryan


Really great walkthrough, thanks for the assistance in how to create a new user account on my Mac. It is the best. thanks.
Just discovered something to update my earlier comment here:
Spotlight searches other user accounts’ files depending on the permissions set for folders. The default behavior (for me, anyway) is that new folders created outside of Apple’s predefined folder set can be viewed and searched.
Since Spotlight won’t search inside restricted folders (everyone = no access) checking your permissions on a folder by folder basis is certainly another way to do achieve a stronger division between user accounts, but Spotlight privacy is a convenient “set it and forget it” approach.
Unlike Windows, you can set up an account to have a different default language than the system language. This is very helpful for people who are not monolingual and have to work in more than one language.
Dumb idea. Eventually everyone trashes their “work” account with garbage. It’s all about discipline, not crutches.
(First time I tried this approach was over close to 20 years ago).
This is so hilarious. I just did that over the weekend and felt a little silly for not having thought of it before.
It’s amazing how much more enjoyable the computer is to use when work and play are segregated. Different Apple IDs to separate work apps/podcasts/iTunes U stuff in iTunes, different Launchpad layouts, different Docks.
Spotlight will still search the contents of your entire computer, rather than just the user account space you are using. So, in the interest of further reducing distractions, and for the efficiency of pre-filtering your Spotlight search results to keep other user account results out of the list:
System Preferences > Spotlight > Privacy tab > add the user folder from the other account
Do this from each account to harden the boundary between work and play.
Of course, you can just do this from each separate search by going to the “Show All” windowed view of Spotlight, where you can refine the search by clicking off of “This Mac”. But many people just search from Spotlight’s drop-down menu, and it always defaults to “This Mac”, requiring the extra step to avoid searching everything.
I want that roaring lion picture.
it looks like it’s yawning