How to Authorize a Computer with iTunes

If you have a new computer, you’re going to want to authorize it with iTunes and an Apple ID. Authorizing iTunes does quite a bit, it lets you sync apps, books, music, movies, and other content from the iTunes Store, re-download past apps from the App Store, it enables Home Sharing with iTunes, and also allows for some iCloud specific features like Automatic Downloads. In other words it’s basically essential, and it’s very easy to do, make sure you have have an active Apple ID before continuing.
If you do not authorize a computer with iTunes you will not be able to access content you have paid for or downloaded through iTunes on a Mac, or Windows iTunes. This includes everything from apps to music to movies. So, let’s authorize that computer with iTunes so you can gain access to your stuff.
How to Authorize a Computer with iTunes
- Launch iTunes on the new computer (PC or Mac)
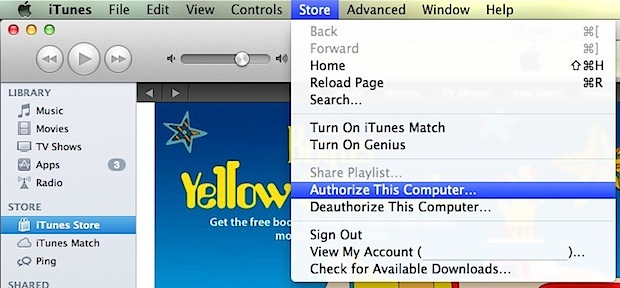
- Pull down the “Account” or “Store” menu and select “Authorize This Computer”
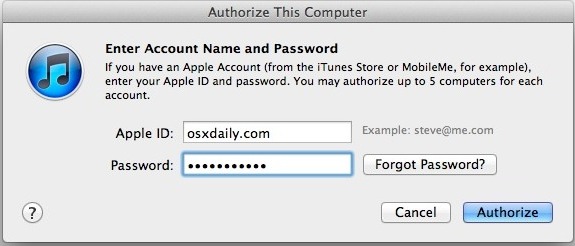
- Enter your Apple ID and password at the next screen and click on “Authorize”

You can authorize up to five personal computers of any variety of Macs or Windows PC’s. In other words, up to five computers can sync and share your data and purchases. If you go over that number, you’ll need to deauthorize one of the computers before authorizing a new one.

Note sometimes the Account menu is called the Store menu, and vice versa, it depends on the version of iTunes you are using as consistency varies per iTunes release.
See, if you don’t authorize your computer then you can’t get anything from iTunes that you may have paid for, even if you’re logged in with the proper Apple ID. This is why authorizing with iTunes is obviously necessary, and the convenience of authorizing computers before you can get stuff is something you will surely learn to master every time you get a new computer whether it is a Mac or Windows PC. It’s a very simple, intuitive, and user friendly experience in iTunes.
And if you think authorizing a computer with iTunes is easy, down the road you will learn how to de-authorize a computer you no longer have access to or no longer need! But that’s a topic for another time. Happy authorization and enjoy!


my iTune doesn’t have the browser. I don’t know where Store Menu is.
[…] connect the iPhone to the new Mac, launch iTunes, confirm that everything is in order, and authorize the new […]
Just go to “unauthorize computer” option.
Then you have the choice to unauthorize ALL computers attached to your Apple account.
Then you can authorize one by one the computers you want.
This can be done only once a year.
@Jon
Me too!
Authorizing happens nearly automatically. I would really value a how-to for deauthorizing old computers after they have been thrown away years ago.
Is there any limitation for the number of iDevices, e.g how many Ipad, Iphone can be attached to an AppleID?