Easily Use & Switch Between Multiple Gmail Accounts on iPhone & iPad with Gmail App
![]() If you have multiple Gmail accounts that you juggle between, rather than adding them all to the default iOS Mail app, do yourself a favor and grab Google’s official Gmail app for the iPhone, iPad, or iPod touch. Not only is Gmail for iOS an excellent full-featured mobile email client, it also makes managing multiple accounts extremely simple. This helps to take the strain off your primary Mail app account for iOS by not cluttering it up with too many notifications and alerts, and works well in line with our general recommendation to separate email accounts with different apps to aid in handling the inevitable inbox overload we all suffer from.
If you have multiple Gmail accounts that you juggle between, rather than adding them all to the default iOS Mail app, do yourself a favor and grab Google’s official Gmail app for the iPhone, iPad, or iPod touch. Not only is Gmail for iOS an excellent full-featured mobile email client, it also makes managing multiple accounts extremely simple. This helps to take the strain off your primary Mail app account for iOS by not cluttering it up with too many notifications and alerts, and works well in line with our general recommendation to separate email accounts with different apps to aid in handling the inevitable inbox overload we all suffer from.
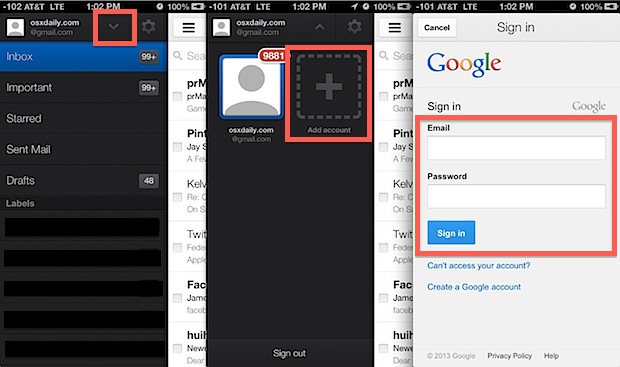
Setting up and using Gmail for iOS is easy, whether for a single account, or as we’ll focus on here, for managing multiple accounts and inboxes:
- If you don’t have it yet, get Gmail for iOS (free) for your iPhone, iPad, or iPod touch
- Open the app and sign into any Gmail account to get started
- Go to the inbox screen either by swiping to the right or by tapping the list button in the upper left corner
- Tap the downward pointing arrow at the top of the screen, then tap “Add Account”
- Enter the additional gmail account information (or alternatively, tap “Create a Google Account” to set up a completely new address) and choose “Sign In”
- Repeat as necessary to add additional accounts

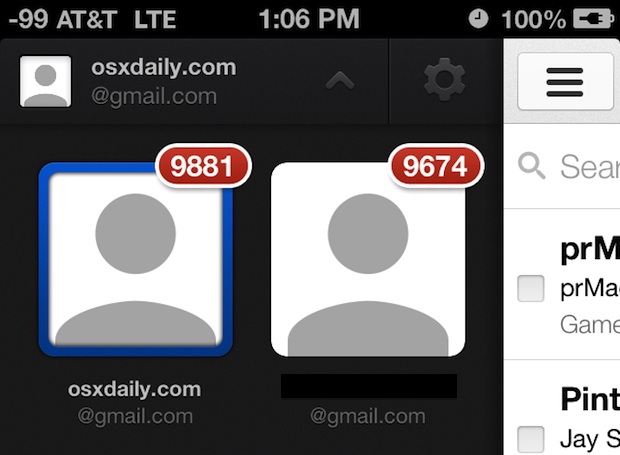
That’s how easy it is to add multiple accounts, once you are finished you will find that switching between different mail accounts is equally as simple. Just swipe over to the mailbox screen, tap the down arrow again, and tap on the alternate account you want to flip over to:

You can even set up notifications and alerts on an individual account basis by tapping the Gear icon and choosing whether to see Notifications for “All New Mail” or “None”. Choosing “None” is very helpful if you setup a separate junk mail catch-all account and don’t want to be alerted every time some new piece of rubbish mail piles into the inbox.
There is likely a limitation on the total number of accounts to hold in the Gmail app, I added four without incident for this walkthrough. If you decide you no longer want a specific address associated with the Gmail app, removing a GMail account is also very simple, done by selecting that specific account and then choosing “Sign Out”.
Yes, you can also add multiple accounts to the iOS default Mail app, but we generally recommend using the default Mail app for an account that is most relevant to the devices primary usage. For example, if your iPhone is your personal phone, set up your personal email address on the default iOS Mail app, and then use the Gmail app for handling additional accounts. Similarly, Gmail for iOS provides an excellent way to have access to separate personal email accounts on a primarily work-related iOS device, helping to avoid any unintentional crossover between work and personal mail when doing things like sharing photos, documents, web pages, or whatever else from an iPhone or iPad.


I want free my phone
Cool story Ahad, do you want to use multiple gmail accounts in the GMail app too? For me, I want a pony with my Gmail! Deep!