How to Enable Expanded Save Dialog as Default in Mac OS X
 There has never been a time when I am saving a document in Mac OS X that I don’t click the expand arrow to see the full save dialog screen. That little button is situated alongside the file name input, and when you click on it, you have access to the expanded dialog that allows users to navigate the folder hierarchy on their Mac to save files to exactly where they are wanted, rather than in the default location for that specific app.
If you don’t want to manually hit that expand button all the time, you can use the defaults command to set that expanded save dialog window to be the new default setting. Yes, you won’t have to click that expand arrow anymore after this is run – the directory structure will already be open and there for you to navigate! Follow the easy instructions below to try it out yourself.
How to Enable Expanded Save Dialog as Default in Mac OS X
You will need to use the command line for this, so open up the Terminal (found in the /Applications/Utilities/ folder), and type or copy/paste the following commands to get the effect desired:
Enable expanded save dialog with defaults
defaults write -g NSNavPanelExpandedStateForSaveMode -bool TRUE
Hit return, then relaunch the app(s) where you wish for the change to take effect. If you want the setting to be universal, quit all apps or just reboot the Mac.
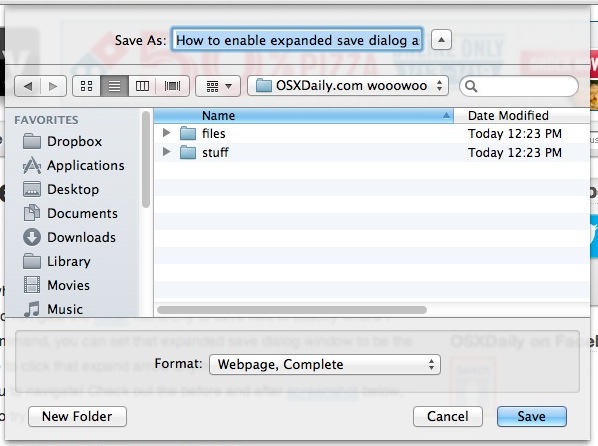
Here is what the expanded save dialog box in OS X looks like:

If you decide you don’t want that dialog box to be open all the time, here’s how to change it back to the simpler, shorter version (note that you can also do this dialog box at a time by clicking the arrow button, thereby reversing the default behavior).
Disable expanded save dialog – revert back to Mac OS X default
defaults write -g NSNavPanelExpandedStateForSaveMode -bool FALSE
![]()
Again hit return, then quit everything that is open for it to carry out to those apps.
You’ll now be back to the original setting of the shorter/smaller open and save dialog windows, meaning you’ll need to click on the little arrow to expand or shrink the windows again.

Thank you so much, this had been driving me nuts!
Terminal is an application located in the Utilities folder which is in the Applications folder.
What’s the Terminal??
Keeping content on your site “forever” is so useful. It has been over two years since this was posted and I just found it today. I am fairly new to MACs and the Save/Save As dialogs drove me crazy. I wanted to be able to drill down to where I wanted to save a file, not let some silly OS decide where I had recently been or something.
thanks!
I’m running the latest update to OS 10.4 and still don’t get the expanded “Save As” dialog box after running the script above. Is there something else I should try doing? This is really starting to bug me!
nice tip
AWESOME thank you so much