Wi-Fi Scanner Tool is Native in Mac OS X, Here’s How to Use it
 The native and already powerful Wi-Fi Diagnostics Tool in Mac OS X got a redesign in modern versions of Mac OS X, and with it came some new features that make the utility better than ever. One of the best new additions is the built-in Wi-Fi scanner tool, which is a full-featured wifi stumbler to find and discover nearby Wi-Fi networks – even those that don’t broadcast their network names.
This is really an advanced feature that has a wide variety of potential uses beyond just locating access points, most users would be best off just using the Wi-Fi menu to find available wireless networks to join. For those that want a wireless stumbler, here’s how to find and use it.
Accessing Wireless Diagnostics in Mac OS X
In modern versions of Mac OS X like OS X Yosemite, OS X Mavericks, you can get to Wireless Diagnostics from the Wi-Fi menubar item:
- Option+Click on the Wi-Fi menu item in OS X
- Choose “Open Wireless Diagnostics”
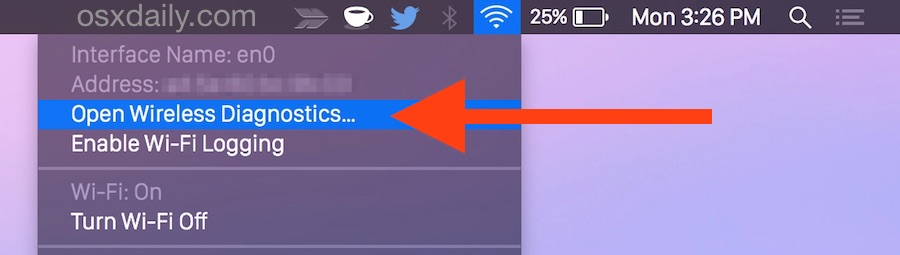
This is somewhat hidden, but still much easier than accessing it in prior releases of OS X where the app was basically hidden.
Scanning for Wi-Fi Networks with the Mac Wireless Diagnostics Tool
Now that you’re in Wireless Diagnostics, here’s how to use the Scanner:
- Go to the “Window” menu and choose “Scan” to immediately open the Wi-Fi Stumbler tool built into Mac OS X
- Within the Scanner tool, click on the Scan button to scan for available networks
This will open the wireless card to detect all possible nearby wifi networks, effectively stumbling onto available wireless routers and discovering details about those networks.
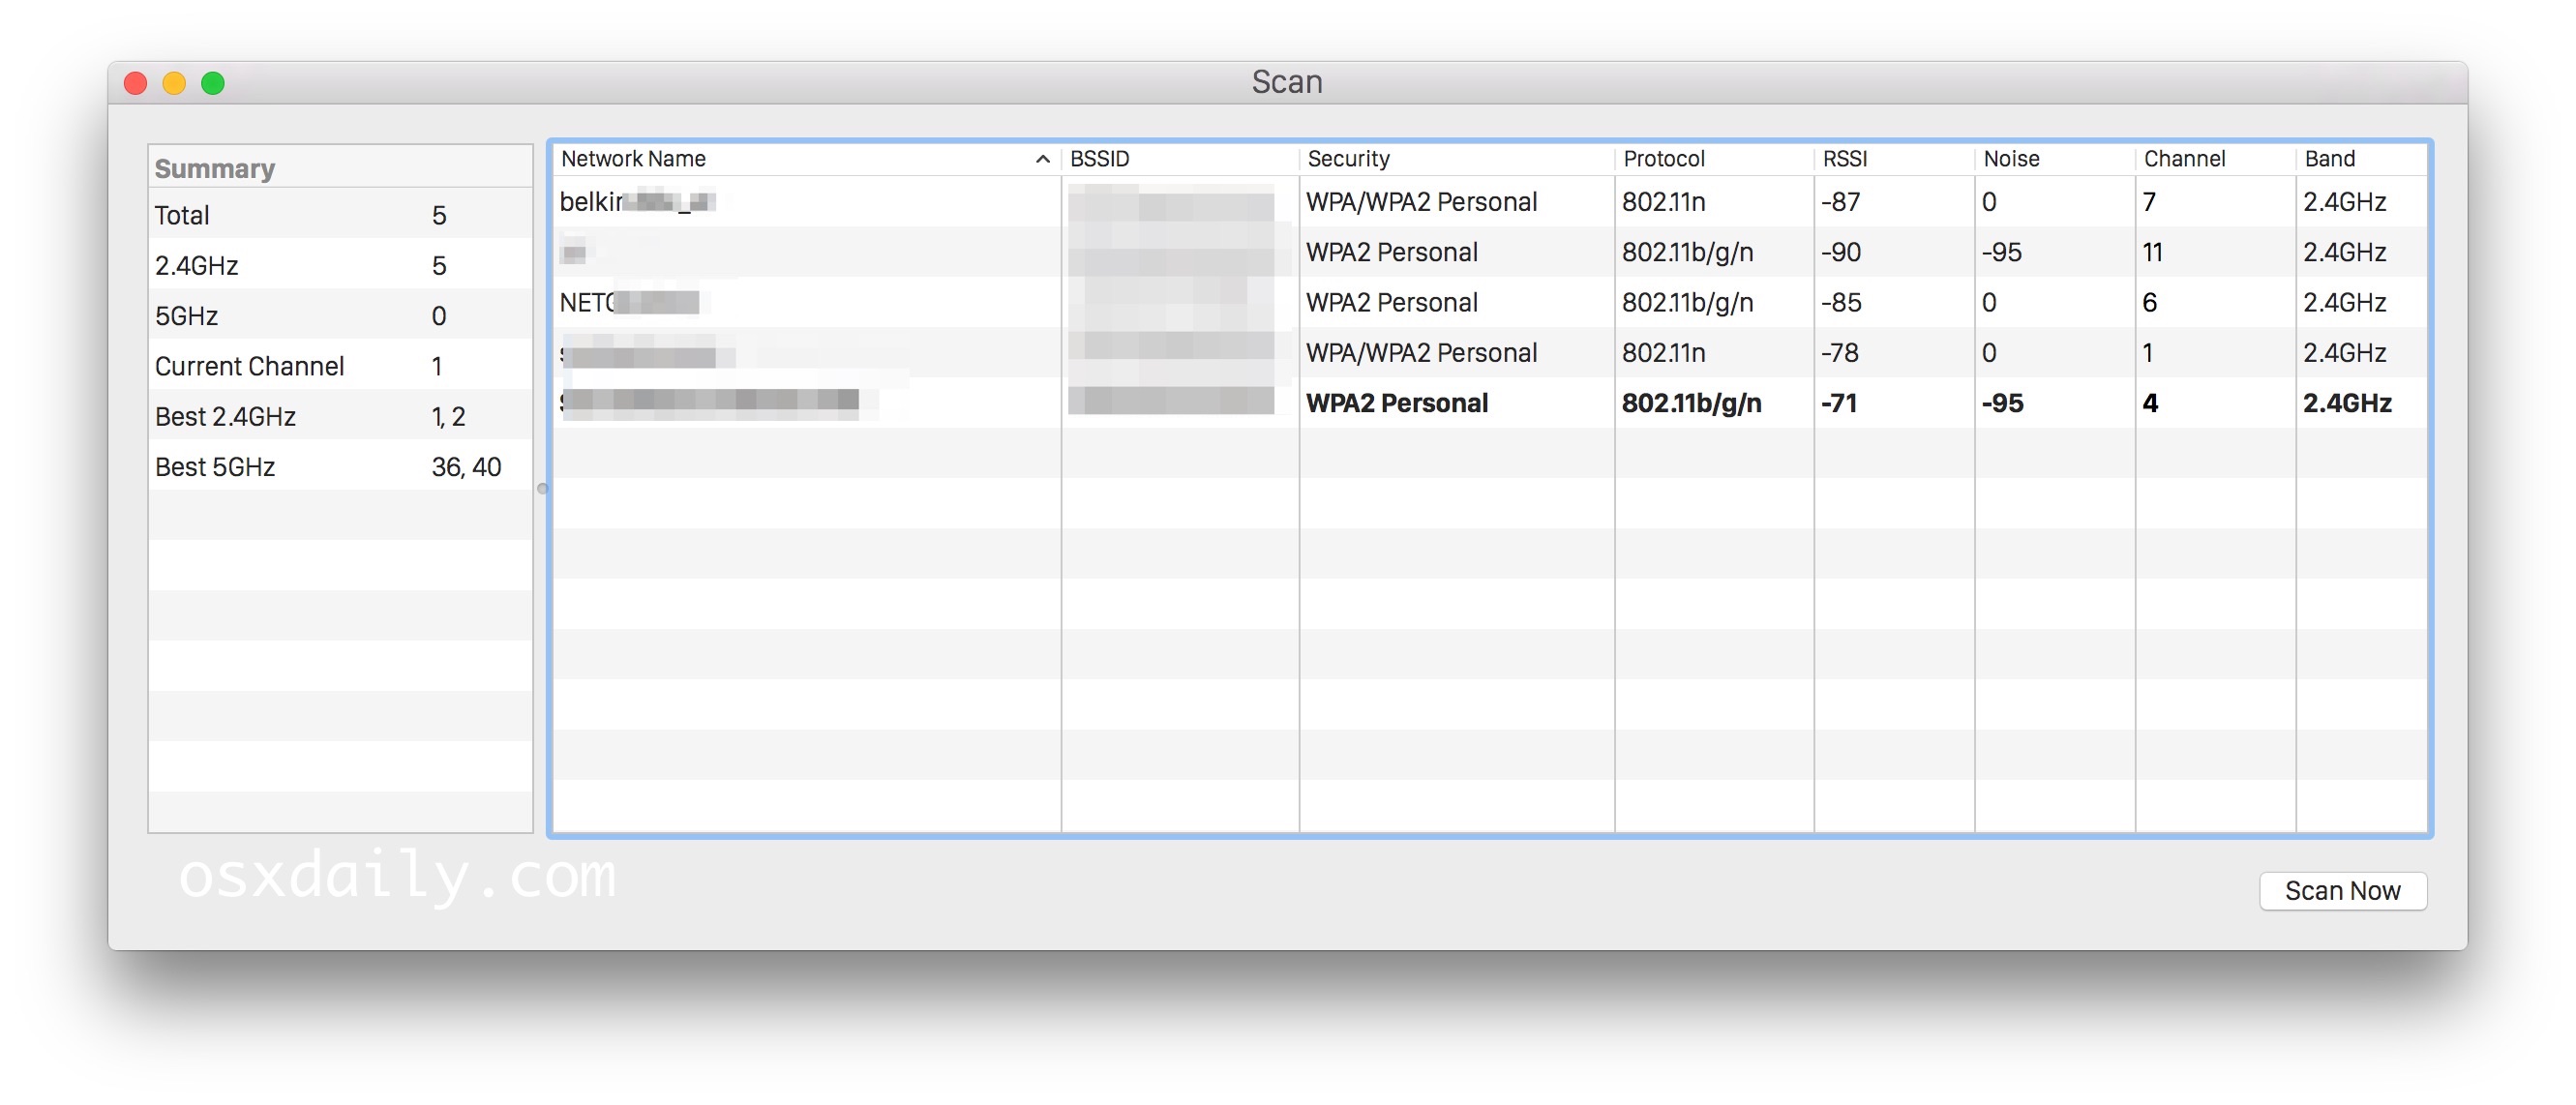
All available wireless network names, SSID, channels, band, network protocol (wireless n, g, b, etc), the network security type, the network signal strength, and the network noise level of the signal discovered will be listed by the scan utility.
This is obviously much easier in modern versions of Mac system software, but don’t worry if you’re not on OS X Yosemite, you can still access and use these tools with the directions below.
Making Wi-Fi Diagnostics Easier to Access in OS X
For other versions of OS X, like OS X Mountain Lion, you’ll want to make the Wi-Fi Diagnostics app readily available by bringing it to LaunchPad or the Dock, to do that:
- From any Finder window, hit Command+Shift+G and enter the path: /System/Library/CoreServices/
- Locate “Wi-Fi Diagnostics” (or “Wireless Diagnostics”, depending on OS X version) and drag and drop it into Launchpad or the OS X Dock for easy access
Now that you have the Wifi app in an easy to find location, using it is slightly different depending on your OS X version. Newer builds of Mountain Lion (10.8) changed it slightly, and those changes are reflected in OS X Mavericks (10.9) as well. Outside of accessing the tool, all functionality remains the same.
If the app is called “Wi-Fi Diagnostics”, here is what you need to do:
- Launch Wi-Fi Diagnostics and ignore the frontmost menu, instead hit Command+N to summon the new “Network Utilities” window (this is also where the wireless signal strength measurement tool is located now)
- Click the “Wi-Fi Scan” tab to get started with the wireless stumbler tool
If the app is called “Wireless Diagnostics”, to access the scanning utility is slightly different:
- Open Wireless Diagnostics and ignore the menu, instead pull down the “Window” menu and select “Utilities”
- Select “Wi-Fi Scan” tab to summon the scanner and stumbler wireless networking tool
Under the Wi-Fi Scan tool, you will see all available network names and their respective BSSID, channel, band, protocol (wireless n, g, b, etc), security type, their signal strength, and the noise level of the signal.

The tool defaults to scanning once and displaying the found information, but you can turn on Active Scan or Passive Scan mode to constantly search for new networks by clicking on the “Scan” pulldown menu in the lower right corner.
There are plenty of potential uses for this utility and the wireless stumbler, whether it’s optimizing networks, reducing interference and noise, or discovering those around you, but the wifi diagnostics app also includes many powerful features that allow you to capture network traffic, be it data that is sent from the computer in use or even all nearby wireless networks. Ultimately those latter functions and their uses are far beyond the scope of this article, but previously Mac users had to use third party apps like Kismet or boot from a separate Linux installation to access advanced network capturing abilities.

Sniffer is not getting started in my mac. When i click on “Start” button, it asks for admin credentials and It does not get started even after authenticating.
very nice thank youu!!!
very nice tip thanks
Has the full wifi diagnostics app been removed or refined in the later versions of OSX?
I’m on 10.12.2 and I can’t get to wifi diagnostic by holding option, no extra menu items appear. I can load wifi diagnostics via loading the app directly, or through networking / assist me, however there isn’t an option to load the wifi scanner or any other features.
~ Cheers. :)
Yes Wi-Fi diagnostics and scanner is in all versions of Mac OS including Sierra and 10.13.
Have you had a look at the 2.0 version of our WiFiRadar Pro?
Have a look at: http://wifiradarpro.com
The first release was some 3-4 years ago, but now we’re coming with a brand new fresh one, written from scratch, with an ultra easy-to-use GUI, advanced capabilities AND an elegant status bar icon replacement (to get rid of the… ugly default OSX icon) with lots of useful information as well.
Looking forward to ideas/feedback/anything!
I can not wifi scanning and not found Ip adress .how it is possible
alt+click wifi icon -> open wireless diagnostics -> in menu goto Window -> utilities
There you have wi-fi scan tab where you see all visible wifi networks and their signal strength. the closer RSSI to 0 the more powerful the signal is.
Thanks this worked for me
cannot access the app in yosemite either in the folder or with the option dropdown
Mike: Hold down your option key and click on the wifi icon in your menubar. In the resulting menu, choose “Open Wireless Diagnostics…”. When the app opens up, ignore the dialog and look at the options under the Window menu.
Ian, thank you for being really clear, this worked!
Just like lucky said. I Also got my wireless adapter stuck in monitoring mode and have no fucking clue how to get it back to normal… Someone please help me!?!?! I have business to handle and I can’t send the files from my phone!!!!
In Mavericks the app locations is:
/System/Library/CoreServices/Applications
OR, you can go get a REAL STUMBLER for your WiFi environment at http://istumbler.net…….
MUCH better Data.. MUCH better tracking… MUCH better granularization… MUCH better app – PERIOD.
I prefer the rev. 99 versus rev. 100.. It has an added category in the left hand column called ‘Spectrum’… It breaks down WHERE the signals are with respect the channels and frequencies versus the ones allocated by the various international licensing bodies for global WiFi propagation… Handy…
doesn’t really tell you how to use it like the title suggests, just how to find it…
Another tip bites the dust – great tip man and i didnt need to download any tools :)
Hi, I’m a mac newbie and I got a question to ask.
I’m staying in a house full of students that share 1 internet line. Can the new wifi-diagnostic tool in Mountain Lion OS helps me to monitor the traffic flow? As in to detect is there any P2P activities going on so that we are able to find out which inconsiderate bas**** is making the line lag.
And how do I view the “Captured Traffic” report? Please reply, thank you. :)
Download wireshark and X11. Be sure you set it to open with wireshark or else it will open with text edit
@Mike and @aidan
I’ve known about the option “secret” menu items for some time now. There has never been a “Open Wi-Fi Diagnostics” item there, as aidan says. And also same as aidan, when I hit command + N, some notes thing comes up, and command + t brings up fonts.
I have Lion, not Mountain Lion, everything up to date, and a mid 2009 macbook pro 17 inch, so it’s strange that his retina mbp is doing the same thing.
I played with this utility and I got my Wi-Fi card stuck in monitoring mode. How can I turn this off?
Reboot if all else fails
Follow Scott’s instruction: While holding OPTION, click the Wi-Fi icon in the menu bar and select “Open Wi-Fi Diagnostics”, then press COMMAND+N to get to the Network Utilities.
well i followed the instruction opened wi-fi diagnostics when i use command+N i get notes and when i use command+T i get fonts lol i guess this new retina display mac book pro is coded differently
Very nice utility. I previously used iStumbler for this. What I have noticed is that iStumbler is displaying the names of the closed/hidden WiFi networks and the ML WiFi utility is not.
Thanks, this is awesome !
Reminds me of Kismac
Mine was Command + T to bring up Network Tools View…Nice tip Scott
No App available on my OS X
I guess the WiFi menubar applet uses the same framework to find networks as the Network Utilities app.
Shouldn’t it be possible to hack that applet, so that it displays the hidden networks?
Easier way…
While holding OPTION, click the Wi-Fi icon in the menu bar and select “Open Wi-Fi Diagnostics…” from the bottom of the drop-down menu :)
Whoa! Thanks, Scott :)
VERY interesting that you can find hidden networks and capture network traffic with this.
I also find it interesting that Apple is hiding all the powerful tools in the CoreServices folder rather than Utilities these days, anything to make of that or just Apple hiding clutter from novices?