Convert Any Audio or Video File to an iPhone Ringtone Easily with QuickTime

Want to concert an audio file to an iPhone ringtone? That’s easy to do on the Mac, thanks to QuickTime. Yes the video player! This also allows you to concert audio tracks of video files to ringtones too.
Sure, most people use QuickTime Player as a way to watch movies, but using it’s Export function you can also turn any audio or video file into an iPhone ringtone very quickly.
How to Convert Audio to iPhone Ringtones with QuickTime Player on Mac
Here is how to convert just about any audio file into an m4r ringtone file, which can then be used on iPhone.
- Launch QuickTime Player and use it to open the desired audio or video file that you want to turn into a ringtone
- With the audio or movie file is in QuickTime, hit Command+T or pull down the “Edit” menu to activate the Trim function and trim the clip to 30 seconds or less, use the sliders to select the portion of audio to use as the ringtone, then hit the yellow “Trim” button when done
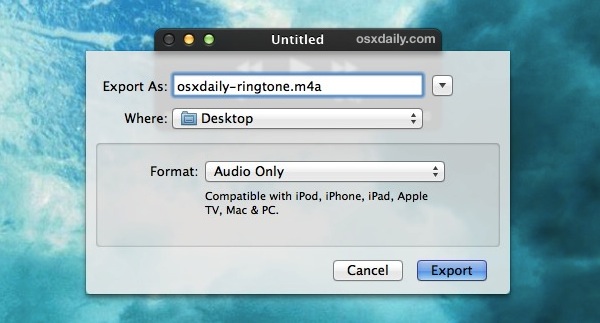
- Now pull down the “File” menu and choose “Export”, selecting “Audio Only” as the Format type, and set the Desktop as the save location, then click “Export”
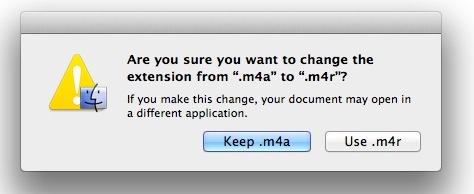
- Next, go to the desktop to find your ringtone, and rename the .m4a file extension to .m4r, confirm the change
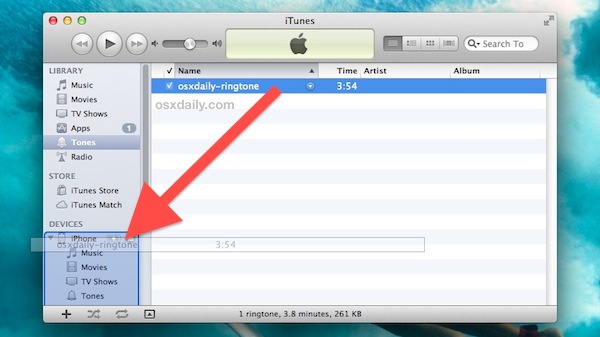
- Double-click yourfile.m4r to open it in iTunes, where you’ll find it under the “Library” section within “Tones”
- Connect the iPhone to the computer via USB and drag & drop the ringtone from the Tones folder to the iPhone


That’s all there is to it, pretty simple and should take you just a minute or two to complete.
One hiccup I ran into with some audio sources is the audio length metadata remains in exported m4r despite creating a new file. This then causes iTunes to complain the ringtone is too long and can’t be transferred to the iPhone, but it ends up copying over anyway. Just ignore the error if you see it and you should find the ringtone on the iPhone anyway.
Also, if you recorded a video with your iPhone or iPad that you want to use the audio track as a ringtone, you can get a head start by using the same trim function in iOS before sending it to your computer to finish the conversion to a ringtone.
You can also still use iTunes to create free ringtones out of any song in your music library, a method that has been around forever, but the QuickTime approach is often faster and works with a wider variety of file formats, reading and converting both audio and video files to the desired m4a filetype. You can also create your own ringtone files with GarageBand, both on iPhone, iPad, and Mac.
Were you able to convert your audio file into a ringtone using this method with QuickTime? Did you find another solution? Share with us in the comments whatever your experience is!


I converted the file to m4r but it is not in my Itunes. Can’t find it there and can’t seem to drop it in there. Why not?
when I “Double-click yourfile.m4r to open it in iTunes, where you’ll find it under the “Library” section within “Tones”” nothing happens. Itunes doesn’t open it and it doesn’t put it under Tones.
As for me, I think iTunes is a little complicated to turn my MP4 files to M4R. Because many windows will pop up for my confirmation, which may make me feel confused. So I prefer use video converter to convert my audio/video to iPhone’s ringtone format.
Or on Android you just pick any song and tap Set As Ringtone. Done. Why does Apple make it so difficult?
BRILLIANT!!! This was well written and solved my problem with amazing ease. THANK YOU!!!
Doesn’t work in Quicktime ver. 10.1 either. There’s no “trim” button.
This does not work in the latest QuickTime player version 7.7.2. Are there any other options?
“but using it’s Export function”
Paul, it’s = it is. You just typed “but using it is Export function”.
Cool, did it in Mountain Lion with a short video clip in like under a minute. Piece of cake thanks for the great tip.
Do it even quicker with Lion encoding tools!
Right-click file -> Encode Selected Audio -> Rename to m4r and import to iTunes
It still needs to be trimmed to 30 seconds, so either way you’ll have to go through as many steps to make the ringtone.