Automatically Stream Photos from iPhone to a Mac Screen Saver with Photo Stream
The latest versions of iPhoto (11+) and OS X (Mountain Lion+) support Photo Stream screen savers, this means you can have your Mac display a screen saver show that automatically updates the stream of photos based on pictures that are taken on the go with an iPhone, without ever having to manually copy pictures over to the computer or set them into folders like the old fashioned way..

You probably already guessed as much, but OS X Photo Stream screen savers rely on iCloud. If you somehow have gotten this far in iOS and Mac ownership without a free iCloud account, please take the time to set one up and enjoy the many benefits, including this snazzy screen saver. With iCloud taken care of, you can follow the simple three step process to get the automatically updating screen savers working.
Step 1: Enable Photo Stream in iOS
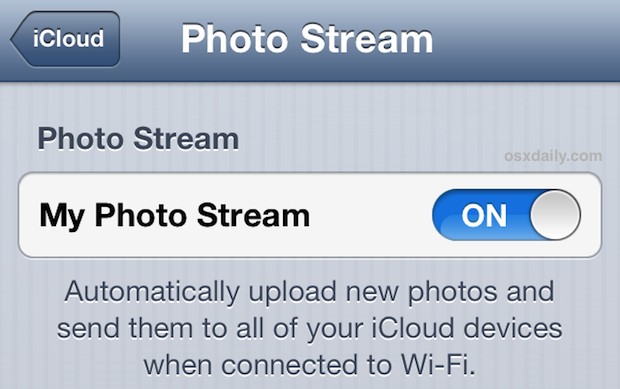
To use the auto-updating Photo Stream screen savers in Mac OS X, you’ll first need to enable Photo Stream in iOS. Here’s how to do that in iOS, we’ll focus on an iPhone because most people use those to take pictures:
- Go to Settings, then “iCloud” and scroll down to “Photo Stream”
- Flip “My Photo Stream” to ON

You can also use individual shared streams if they have been shared and gathered by iPhoto.
Step 2: Enable Photo Stream in iPhoto for OS X
Speaking of iPhoto, that’s the next place you’ll want to look, because you need to enable Photo Stream in iPhoto as well. This allows the iOS device (iPhone in this example) to stream it’s images automatically to the Mac, with iPhoto being the receiver. From the Mac:
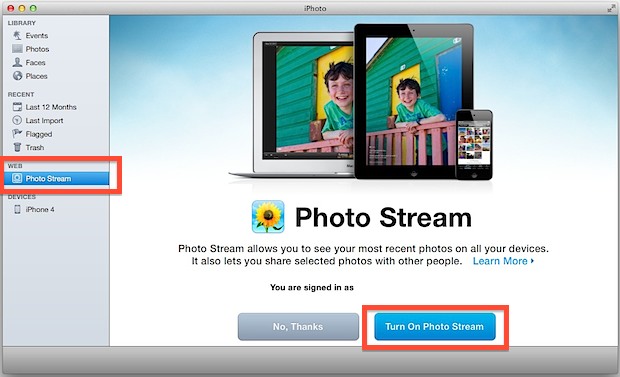
- Launch iPhoto and click “Photo Stream” from the left menu
- Click the big blue “Turn on Photo Stream” button to let iPhoto start importing the pictures from your iOS device to the Mac via iCloud

Remember you will need iPhoto 11 or later to have this feature at all, and iCloud set up must be for the same account as the iPhone (or iPad or iPod touch).
iPhoto will gather all pictures taken on the iPhone (or other iOS device) until this has been turned off, or until a new Photo Stream has been created. If you don’t want to use iPhoto for this purpose or for general photo management, you can also use the Photo Stream Finder access hack and then either hard link that directory to another, or copy the pictures into a folder yourself for the folder-based screen saver method, but that’s much more work than is necessary when iPhoto & Photo Stream do it so seamlessly with little effort.
Step 3: Choose the Photo Stream to Use as the Screen Saver in OS X
Now that iPhoto is going to automatically accept your photo streams from the iOS device, you can choose the individual photo streams as an option in the Screen Saver control panel:
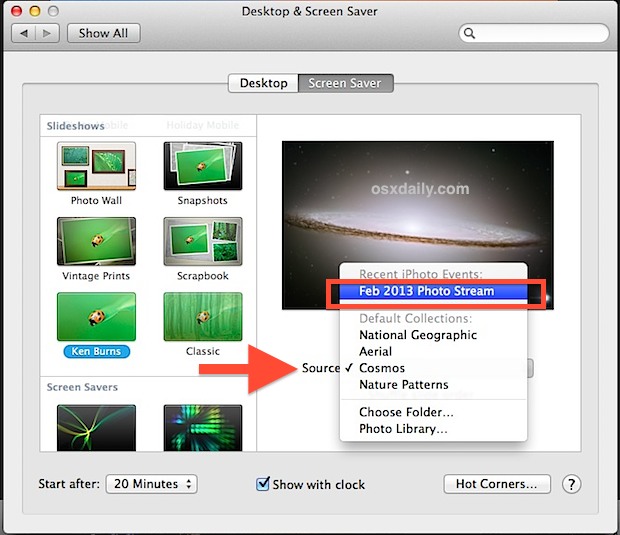
- Open System Preferences from the Apple menu
- Choose “Desktop & Screen Saver” and click the Screen Saver tab
- Select any slideshow style (Ken Burns is great) from the screen saver type, then click the “Source” button
- Under “Recent iPhoto Events” choose the photo stream you want to use as the screen saver

Enjoy your new Photo Stream screen saver!
Wait! If you recall a prior tip, you can use the forward and back arrow keys of your keyboard to navigate photo screen savers, making the screen saver into a slide show as well.
This works very well. For a quick example, I took this picture of the sky with an iPhone and it took about 30 seconds to appear on my Mac screen saver:

(Click the “Show with Clock” checkbox in Screen Saver preferences if you want to have the time on yours as well)
This feature is also available on the Apple TV if you feel like decorating your living room a bit too.
One final important note: because pictures are automatically streamed in from the active iOS device, be careful what photos you take and save into the shared stream. A carefree moment or two with a camera could easily wind up with a potentially embarrassing situation when an ‘unexpected’ image turns up on your Mac screen saver! For that reason you may want to limit this to specific shared Photo Streams, or just keep this feature on home computers and avoid it on work or public-facing Macs.


I don’t know yet but I will let you know when I have had time to try it out
I think it no longer works now as a stream :(
Also works with Aperture.