8 of the Best Tricks for Mail App in Mac OS X
 Use Mail app in Mac OS X to handle your email? Then this collection of some of the best tips you’ll find for Mail app in OS X is for you. We’ll cover some of the greatest tricks out there, including how to get new mail faster, see more messages at once, send attachments faster, trashing spam automatically, using VIP, previewing websites without opening them, speeding up mail app, and even a great trick to remotely sleep a Mac with an email sent from your iPhone.
Let’s get started and make the Mac Mail app even better!
1: Get New Mail Faster by Changing Check Frequency
The default setting is checking for new email every 5 minutes, but you can set it to be faster:
- Pull down the Mail menu and choose “Preferences”, then click the “General” tab
- Select a new frequency under “Check for new messages” – the fastest setting is Every 1 Minute
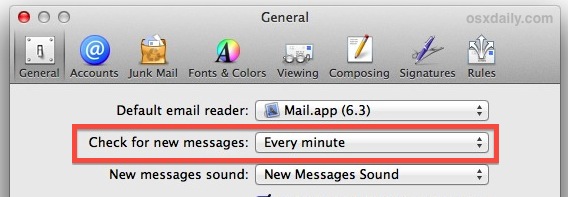
Checking for new email every minute is pretty aggressive and if you’re working with or relying on time-sensitive messages it can make a big difference.
If you’re wanting to get emails faster while on the go, you can do the same on iPhone as well.
2: See More Mail Messages with Classic Layout
The Classic Mail layout allows you to see many more emails on screen without scrolling, and it also defaults to hiding any preview of the mail content, instead just providing a large list of senders, subject, and times:
- From Mail Preferences, go to the “Viewing” tab
- Check the box next to “Use classic layout”
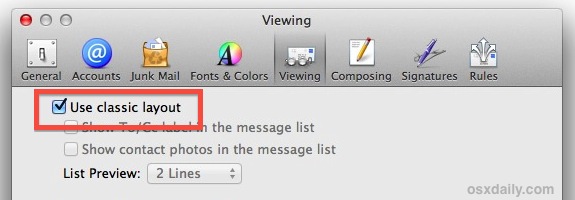
You’ll instantly see the difference by toggling this setting. This change became the new default with 10.7 and wasn’t particularly popular with many who
3: Automatically Trash Old Junk/Spam Mail
The Mac Mail app defaults to holding onto all email that is deemed as “junk”, it will never delete itself. While that certainly errs on the safer side, particularly considering there are sometimes false-positives for spam and junk mail, if you get a lot of junk mail then you’ll discover that folder can become huge. A good alternative is to set the Junk folder to automatically trash itself after its contents are a month old. This gives you plenty of time to check through the folder for anything inappropriately flagged, while helping to keep the Mail app tidy.
- From Mail Preferences, choose the “Accounts” tab
- Select the Mail account to modify from the left side, then click the “Mailbox Behaviors” tab
- Under “Junk” pull down the menu next to “Delete junk messages when:” and set this to “One month old”
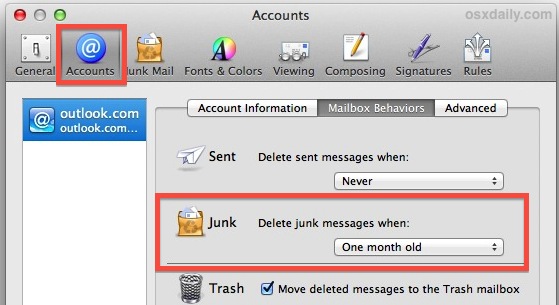
You can set automatic trashing of junk and spam to a faster setting, but a month provides a good amount of leniency, and if you’ve ever accidentally deleted a very important email then you’ll probably appreciate the less aggressive option.
4: Use VIP to Sort Important Mail
VIP provides a much better way to manage email onslaught because it helps you flag mail sent from particular people or addresses to stand out. To mark someone as a VIP is easy:
- Open any mail from the sender to mark as VIP, hover over their name, then click the Star icon that appears next to it

You can even take this further and setup VIP notifications along with the lists, which makes it so Mail will only bother you if messages have come in from those on the VIP list.
To remove someone from the VIP section, just click that star again and the sender will become normal again. Toggling VIP on and off for particular people for specific conversations is also a good strategy.
5: Preview Websites from Emails with Quick Look
Not sure about the website URL someone sent you? Rather than launch it into the web browser, you can preview the URL using Quick Look directly from the email message:
- Hover over the URL in any mail message, then click the little downward pointing arrow to load the webpage into Preview
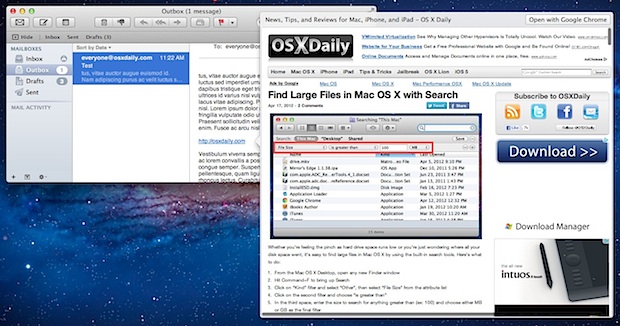
Using this URL preview feature keeps the website from appearing in any sort of standard web browsing history or caches, and can be really useful if you’re unsure whether a particular message is SFW or NSFW.
6: Send New eMails with Attachments Faster
Want to send a file or group of files as an attachment in a new email? Just drag & drop it into the Mail icon to instantly create a new mail message with the file(s) as attachments. It’s that easy, and there’s nothing more to it.
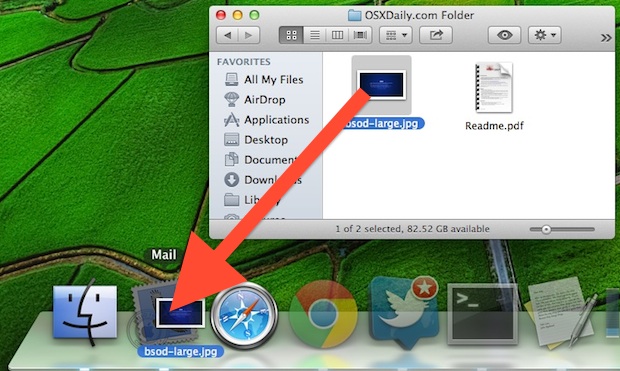
If dragging and dropping isn’t for you, you can also set up a keystroke to do the same thing and instantly create a new message with whatever items have been selected.
7: Send an Email to Remotely Put a Mac to Sleep
Ever forgotten to sleep your Mac before you left home or took off from the office? It has happened to all of us, but take a few minutes to set up this awesome trick and you’ll never be worried about it again. How does it work? You set up an email rule in Mail app for OS X to monitor for a very specific phrase from your own email address, when it has been recognized it will launch a simple AppleScript that sleeps the Mac and locks it down, allowing you to instantly sleep the computer from anywhere just by sending it an email from your address (say, from the iPhone or another Mac) containing the magic phrase. It’s technical but easier to configure than you may think:
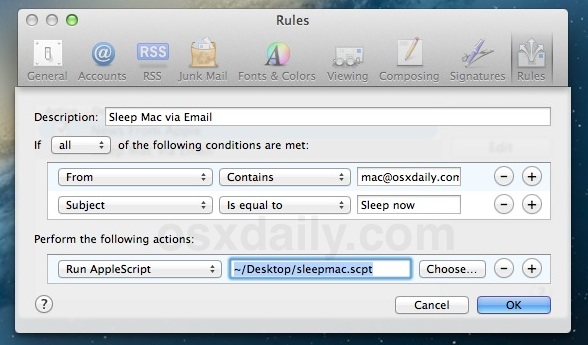
This is obviously a bit beyond your standard email tricks handled entirely through Mail app, but it’s so useful that it needs to be included in this list.
8: Speed Up Mail by Turning Off Image Previews
![]() Do you find Mail running sluggish, especially opening emails with many attachments? You can speed it up dramatically by disabling image attachment previews, which prevents Mail from loading any attachments into the email message. Instead you’ll have an option to individually load each image on your own, and this can really speed up email viewing for older Macs.
Do you find Mail running sluggish, especially opening emails with many attachments? You can speed it up dramatically by disabling image attachment previews, which prevents Mail from loading any attachments into the email message. Instead you’ll have an option to individually load each image on your own, and this can really speed up email viewing for older Macs.
This is slightly more advanced and requires the usage of a defaults write command. Enter the following into Terminal, then reload Mail app for changes to take effect:
defaults write com.apple.mail DisableInlineAttachmentViewing -bool true
To go back to the default setting of automatic image loading, simply switch the -bool flag to ‘false’.

