How to Verify (& Repair) a Disk from the Command Line of Mac OS X
 The Disk Utility app bundled with Mac OS X has a command line equivalent which offers advanced users the ability to perform disk maintenance from the terminal, including disk verification and repairs. This allows for a variety of helpful troubleshooting abilities, including the possibility to remotely issue disk repairs though SSH, or through Single User Mode if the user accounts are inaccessible.
This guide is intended for advanced users who are comfortable with the Terminal and command line. Most Mac most users are better off sticking to the graphical side of things and repairing drives directly with with Disk Utility or through recovery mode.
Verifying a Disk from the Command Line in OS X
Verifying the volume determines if the drive needs to be repaired and can be done with the following general syntax:
diskutil verifyVolume [drive identifier]
For example, to verify the default drive of a Mac you could use:
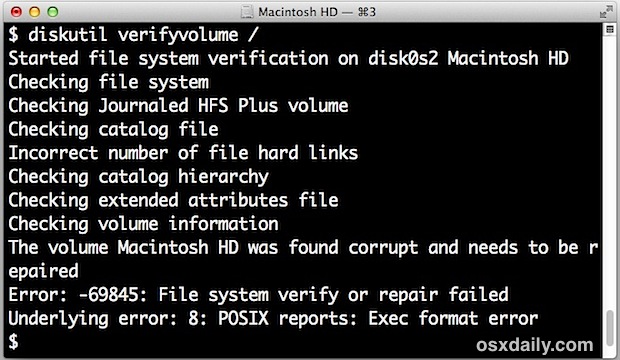
diskutil verifyvolume /
Other mounted drives can be specified as well if you know their name:
diskutil verifyvolume /Volumes/ExternalBackups/
Note: the drive must fall with the users privileges (or use sudo), and the volume must be actively mounted (here’s how to do that from the command line).
Just like running Disk Utility from the GUI, the command line may take a while. If no errors are reported, repairing the volume is unnecessary. If you see a message like the following:
“The volume Macintosh HD was found corrupt and needs to be repaired”
You will want to fix that by issuing the repair disk command next.

The following Repair Volume trick is simply the command line approach to the same ability contained within the Disk Utility GUI app. As mentioned before, this is best reserved for advanced users.
Run Repair Disk from the Command Line to Resolve the Identified Drive Problem
Once you have determined the drive needs repair, you can do so by using the diskutil command again:
diskutil repairvolume /
Again, this can be directed at other volumes by specifying their name or mount point like so:
diskutil repairvolume /Volumes/ExternalBackups/
Regardless of the disk being run on, let the process complete entirely before doing anything else. Repair Disk is usually successful at resolving issues detected by the Verify Disk command.
Repair Disk does not repair permissions on the disk, though that can be done with a separate diskutil string while you’re already at the command line.
If repair disk fails, don’t freak out yet, because you may be able to repair the volume with the fsck command using this procedure, which is a bit more complex, but often works for situations when standard Disk Utility fails or is otherwise unavailable.
If you continue to have problems, the drive itself may be failing physically, which indicates it’s a good idea to get as much off the disk while possible, back up everything, and get a replacement drive.


diskutil repairvolume /dev/disk2s1
and
diskutil repairvolume /dev/disk2s2
solved my issue, thank you!
After reading all. of the above I. was able to use Uros’ input to correctly use the command line for diskutil repair.
Thank you Uros,
George Holmes
A trick would be this command line : diskutil mount readOnly
This will allow to read the disk, unmount it normally and then mount it again.
Good luck
How to plan with a script? Can be interesting a recursive permission repair that does everything itself (night time, maybe?)
i have a media server on my Mac Mini in another city and I must connect with VNC everytime I need to repair permissions. This can be my solution!
Cannot Repair Volume in Live…
Or tell us how ?
hi adams
You can’t repair the volume you’ve booted from. You must boot from a volume on an external drive or from the install DVD, and then use ~/Applications/Utilities/Disk Utilities or diskutil from the Command Line.
Fred
Sorry : /Applications/Utilities/Disk Utility (no ~).
I’ve never done this through SSH, but I will keep this in my bag of tricks for later :)