Print Files Directly from Mac Desktop & OS X Finder to Save Time
 Did you know you can start printing any file directly from the desktop of a Mac? While most users open a file and then print it from the application of which the file was built in, that’s not actually necessary, instead printing can be initiated from anywhere in the Finder of OS X. This often overlooked feature is incredibly convenient and it really speeds up the process of printing a document or picture, as it prevents having to open any apps. Instead, you just locate the document in the file system and start printing directly from there.
You’ll obviously need a printer set up with the Mac to do this, though it can either be a local network printer, USB connected, or any wireless AirPrint printer, and yes this does work with printing to PDF as well.
Fast: Printing Files Right from the Mac Desktop & File System
This trick works with a file either residing on the literal desktop or anywhere in the file system of OS X:
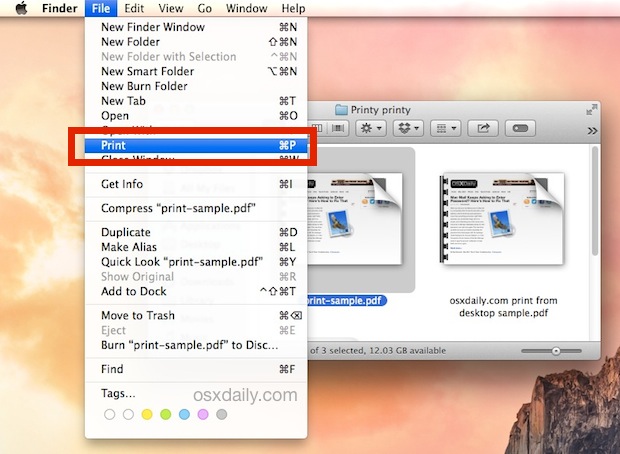
- From the Mac OS X Desktop or any Finder window, locate the file(s) or image you want to print and click on it so that it’s selected
- Pull down the “File” menu from the Finder and choose “Print”
- Set your printing options and preferences as usual and choose ‘print’ to start printing the file
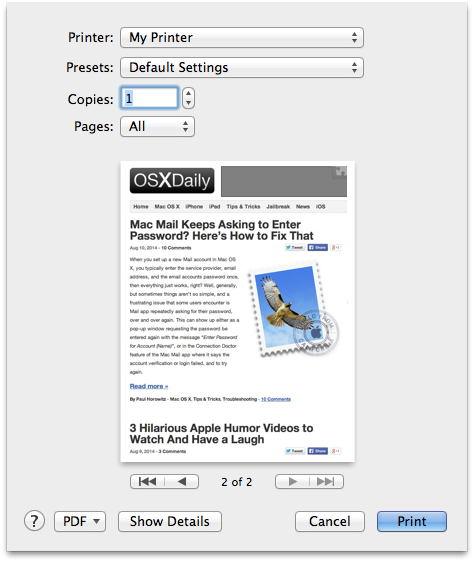
Using this Print menu item with a file selected will bring up the standard printer interface for OS X:

Then you just need to set the printer (if multiple are available), and the details of the print job, click on “Print” and away you go. If you already have all that configured, you can expedite the process by just hitting the Return key the moment the printer preview pops up:

Your file(s) or picture(s) will immediately print, without ever having to open the application they are associated with. Is that quick or what?
Faster: Starting Print From Desktop with an OS X Keyboard Shortcut
Perhaps even faster for many users who like keyboard shortcuts, you can also initiate the quick desktop printing with a super simple keystroke – in fact it’s the same keystroke that works to start a print job inside an application:
- Select the file(s) you want to print from the Finder
- Hit Command+P to bring up the printer preview and utilities, then hit the Return key to start printing the file(s)

Printing from the desktop and file system of OS X has been around for quite some time, but like many of the longstanding features, many Mac users don’t know about these great little tricks that can really boost productivity by eliminating unnecessary steps.
And for the geekier users and sysadmins out there, yes these these desktop initiated print jobs are stored within normal print history, and is also visible from the web-based CUPS browser.


Just open the printer and drag your files in. Works perfect when you want to print full documents.
PDF printing from Finder works fine. I’d use it printing multiple pdf-s. The only problem that I can’t print two-sided pdf-s whatever I do. I even changed the default options in the CUPS to two-sided.
So, I’d like to print multiple PDFs from finder menu whithout opening the dialog box for each PDF. but with double-sided printing.
Any idea?
Many thanks
I got this to work for PDFs by setting Preview as the default ‘Open with’ application.
To do this, select a PDF file in Finder, press Command-I and change the ‘Open with’ application for all PDFs.
I guess you could do the same for other file types.
Dear OSXdaily and readers,
I’m using this shortcut very often (command + P within the Finder). When using it on a PDF, it opens the Preview.app and prints the document.
I’m missing the possibility to get a printer dialog before printing. Any idea how this could be done, while using this/a similar shortcut?
Thanks!
When I save all attachments from an email to my documents folder and later open the documents folder and select all the documents I have just added, I use this printing trick but I hit command P instead of using the menu, file, print option..
The only difference is by doing this I don’t get a printer preference prompt they just automatically print and if there are more then 1 page in a file it automatically prints double sided..
Where if I select file and print through the menu tap I get prompted and can print 1-sided..
How do I change the settings so the command P method prints 1-sided instead of 2-sided..?!?
i think it is because older versions of os x dont work; i run sierra 10.12.4 and i worked like magic.
If you have problems with this or it opens photoshop etc – do this instead:
Open system prefs, Printers. Drag your printer (the large picture of it) to the dock. Now you can drag any file onto the dock icon to print it without any dialog.
I found a work-around. This will fix any margin issues while printing in finder. I opened the document (in it’s application) and hit command-P. I navigated to page size and selected “Manage Custom Sizes…” and made a new custom size with the “Non-Printable Area” set to the printer’s settings and called it “US Letter HP-D110” (that’s the kind of printer I have). I then went into System Preferences, Printer & Fax, selected the printer, and set the default page size to this new custom size I created. Now printing in finder won’t give me margin issues since that’s the new default.
this worked great for me, thanks!
Worked perfectly for me. Just highlighted the file or multiple files, hit command-p and the files printed straight away, no hassles.
When I hit either Print or the Print shortcut, it just prints automatically with no print window popping up for me to choose print mode. As I print booklets, two-sided, draft, labels, one page etc… this doesn’t help me. Sure wish there was a real option for this, as it would speed up my work day by a LOT.
Is there any way to print two-sided when using this method?
Great tip, only problem is when I’ve done it repeatedly with multiple types of files and it skips the “Set your printing options and preferences as usual and choose ‘print’ to start printing the file” step and prints directly to my default printer. That will work great when I’m at home but elsewhere doesn’t allow me to do that essential step.
There’s probably a very simple fix that I’m not considering.
Let me know.
When I have a .jpg file selected in Finder and do either command/P or File/Print, it simply opens up the file in Preview and prints it (and on regular 8.5×11 paper). I do not get an option to change to 4×6 photo paper. I have Mavericks OS X 10.9.4, and a Canon MG7120 wifi printer.
It’s not precisely so; it first opens the app (TexEdit for an .rtf file, exempli gratia) and THEN, BY IT opens the printing dialogue.
When I do this it opens the app associated with the file, and then starts printing. I’ve never seen a dialog as in the article. But it does work.
Tried this with a pdf and it opened acrobat before printing.
OSX 10.9.4
I see the Print option, but its not highlighted so I cannot click.
Sorry, but I think this is bollocks. I tried this from the desktop with both .odt and .pdf files (sys 10.6.8 – command-P) and it did absolutely nothing. Not that I expected it to. Why would we have been opening files for 30 years to print them — are we all supposed to be totally dumb?
It does not work on my iMAC/OSX10.9.2: “The file could not be opened.
USELESS
I don’t get any print dialog up, it just starts to print ?!?!
This does not work in Mavericks. For every jpg and pdf file I get the error message:
The document “nameofthefile” could not be opened for printing.
This article was written printing from desktop in OS X Mavericks 10.9.4, what version are you using? Do you have a printer configured? Try with different file types, do each of them report the error? We’ll try to troubleshoot this.
You can also create a keyboard shortcut so that when you hit Cmd+P twice, it brings up the Print to PDF dialog. David Sparks writes how to do it here: http://macsparky.com/blog/2008/3/19/keyboard-shortcut-for-save-as-pdf-in-os-x.html
Does not work for me. It opened the Photoshop app. Using 10.9.4.
Same for me: for image files, it opens photoshop (without the image)
for pdf, opens Acrobat, then the Acrobat Printer dialog
Oh, well.
Or you can pop the print queue for a given machine into your dock and drag-and-drop! This saves a ton of time, especially if you’re just printing a text file or a screen grab.
http://cl.ly/image/3J110E2v0H2Q
The only caveat is that it will use the default settings, which for an image usually means filling the page. That can be overkill if you’re printing some kind of drop-down menu or other small item — you don’t need a poster of something that’s only 100px to begin with!
That’s an excellent tip, thanks Prescott!
Just like the Desktop Printer from OS9, which we used constantly; I run a large design office, and we would frequently need to send multi-sheet sets to a Design Jet printer. With the Desktop Printer, we could drag the PS file and not have to load up 20 or 30 D-size sheets.
OSX’ version is better, though, as you don’t have to make a print file first. On the other hand, you could double-click the print file and printing happened in the background.