Where to Set Environment Variables on Mac

At the command line, environmental variables are defined for the current shell and become inherited by any running command or process. They can determine anything from the default shell, the PATH, the users home directory, to the terminal emulation type, current working directory, where a history file is located, language and localization settings, and going further to include shell variables, which include everything from customizations to the bash prompt, colorized ls output, and changes to terminal appearance, to aliases, and much more.
Let’s walk through how to list environment and shell variables, and then how to set and add new environment variables at the command line of Mac OS X. We’ll cover this for both bash and zsh shells.
Displaying Current Environment & Shell Variables in bash on Mac OS X
To quickly get a list of environmental variables, you can use the following command with bash:
printenv
To list environmental variables in zsh, use the following command:
env
Or optionally:
echo $ENV_VAR
If you want to see a complete list of shell variables, the ‘set’ command can be issued as well:
set
The output of these commands can be lengthy so you may wish to pipe the output through the less or more commands.
Setting Environmental variables in macOS Command Line with zsh
The zsh shell sets environmental variables through the zshenv file, located in the users home directory at:
~/.zshenv
Thus you can add zsh environmental variables by modifying that file with nano, vim, etc, or by using echo like so:
echo 'export ENV_VAR=example' >> ~/.zshenv
For example:
echo 'JAVA_HOME=$(/usr/libexec/java_home)' >> ~/.zshenv
Setting Environmental Variables in Mac OS X Command Line with bash
Because the Mac defaults to using bash shell, you can set environmental variables in the user directories .bash_profile, for an active user account the path to that file is locate at:
~/.bash_profile
If you changed your shell or you aren’t sure what shell you’re using, you can always check by issuing the echo $SHELL command, which will display which shell is in use. We’re going to assume you’re still using the OS X default bash shell, thus we’ll add new environment variables by modifying .bash_profile with nano – you can use vi, emacs, or another text editor if you’d like, but we’ll cover nano for it’s simplicity.
Start by opening .bash_profile within the nano text editor:
nano .bash_profile
You can add environmental variables and shell variables onto new lines, if there is already data within the .bash_profile file, just be sure to add new variables to a new blank line by using the arrow keys and the return key as necessary.
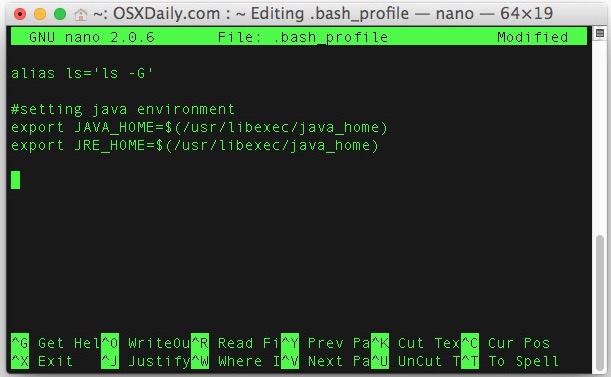
Let’s take an example and say we’re going to set the JAVA_HOME and JRE_HOME environmental variables within .bash_profile by adding the following to new lines of the file:
export JAVA_HOME=$(/usr/libexec/java_home)

export JRE_HOME=$(/usr/libexec/java_home)
Assuming we’re now finished, save changes made to .bash_profile by hitting Control+o (that’s an o as in otter), then exit out of nano by hitting Control+X
Changes and additions made to environmental variables will require the shell to be restarted or a new shell to spawn.
Setting Temporary Environmental Variables in OS X
It’s worth mentioning that you can also set temporary environmental variables in bash by using the ‘export’ command by itself, though these will only persist for as long as the current bash shell remains active. For example, if you wanted to add a temporary path to ~/bin/ you could use the following command:
export PATH=$PATH:~/bin
Again, the ‘export’ command run by itself and not contained within .bash_profile will only be a temporary setting and the environmental variable will not persist unless you add it to the .bash_profile.
If you’re actually looking add a new PATH for usage, you should almost certainly add it to .bash_profile by placing the appropriate export command into the file.
Going beyond bash shell, if you changed your Terminal app default shell away from bash to tcsh, zsh, sh, ksh, fish, or any of the other alternate shells out there, you’ll simply need to modify the appropriate profile or rc file for that specific shell (.tschrc, .cshrc, .profile, etc).

There is a utility for setting environment variables in the OS X System Preferences. Why not use that utility instead of this command line variant, it is so much simpler? What am I missing here?
What default OS X system preference panel adjusts environmental variables? I haven’t heard of this. To set environmental variables, you use the command line. Mac OS X is Unix afterall.
This tutorial is incomplete for newbies, and who else are reading tutorials? The command Open initiates a tedious install of xcode, which are subsequently unable to open the file created. What is the format of the file? Is it text file or data file? What is the preferred editor? How to open this file from the command line? Where is the file and folder (I cannot find it). Is there really no way to define e.g. an environment variable from the desktop preferences system? Really? Ok, looking forward to some tips along these lines. Thanks anyway!
While you’re editing .bash_profile, this is in mine you may find it helpful:
#wifi cycle
alias airportcycle=’networksetup -setairportpower airport off; networksetup -setairportpower airport on’
#color ls
alias ls=’ls -GFh’
#calculate directory size large to small
alias ducks=’du -cks * | sort -rn|head -11′
whoops cut off, here’s the rest:
#ls colors
export CLICOLOR=1
export LSCOLORS=ExFxBxDxCxegedabagacad
#softwareupdate in lieu app store
alias allswupdate=’softwareupdate -ia’
Whoops just realized ‘ducks’ is way better with an -h in there too for human readable, not sure how I missed that until I saw it written out. Here you go:
#calculate directory size large to small
alias ducks=’du -cksh * |sort -rn |head -11′
It’s great to have useful commands aliased like this; however, I’d like to recommend that you use alias names that indicate the provided functionality, rather than just clever shorthands. The alias-space quickly becomes polluted over time with dozens of these and becomes a real nightmare, after starting out as something really useful. In this case, an alias like “disk-space” is far more descriptive and memorable down the road and, in my experience, worth the extra characters.
Main benefit to bashrc is to offload aliases and variables from shell scripts. Mostly for immense CLI geeks and not something outside Unix world you would see too often without need. Unless you want to.
I read somewhere to use a file named “.bashrc” to place your environmental variables. This article also recommended adding a little script to add to the “.bash_profile” which points to .bashrc:
#This loads all configurations in ~/.bashrc
#Put all customizations there.
if [ -f ~/.bashrc ]; then
source ~/.bashrc
fi
I’m not fluent in these matters to understand why one is better than the other. Can you please explain why one would use this approach instead of what you are recommending in this article? Thank you.
Matt
This is definitely helpful.
One important thing is where the JAVA HOME environment variables are kept, which is in the screen shot shown here. For Java and JRE users this is often essential to modify depending on the version of Java in use. Thus, the JAVA HOME environment variable in .profile or .bash_profile is:
export JAVA_HOME=”$(/usr/libexec/java_home -v 1.6)”
export JAVA_HOME=”$(/usr/libexec/java_home -v 1.7)”
export JAVA_HOME=”$(/usr/libexec/java_home -v 1.8)”
export JAVA_HOME=$(/usr/libexec/java_home)
This is out of my own .bash_profile
Oh and Java env variable for .profile
export PATH=${JAVA_HOME}/bin:$PATH