How to Remove a Disk from Time Machine on Mac
![]() All Mac users should have regular automatic backups setup with Time Machine, it’s easy to use and ensures that your personal data and entire Mac is recoverable in the event something goes wrong with the computer. Some people go even further and setup redundant Time Machine backups with multiple disks for added data protection. But sometimes you may decide a particular disk drive is no longer needed by Time Machine, and thus you’d like to remove that particular drive from the backup process without disabling all other Time Machine backups. This can be easily done, and all it does is stop backing up to the particular drive in question, it does not turn off Time Machine to other volumes, and it does not delete any of the backups on the removed drive.
All Mac users should have regular automatic backups setup with Time Machine, it’s easy to use and ensures that your personal data and entire Mac is recoverable in the event something goes wrong with the computer. Some people go even further and setup redundant Time Machine backups with multiple disks for added data protection. But sometimes you may decide a particular disk drive is no longer needed by Time Machine, and thus you’d like to remove that particular drive from the backup process without disabling all other Time Machine backups. This can be easily done, and all it does is stop backing up to the particular drive in question, it does not turn off Time Machine to other volumes, and it does not delete any of the backups on the removed drive.
Deleting a Hard Drive from Time Machine Backup to Stop Backups to That Drive from a Mac
Note that you do not need to have the drive connected to the Mac to remove it from Time Machine, this process is the same in all versions of OS X:
- Pull down the Apple menu and choose ‘System Preferences’
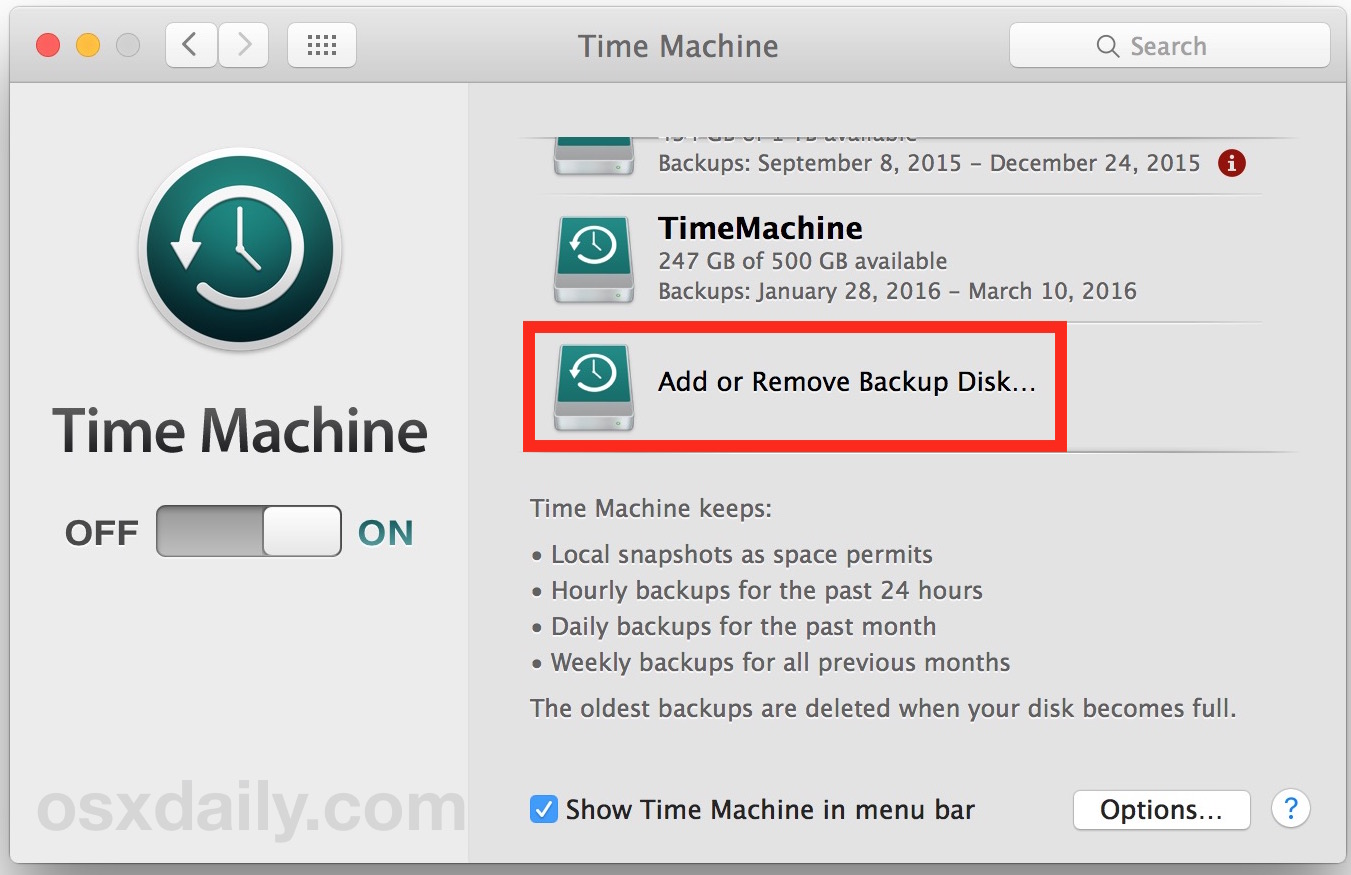
- Go to the Time Machine system preference panel, then scroll down in the drive list to find “Add or Remove Backup Disk” and click that
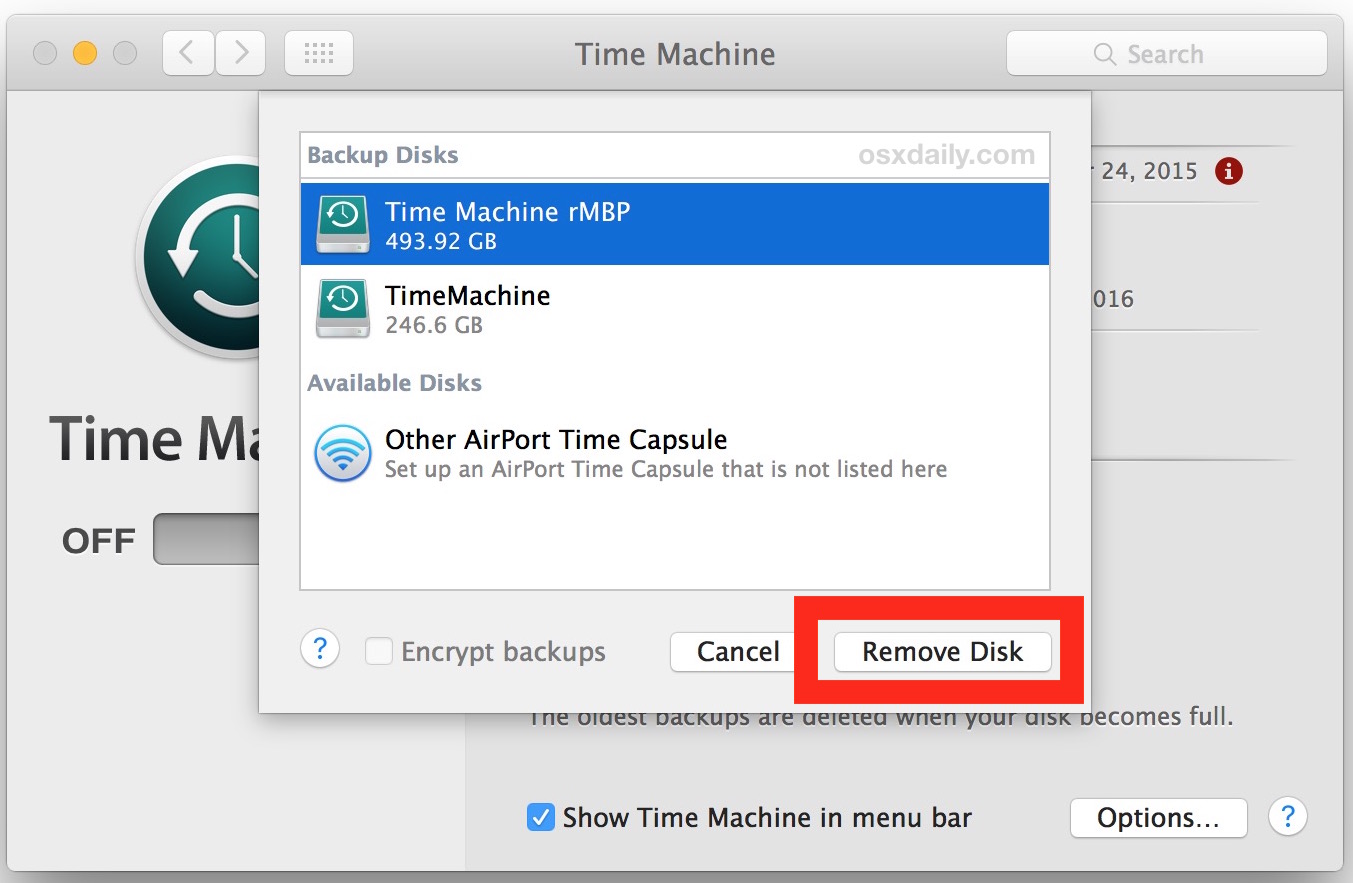
- Select the hard drive, disk, or backup volume that you want to remove from Time Machine backups, then click on “Remove Disk”
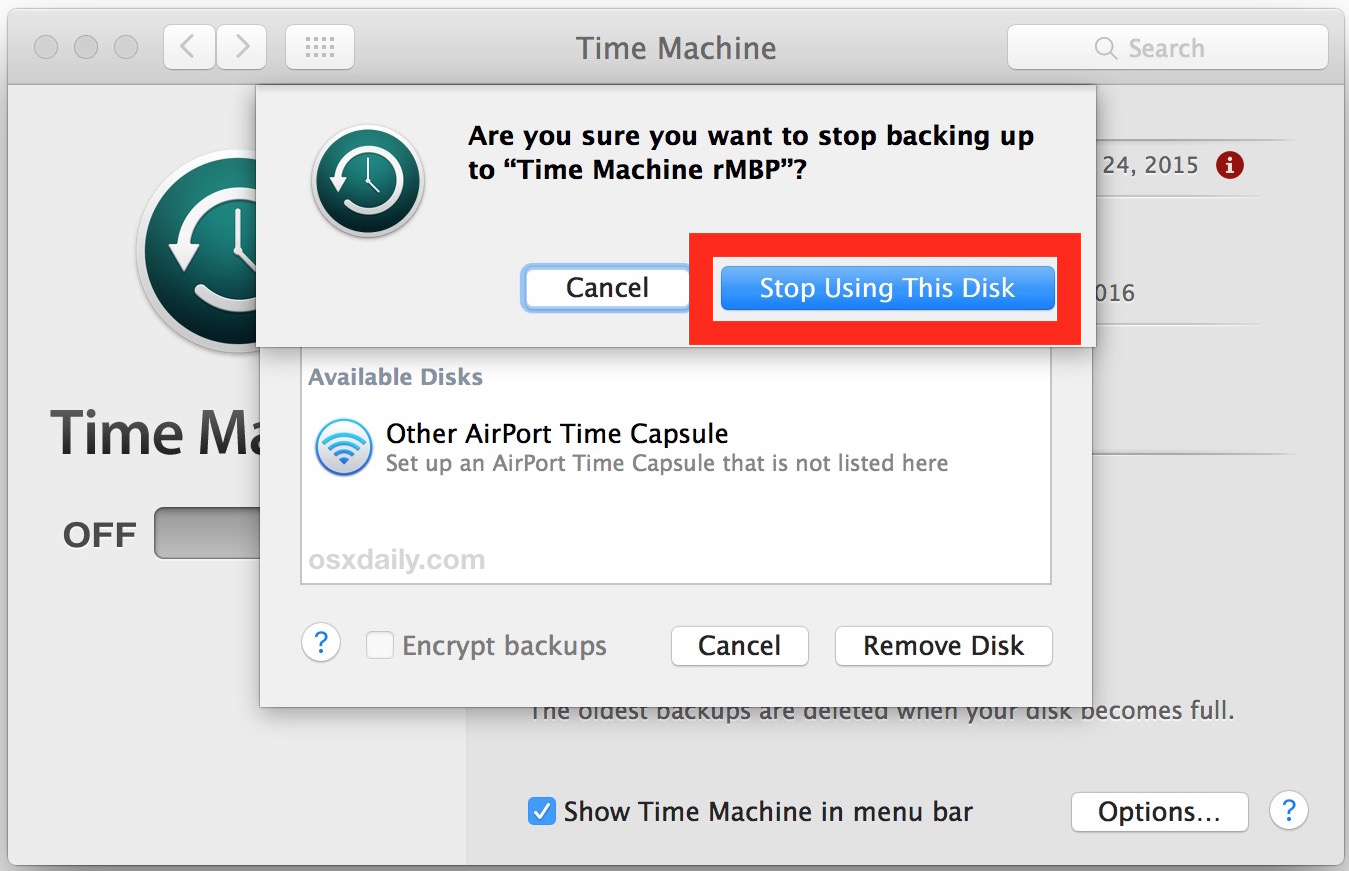
- Confirm that you want to remove the drive from Time Machine and stop backing up to the disk in question
- Exit out of System Preferences when finished


The removed drive will no longer be part of the Time Machine backup chain, meaning when it’s connected to the Mac it will no longer trigger the automatic backup process. Additionally, manually started Time Machine backups will also no longer go to the removed drive when it is connected.
Again, this does not delete any of the data from the Time Machine drive, it simply stops backing up to the drive that has been removed. This also does not turn off Time Machine.
If you want to, you can remove the actual Time Machine backup files from the drive in question yourself, or even format the drive to be Mac compatible and wipe it completely clean of any other data. There’s also nothing wrong with leaving the files there if you think you’ll need it again down the road or refer to them in the future.
Regardless, you’ll want to be sure you have some form of backup going to Time Machine or to another service, never let your Mac or iOS devices go without backups!


Hi,
I’ve removed the disk from Time machine by error!
How can I get it back to TM?
Thanks in advanced!
Clara
Hi,
I don’t see the “Add or Remove Backup Disk” option on my TM preferences. I use TM with two computers but would like to remove my old one now.
Thanks!
PS! I can still use my old computer if that makes it easier (on it right now in fact). Thanks again.
I can’t find the remove or add
Please I need it to be updated now
With Cloning you can have as many backup drives as you want. TM allows only one.
That is not true, you can use multiple hard drives with Time Machine. I use two at a time at work. Same drive is backed up to two ™ volumes. Works great.
What about if you add a second disk, you use both disks for a while and then you want to make sure all of the backup data on the first disk is merged to the second disk before you remove the first disk ?
I added a second disk but now would simply like to have it all on one disk and scrap the first disk..
Backup to the new disk and remove the old one
Is there a way to migrate an existing time machine backup to a new drive?
I mean while retaining all the old data, of course ;-)
Sure there is. Simply drag the Backups.backupdb folder (in the root of your old drive) onto a new disk and have Time Machine use that new disk from then on. It will find the old backups and continue after that.
Note that transferring the data will probably be VERY time consuming. Also note that the first backup after the move might take a bit longer as TM may have to rescan the whole backup.
Use SuperDuper or CarbonCopyCloner and clone the old TM backup to the new drive. Once complete tell your Mac in TM settings to use this drive.
Never liked TM, and IMO it is way overkill for the typical user. Proper use of the “Save As” function and cloning yields IMO a far better method of backup that will only outgrow the HDD it’s on if the source gets larger than the destination drive. Clone drives require no special software to read either unlike a TM backup. Do you really need all 132 edits of that presentation, TM thinks you do and there is no way to NOT have TM backup a new version every time you make a tiny edit. Waste of drive space. I have also seen TM drives FAIL, creating a total loss of backup.
My backup regime: Using SuperDuper, I do 2 clone backups that get connected at the end of every day, scheduled to auto update when the drives are connected, and when complete shut down the computer.
Once weekly another set of drives get clone updated, one onsite, one offsite.
Doesn’t super duper create an _exact_ copy of the drive? Thus, copying a 1TB drive to a 2TB drive makes the filesystem of the 2TB drive look like a 1TB drive.
Cloning creates an exact copy byte for byte, but does NOT make the file system look like anything but what the drive size is.
Yes, SuperDuper creates basically a disk image of the drive you copy with it. It’s a fantastic app for a true imaged backup, if you’re swapping out hard drives or upgrading to a larger SSD or something similar. Carbon Copy Cloner is similar in function. Great apps, but yes they take up a lot of space by nature of how they work, whereas Time Machine performs incremental backups of changes in the file system (kind of like delta backups, really).
Thanks for the info.
I thought it was like the old unix dd command.
My approach is:
Time Machine to 1TB USB3 drive, with Unmount after backup to protect from Crypto virus
In addition once a day Carbon Copy Cloner to a 1TB USB again, unmounted after backup.
Also data is on a NAS with multi version backups, plus a weekly mirror to another NAS, which is out of reach of Crypto.
(Avira AV and Flash block implemented too).
Just my 2 cents’ worth…
-paul
Google couldn’t tell me anything about a “Crypto virus.”
It does mention a “CryptoLocker virus,” which only attacks Windows.
So do you feel the need to protect against a Windows virus, or are you talking about something else?
He could also be referring to the new awful trend of people fishing an Apple ID and using iCloud to lock a device and hold it for ransom. The jerks out there never rest, it’s hard to be too careful. Always backup!
Might be a good idea to enable 2 factor authentication for Apple ID too if you have not already.