How to do Manual Backups with Time Machine for Mac
![]() Letting Time Machine run on a routine backup schedule is important for all Macs, but there also times where you’ll want to initiate a backup yourself, like before installing system updates or major Mac OS X upgrades. If you find yourself needing to initiate a manual Time Machine backup, you’ll be happy to know it is very easy to initiate. Let’s get to it.
Letting Time Machine run on a routine backup schedule is important for all Macs, but there also times where you’ll want to initiate a backup yourself, like before installing system updates or major Mac OS X upgrades. If you find yourself needing to initiate a manual Time Machine backup, you’ll be happy to know it is very easy to initiate. Let’s get to it.
In order to manually start a Time Machine backup, you’ll need to be sure you have an active Time Machine drive connected to the Mac and configured for backups, Time Machine is quite easy to setup even if you only have a single hard drive that doubles as general file storage for media. Without a drive connected or configured then a backup is obviously not possible.
How to Start a Time Machine Backup in Mac OS Manually
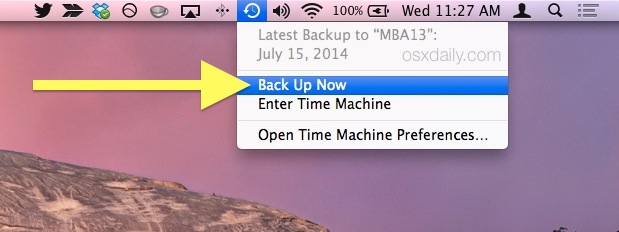
This will instantly start a new backup. You can do this as often or as little as needed for a Mac:
- Click on the Time Machine icon located in the Mac OS menubar
- Select “Back Up Now” to begin the instant backup
Time Machine will now begin a full manual backup of your Mac’s hard drive. This can take quite a while depending on how many changes have been made to the Mac and the file system, and thus should be left alone to run a full backup course.
How to Start Instant Time Machine Backups from Mac Desktop
Another option is to initiate an instant backup directly from the Desktop. This works if you have desktop icons visible, and all you need to do is:
- Click on the Time Machine drive icon (it must be shown on the desktop, or you can choose it from Finder view)
- Right-click the drive icon and select “Back Up Now” from the pop-up menu

This will perform the exact same function as a manual backup initiated through Time Machine system preferences or the menu bar. Use whichever is more convenient for you.
How to Disable Automatic Backups in Mac OS X & Set Time Machine to Only Rely on Manual Backups
Time Machine runs on a schedule that performs backups for you automatically, but if you would rather that not be the case then you can disable automatic backups.
This is not recommended for the vast majority of Mac users, and should only be used if you have a strong reason to turn off automatic backups. With this feature set, backups will rely entirely on user input to initiate manual backups using the methods described above.
- Open System Preferences from the Apple menu and choose “Time Machine”
- Switch Time Machine backups to ‘Off’ to disable automatic backups
![]() Again, this disables all automation of backup processes and is generally not recommended unless you have a strong backup process outside of Time Machine.
Again, this disables all automation of backup processes and is generally not recommended unless you have a strong backup process outside of Time Machine.
With the scheduled backup feature of Time Machine disabled, you can also choose whether to display the menu bar icon through this System Preference by checking the box to display it or not.
Because it’s so easy to forget to perform manual backups, we would highly recommend just leaving the automatic backup feature enabled for the vast majority of users. Having regular backups is one of the most important parts of a maintenance routine and should never be overlooked for any computer, Mac or otherwise.

Thank you. Very usefull.
no<3
[…] Mac before modifying the partition table, the easiest way to do that is by starting Time Machine immediately rather than waiting for the scheduled backup to take place. Let that complete before […]
[…] in any way just in case something goes wrong, the simplest way to do that is to start a quick manual backup through Time Machine. Once you have an adequate backup made, proceed with this […]
[…] proceeding it’s a good idea to backup your drive quickly with Time […]
[…] it’s rare that something may happen during the update, it’s always a good idea to initiate a backup with Time Machine before beginning any OS […]
[…] cover that first. Because either method modifies system files, it’s a good idea to perform a quick manual backup to Time Machine before beginning. It’s unlikely something will go wrong, but it’s […]
[…] slim, but it’s always better to be safe than sorry. Your best bet is to use Time Machine and initiate a manual backup right before installing OS X 10.8 update. If you don’t have Time Machine setup and configured […]
[…] once the drive is connected, you can initiate an instant backup yourself at any time by going the manual route by pulling down the menu and choosing to do […]
[…] recent backup of your Mac and it’s important data. If you haven’t backed up in a while, you can force a manual backup in Time Machine easily. Once you’re backed up, read […]
[…] Mac users should perform a backup before installing system software updates, initiating a manual backup with Time Machine is just a matter of right-clicking a drive. stLight.options({ […]
[…] your data, and so if you’re going to disable this be sure to still use Time Machine, perhaps even initiating a manual backup before you disconnect the drive, in order to preserve a recent copy of your data. […]
It requirement is a non-booting hard drive or partition connected directly to the computer, either internally or by a bus like USB or FireWire.
[…] is unsupported by Apple, it’d be wise to backup your Mac drive before proceeding (do a quick manual backup with Time Machine) to protect yourself in the event something goes […]
I wished Time Machine would offer set backups. I travel a lot and I don’t always have my backup drive with me. I like the option of turning off Auto backups. But would prefer a option to set up a reminder.
[…] data, and so if you’re going to disable this be sure to still use Time Machine, perhaps even initiating a manual backup before you disconnect the drive, in order to preserve a recent copy of your […]
[…] data, and so if you’re going to disable this be sure to still use Time Machine, perhaps even initiating a manual backup before you disconnect the drive, in order to preserve a recent copy of your data. […]
Pls help: since my iTunes upgrade to the version before the current latest (10.2.0), my BACKUP no longer succeeds. I keep getting the error message “iTunescould not back up the iPhone “Antoine Chalhoub’s iPhone” because the backup was corrupt or not compatible with iPhone. Delete the backup for this iPhone then try again”. There no longer is any backup for this iPhone to delete, and I keep on getting same error, even after upgrading to 10.2.0.34. Problem started with 10.1.17, I believe. I can see my iPhone contents on iTunes, Sync is OK, but there is no backup anywhere. Pls help.