How to Backup a Mac with Time Machine

All Mac users should have regular backups of their Mac, and Time Machine offers a fantastic and simple backup solution for Mac users. Once setup properly, Time Machine will backup the Mac automatically on an regular basis, as long as the backup drive is connected to the Mac.
This article is going to focus on how to backup a Mac with Time Machine, the process is the same for all MacOS versions including macOS Sonoma, Ventura, Monterey, Big Sur, Catalina, Mojave, High Sierra, Sierra, Mavericks, El Capitan, Yosemite, Snow Leopard, and everything else.
If you have not already done so, you’ll need to setup and configure Time Machine for this process to work as expected. This article will review how to setup Time Machine on a Mac and also how to backup a Mac by starting a new Time Machine backup at any time.
How to Backup Mac with Time Machine
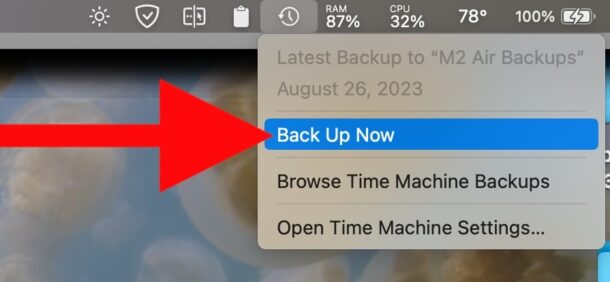
Assuming Time Machine is already setup on the Mac, manually starting a new backup is easy. This is something you’d want to do before installing a system software update, for example. If Time Machine is not yet setup, scroll further below to read instructions on how to do so. Here’s how to start a new Time Machine backup:
- Connect the Time Machine backup disk to the Mac if you haven’t done so already
- Pull down the Time Machine menu item and choose “Back Up Now” to instantly start a backup of the Mac to the Time Machine disk
- Let the backup complete, it may take a while
How long it takes to backup the Mac depends on how much data needs to be backed up, and how fast the drive and interface connection is. Regardless, let the process finish to successfully backup the Mac.
How to Configure Time Machine for Backing up a Mac
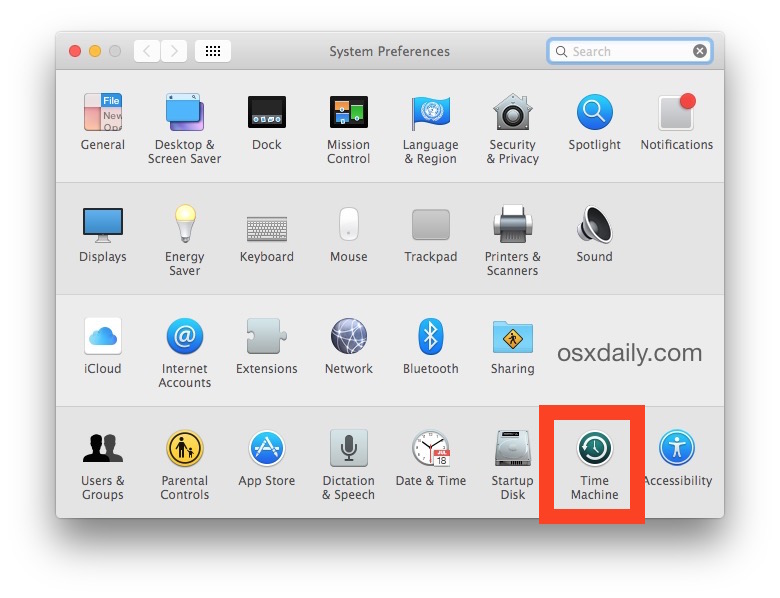
Here’s how to setup and configure Time Machine backups on a Mac:
- Connect the Time Machine hard drive to the Mac if you have not done so already
- Go to the Apple menu in the upper left corner, then select “System Preferences”, and choose “Time Machine” (In Ventura, choose System Settings > General > Time Machine)
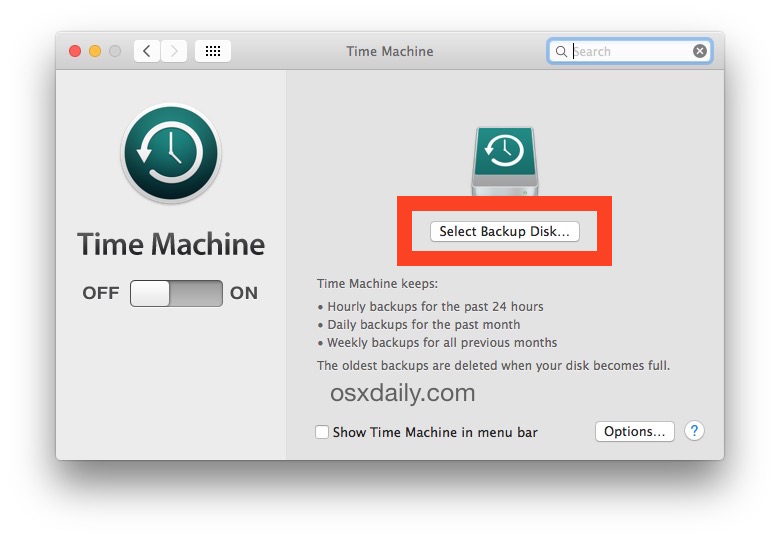
- Click “Select Backup Disk…”
- Select the connected hard drive you want to use for Time Machine backups, and choose “Use Disk” and also enable “Encrypt Backups” (encrypting is optional but recommended for security reasons)
- Time Machine will now be ON and the preference panel will report back information about the backup process including last backup, backup size, and next backup
- Finally, click to toggle the switch for “Show Time Machine in menu bar” to enable easy manual backups in the future


And that’s how you setup Time Machine backups on the Mac, and how to start a Time Machine back-up on Mac.
Time Machine automatically backs up the Mac
If you leave the Time Machine drive connected to the Mac, the Mac will automatically backup using Time Machine periodically throughout the day.
You may notice a slight performance degradation while this goes, but for many users it is seamless and goes unnoticed.
If this interests you, you might also be interested in additional Time Machine tips and tricks found here. Happy backing up!
