How to Find Where Homebrew Packages Are Installed on Mac

Have you ever wondered where Homebrew puts the binaries from brew packages that are installed on a Mac? If you’re a Homebrew user, you may be interested in knowing where Homebrew puts everything and where to find the installed brew packages in Mac OS.
We’ll show you the directory path where Homebrew keeps packages, and also share a few other ways to see what and where Homebrew has installed anything onto a Mac.
This is obviously aimed at more advanced Mac users who rely on the command line and Homebrew, and this won’t be applicable to anyone else. If you’re interested in installing Homebrew you can learn about that here.
Where Homebrew Packages Are Installed on Mac OS: the Homebrew Installation Path
By default, Homebrew will install all packages into the following directory in all versions of Mac OS:
/usr/local/Cellar/
Additionally, Homebrew places symlinks into the following directory path:
/usr/local/opt/
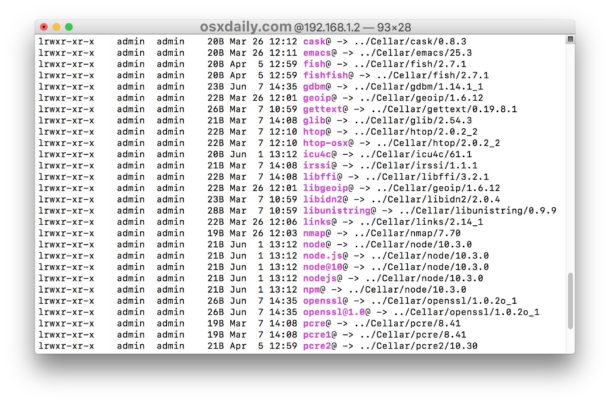
The symbolic links of binaries found in /usr/local/opt/ all point to their respective package in /usr/local/Cellar/ as can be confirmed with ls and the -l flag:
ls -l /usr/local/opt/
The screenshot example demonstrates the symbolic links pointing from /usr/local/opt/ to /usr/local/Cellar/ for each individual brew package:
Thus you can use the ls command to list all Homebrew packages installed on a Mac simply by showing the full directory listing:
ls /usr/local/Cellar
How to Find Specific Homebrew Package Installation Information
Now that you know where Homebrew generally stores packages, you can also learn more specifics about particular packages. We’ll show you a few commands to print the exact path of a specific brew package, and also show you how to get additional detailed information about particular Homebrew packages installed on the Mac.
How to Find Exactly Where a Homebrew Package is Installed
If you want the exact path to where a Homebrew package is installed reported back to you via command line, the simplest method is to use the –prefix flag and point it at a particular Homebrew package on the Mac, this will reveal the location where it is installed:
brew --prefix [package]
For example, using the package ‘wget’ we can get the following information immediately:
$ brew --prefix wget

/usr/local/opt/wget
As you can see in the command output, only the installation path for that Homebrew package is shown.
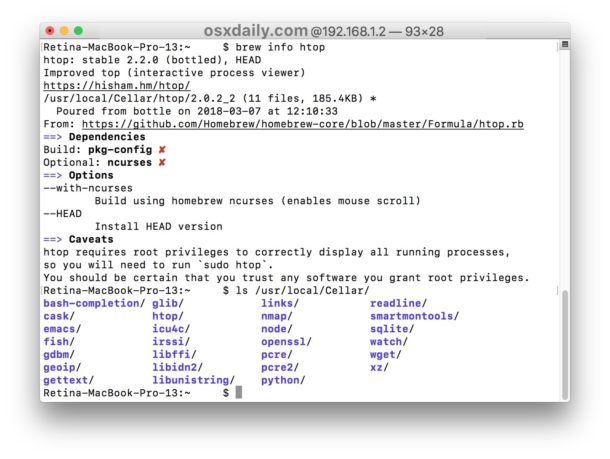
How to Get Detailed Homebrew Package Information
If you’re interested in getting more detailed information about a specific Homebrew package that has been installed, including where the Homebrew package came from, what it is, when it was installed, the path where the brew package is installed, as well as information about that packages dependencies and what other packages are required to use it. This is achieved by using the ‘info’ flag with brew to point it at a specific package, using the following syntax:
brew info [package]
For example, if you wanted to get information about the Homebrew package “wget” then you would issue the following command:
brew info wget
Hitting return will detail information about the brew package. Example output of such a command for ‘wget’ may look like the following:
$ brew info wget

wget: stable 1.19.5 (bottled), HEAD

Internet file retriever

https://www.gnu.org/software/wget/

/usr/local/Cellar/wget/1.19.4_1 (50 files, 3.8MB) *

  Poured from bottle on 2018-05-07 at 10:59:31

From: https://github.com/Homebrew/homebrew-core/blob/master/Formula/wget.rb

==> Dependencies

Build: pkg-config

Required: libidn2, openssl

Optional: pcre libmetalink  gpgme

==> Options

--with-debug

	Build with debug support
The ‘brew info’ command obviously reveals significantly more information than simply the installation path of the package, so if you simply want the exact path of an installed brew package the –prefix command may be easier for scripting or other purposes. Nonetheless the full ‘brew info’ command output is incredibly useful to get extensive information about any installed package and it has obvious value for that reason, in addition to showing where something is installed.
Try these commands yourself with any Homebrew package. If you followed our prior articles about installing Homebrew on the Mac and then checked out some of the popular Homebrew packages available, or perhaps updated to Python 3 or installed node.js and npm through Homebrew, these tips will work to show you the installation path of those packages, as well as other noteworthy package information.
Do you have interesting advice or information to share on finding where Homebrew installs packages onto a Mac, or retrieving package details? Share with us in the comments below!

annoying thing is having installed stuff in the past and then not really remembering what i’ve installed and perhaps can purge from former installs… particularly due to the nature of homebrew dependencies..
what’s the easiest way to clean up a little to free up disk space, short of just uninstalling it all and reinstalling whatever ends up being needed before..
FWIW am still on high sierra (EOL i7) so just not wanting to break things more than might implode on their own
How do we run the application once its installed?
You run Homebrew packages from the command line, for example if you install htop with Homebrew you would type “htop” to run that.