How to Install & Run macOS Mojave Beta in a Virtual Machine the Easy Way
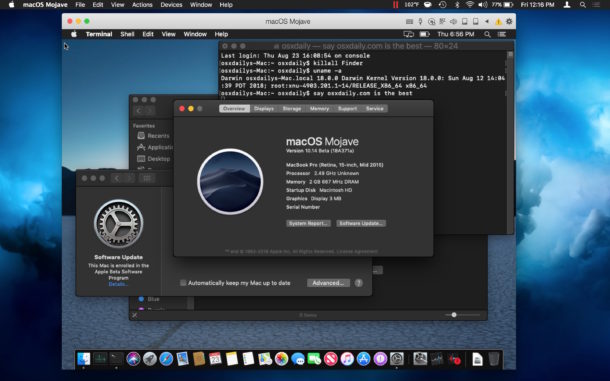
You can easily install and run macOS Mojave beta in a virtual machine right now on a Mac, and the process is surprisingly easy, plus it’s free!
This tutorial will walk you through the steps required to install macOS Mojave beta into a virtual machine environment using freely available software. It’s quite easy, so even if you have never used a virtual machine before you should be able to get it all working by following the instructions as written.
For some quick background, virtualization essentially means you can have a self-contained instance of macOS Mojave running in an application layer atop your primary version of Mac OS system software, allowing to run and test macOS Mojave in a virtual machine (VM) without committing to a complete system update. Because the VM is self contained, it won’t have access to your files or normal data, but it will have internet access and be a completely functional installation of Mojave in the virtual environment. In this case the virtualization software we’re going to use to accomplish this is the excellent Parallels Desktop Lite app, which is the free version of the equally excellent Parallels app.
Requirements: Before getting started, you will need to meet the following requirements; you must have an active internet connection, the host Mac must be compatible with macOS Mojave, you will need to download the free Parallels Desktop Lite app, you will need to download the macOS Mojave installer (currently in beta, meaning you will need to enroll in the public beta to get access to the installer), and you’ll need about 30 GB of free disk space available to get this working all working not including the space required to download the macOS Mojave installer app or Parallels Desktop.
How to Install macOS Mojave in a Virtual Machine with Parallels Lite
- Get Parallels Desktop Lite free from the Mac App Store
- Next, download the macOS Mojave beta installer from the Mac App Store to the Mac – when the download completes be sure to quit out of the Mojave installer and do not install it
- Launch “Parallels Desktop Lite” from the /Applications/ folder in Mac OS
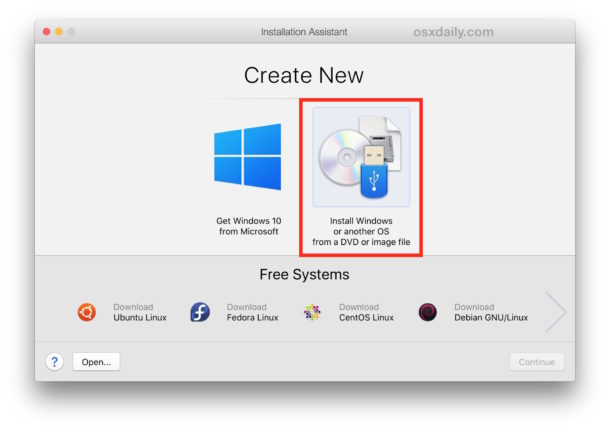
- At the ‘Installation Assistant’ screen, choose “Install Windows or another OS from a DVD or image file” then continue
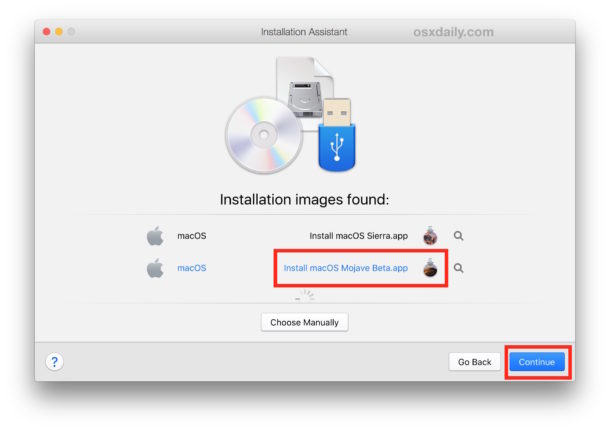
- Parallels Lite will locate any macOS Installer applications found on the Mac, choose “Install macOS Mojave beta.app” from the list shown and then click Continue
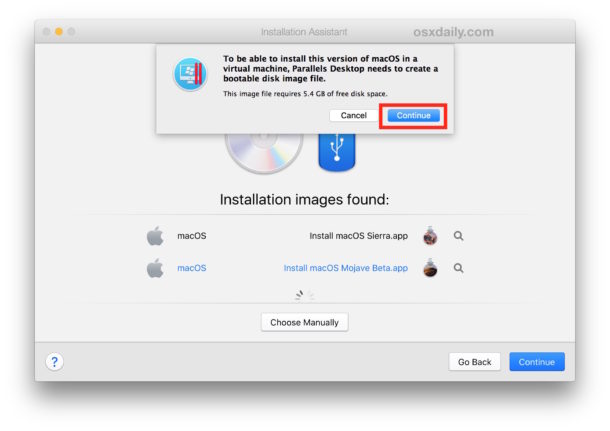
- Confirm that you want to create a bootable disk image file by clicking Continue
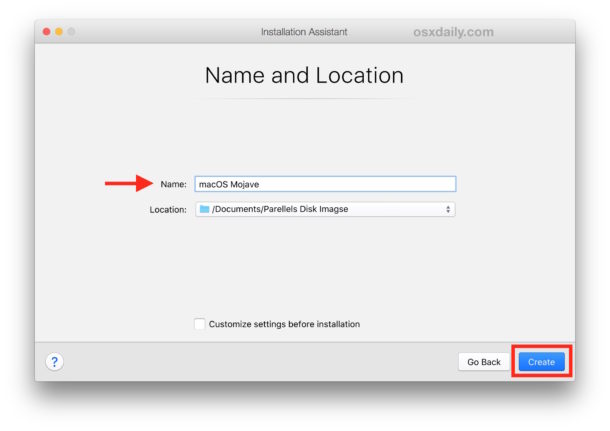
- At the ‘Name and Location’ screen, name the virtual machine something obvious like ‘macOS Mojave’ and optionally change the destination location of the Parallels image file (this will be the large file that contains the entire virtual machine and installation of Mojave), then click Create
- Wait a few moments and the virtual machine will begin booting
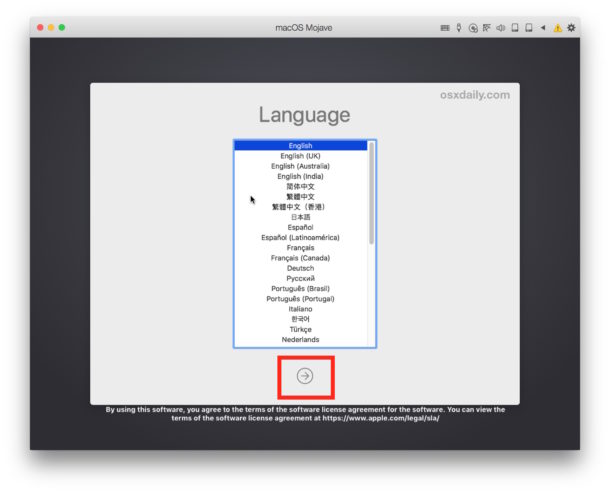
- Choose your language at the language setting screen
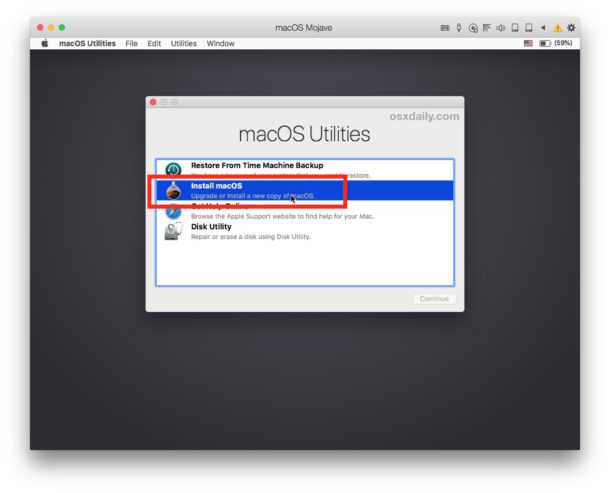
- At the ‘macOS Utilities’ screen choose “Install macOS” to begin the process of installing Mojave into the VM
- Click ‘Continue’ and agree to the MacOS Mojave terms of license agreement
- Choose the virtual drive to install macOS Mojave onto (typically labeled as ‘Macintosh HD’) then click “Install”
- The installation process for macOS Mojave into the Parallels virtual machine will begin
- The VM will reboot in a moment or two and you’ll eventually see the familiar Apple logo with an “Installing” indicator and a guesstimate on when the installation will complete, let this process run
- When installation is complete you’ll see the “Welcome” and setup screens for macOS, choose your country location and click Continue
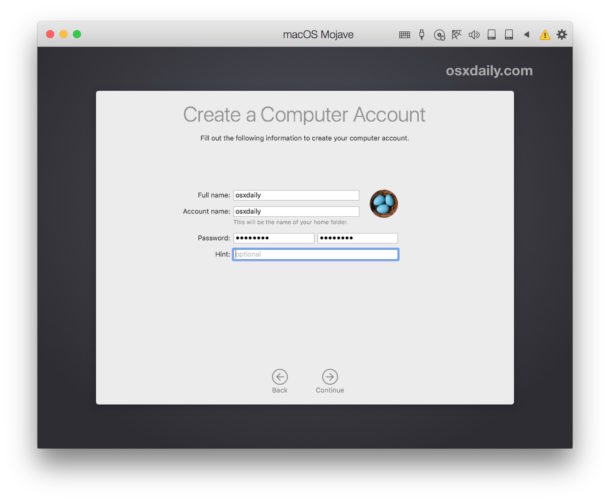
- Create the account for the VM with macOS Mojave and continue
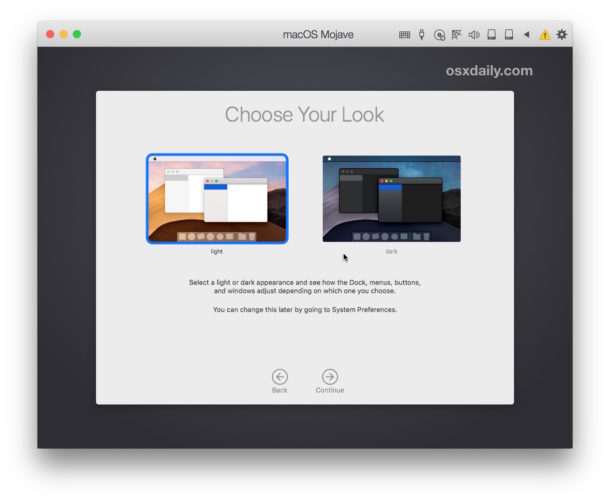
- Choose other simple configuration and setup options as you continue through the Mojave setup process, including whether to use light theme or dark theme
- When complete, a fully functioning macOS Mojave installation will boot and be running inside the Parallels Desktop Lite app
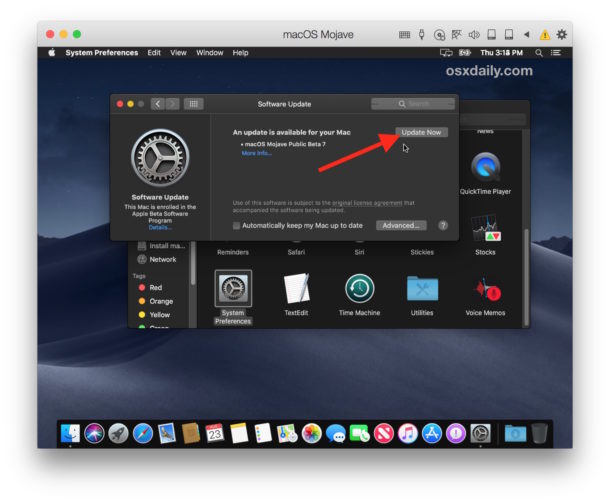
- You’ll likely want to update macOS Mojave after completing installation, do this by going to Apple menu > System Preferences > Software Update and installing any available updates to Mojave
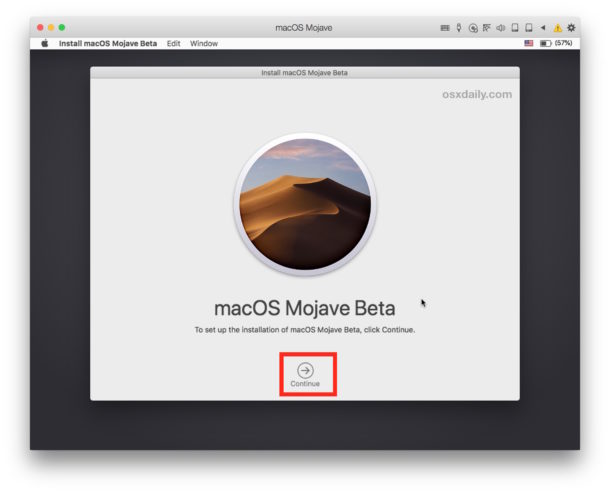
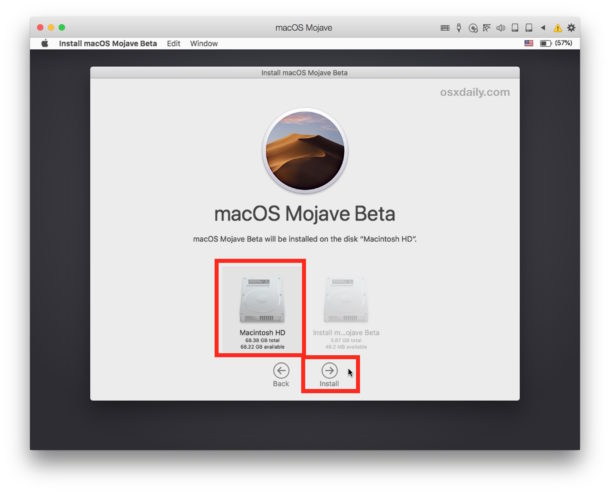
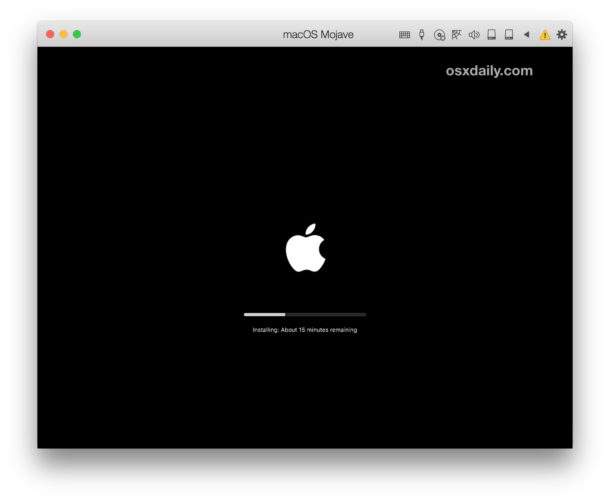
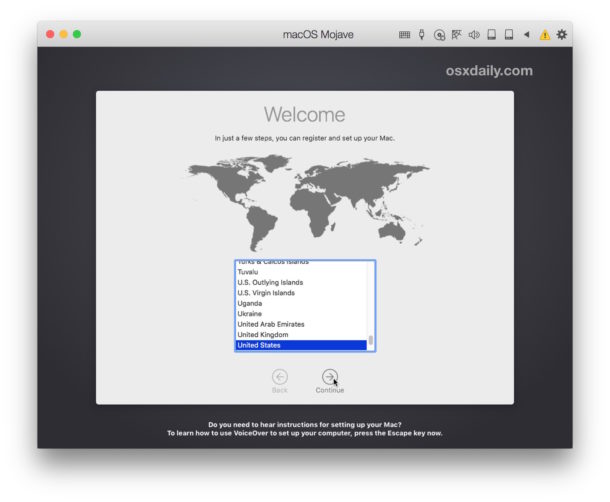
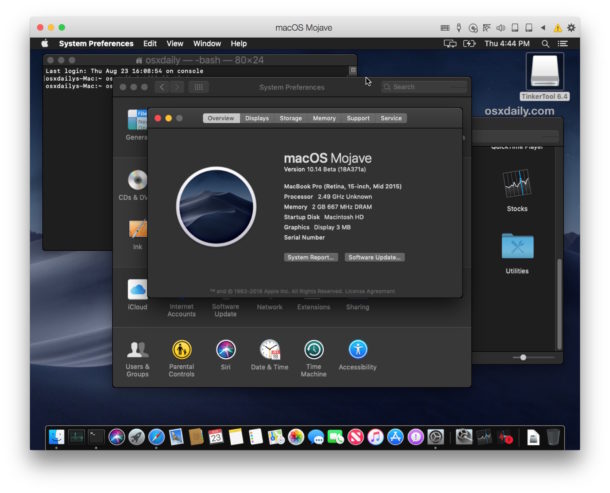
That’s it, you’re now running a complete installation of macOS Mojave inside the Parallels virtual machine, have fun! You can explore all the new features and changes in macOS Mojave, including changing between Dark Mode and Light Mode themes, checking out Dynamic Desktops, desktop Stacks, explore changes to the Finder and Software Update mechanism, investigate the apps new to macOS Mojave like Stocks and Voice Memos, and whatever else you want. It’s a complete clean installation of macOS Mojave in a virtual machine.
Quitting out of the macOS Mojave Virtual Machine
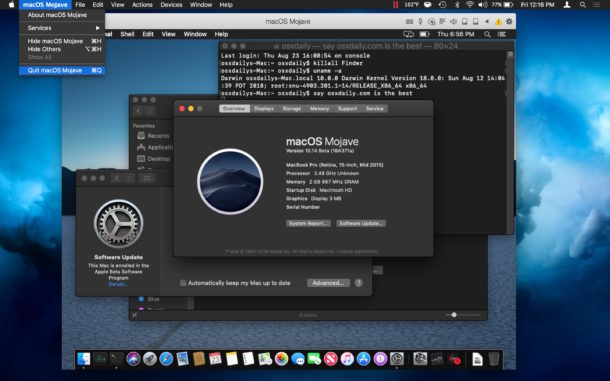
Because MacOS Mojave is running entirely in the virtual machine environment, you can quit and open the entire instance like any other application, just pull down the application menu and choose “Quit” to quit out of Mojave.
Opening and Resuming macOS Mojave Virtual Machine
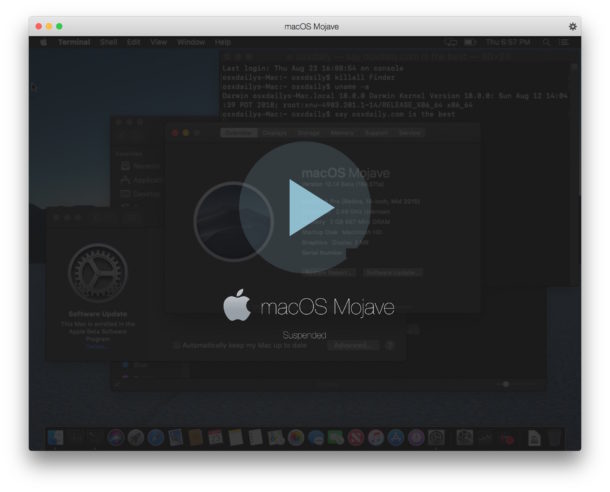
To relaunch macOS Mojave, open “Parallels Desktop Lite” from the Applications folder to start the Mojave virtual machine again, it can resume immediately where you left off last.
This offers a great way to test out macOS Mojave without committing to the full installation and update on a primary Mac. Maybe you want to give it a test run and see how you like it, or test compatibility with particular apps, or to give Dark Theme Mode or Stacks a closer look,
Any Mac that is capable of running Parallels Desktop Lite and any Mac compatible with macOS Mojave should be able to get this working, but performance will be better on machines with more hardware resources, so the more RAM and the faster the CPU and hard disk, the better the experience will be. It’s not going to perform as well as a native installation, that’s just the nature of virtualization and virtual machines, but that’s a small inconvenience when compared to the usefulness of using a VM.
By the way if you got a kick out of this, you’d almost certainly enjoy browsing through our other articles about virtual machines. In a similar manner, you can run Windows 10 on a Mac in a virtual machine for free, or run Ubuntu Linux in a VM, Sierra, Snow Leopard, or even Windows 95, or so much more. Virtual machines are a fun world to explore and widely used for testing, administration, development, among countless other environments used by many industry professionals throughout the IT world.
This approach with Parallels really should be the simplest method available to install and run MacOS Mojave in a VM. If you’ve spent any time looking into this before you may notice that many of the guides for virtualizing macOS aresuggest that to install or run macOS Mojave in a virtual machine requires modifying tons of settings and configuration files in order to get macOS Mojave to load in VirtualBox or VMWare, but none of that is necessary if you simply use Parallels Desktop Lite, which is a free download from the Mac App Store.
* You can also install and run macOS High Sierra or macOS Sierra in a virtual machine this way, but we’re obviously focusing on macOS Mojave here. Parallel
Happy virtualizing of macOS Mojave! Do remember that the virtual machine is going to take up a pretty sizable amount of disk space, so if you do this just for fun and decide you don’t care to use it again, don’t forget to delete the Mojave virtual machine from the location you created in at (in step 7) to recover the 30GB or so of disk space from the Mac. You can also delete the Mojave virtual machine from the Parallels Desktop Lite app too.
Are you running macOS Mojave in a virtual machine? What do you think? Let us know your experiences and comments below!


What about making a partition and dual booting? That’s fairly simple and gives you full access to your machine! I’ve used it for Mojave and Windows 10 (using bootcamp). All fine.
Help!
How do you get the install to use the host computer wifi network? I have a 2017 15in Mac Pro which does not have Ethernet connection ability so I need to bridge my computer wifi to the install.
When I ran through the macOS Mojave installation in Parallels, it all was automatic. You can always configure your hardware settings later though if it skips them, both in the Parallels software (which should be all that is needed) and the virtualized OS itself.
Wi-Fi should be detected automatically, though sometimes the Virtual Machine will instead identify its connection as ethernet rather than wi-fi since it is piggybacking on the connection from the underlying hardware (the MacBook Pro in your example).
Typically no configuration is needed when setting this up with Mojave, Parallels and MacoS auto-detects just about everything to get online and get working.
Lew, the virtual machine will show ‘ethernet’ as the internet connection because it is pulling the default internet connection from the host machine, so if your Mac Pro uses wi-fi does not matter because Parallels will use that connection directly, showing it as ethernet.
As long as your internet ocnnection is active, Parallels will detect it just fine and the VM will get online. I am using it now, it works well and performance is decent given that it’s emulating an Intel CPU!
WAY too much trouble just for a look-see, you have to enroll in the beta program, install some package that then stays on your mac, and then install parallels and mojave…
Exactly what I was thinking, but that’s just how it seems to go with these types of things. Basically the same story when trying to emulate Android on Windows.
Personally I have no problems with High Sierra. I installed MacOS Mojave public beta 18a377a into Parallels Lite and it’s full of bug and missing functions.
I would like to install it into VMware Fusion 10.1.3 to see if it’s any better. So far, I have not found out has to accomplish that. VMware Fusion “NEW” does not recognize any thing later the macOS 13.
Any suggestions?
I have not seen much written about the consequences of upgrading to Mojave in terms of the file format (?) of hard drives that are used with the machine. Are all SSDs and HDs converted to APFS?
I’m currently running El Cap on a mid 2012 MBP with an SSD in the main bay as the start-up drive and the original equipment HD in the former superdrive bay, used as a clone backup (with carbon copy cloner). If I install Mojave on my MBP SSD, what will happen with the clone HD in terms of APFS? And does APFS work well on hard drives (as opposed to SSDs)? I just don’t know enough, so I’m thinking about just staying with El Cap, except that some apps want at least Sierra these days. Any advise is much appreciated!
Thanks, this looks nice and easy for running Mojave in VM. I do agree with @John that Mojave is probably at least as stable as High Sierra (which I dislike, High Sierra is not great), but I think performance is less than Sierra or El Capitan just from my own experiences.
Another possibility is to run macOs Mojave in Virtualbox, very easy setup with this script
https://github.com/AlexanderWillner/runMacOSinVirtualBox
Hm. Mojave is stable enough in my opinion. Anyway, this virtualisation is so funny, thank you for this information.
I agree. I find Mojave to be a lot smoother and more stable than High Sierra. And I’m running it on a mid-2012 MBP, which is the earliest model that can still support Mojave.
Mojave has been running fine on my unsupported mid-2010 MBP. I cannot live without dark mode now!!!
What are you using to get macoS Mojave running on your unsupported Mac and was it difficult to configure? Is performance good on 2010?
Anyone ever notice how macOS sounds like tacoSAUCE? MayBE thEY shouLD nOT speLL iT wiTH weiRD capitalizatiON?