How to Change Spotify Music Quality for Streaming on iPhone, iPad, Android
![]()
Spotify defaults to automatically adjusting music quality when streaming songs. That default music quality setting is recommended for most Spotify users, but some audiophiles may like to manually adjust the streaming music quality in Spotify to be either lower or higher as desired. As you’ll see it’s fairly easy to make changes to Spotify music quality on iPhone, iPad, or Android.
Note that making changes to streaming music quality can dramatically impact data usage, so if you’re on a limited internet data plan you might want to take that into consideration. If in doubt, maintain the default setting.
How to Change Streaming Music Quality in Spotify
Here is how you can manually adjust music quality streaming settings in Spotify, this is done from iOS but the setting is the same on Android:
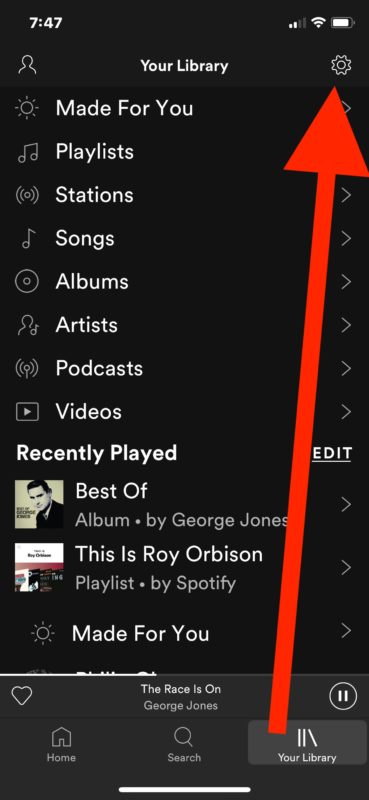
- Open the Spotify app and go to “Your Library”
- Tap the “Settings” button in the corner, it looks like a gear icon
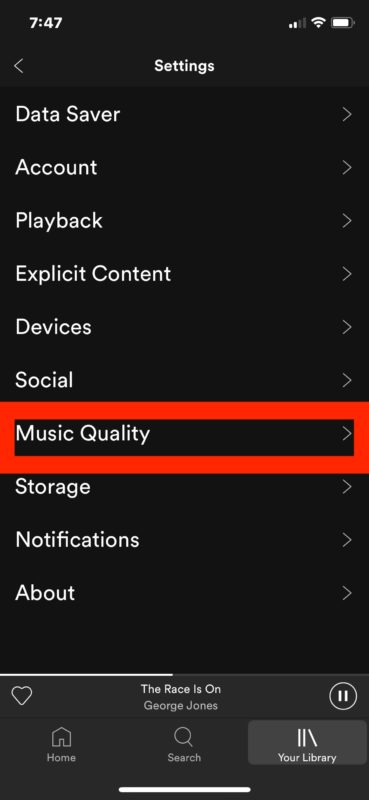
- Choose “Music Quality”
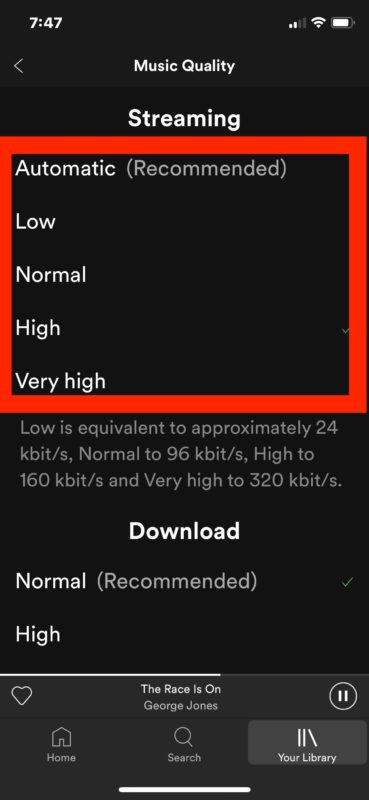
- Select the streaming music quality you’d like to use:
- Automatic (Recommended) – the default setting, this adjusts the music quality automatically based on bandwidth availability and other considerations
- Low – equivalent to 24 kbps
- Normal – 96 kbit/s
- High – 160 kbit/s
- Very High – 320 kbit/s
- Return to listen to Spotify as usual with the new music quality setting in place


The higher the music quality setting, the better music will sound, but at the expense of increased bandwidth consumption and data usage. The lower the music quality setting, the worse music will sound, but at much lower bandwidth and data use.
Most Spotify users are best off by leaving the setting the default option as “Automatic” so that the music quality will scale up and down as needed, but some users may prefer to change the setting directly. Using the ‘low’ setting can reduce bandwidth use considerably and be fine for most spoken audio, podcasts, and similar types of audio, whereas the same low setting can make music sound less than ideal. On the opposite settings end, the “Very High” streaming setting will make audio sound about as it can in Spotify, but at a considerable cost to data usage, so for many people the ‘very high’ setting would only be appropriate for a wi-fi connection or unlimited bandwidth scenario, like if you’re streaming streaming to a Sonos speaker or other external speaker at a home or office without bandwidth constraints.
In the same Music Quality settings screen of Spotify, you can also change the music quality for downloaded music, which may be more appropriate if you want a higher quality music setting since it won’t continuously stream and re-download the audio.
This obviously applies to Spotify, but you can make similar changes to enable High Quality streaming in Music app for iPhone and iPad too.


Hey Paul,
Thanks for sharing your great tips! Honestly I don’t use
Spotify because it’s only for Premium users, I use better
Apple Musik & Abonnenten, and I can choose any music
Which I love 💕!
Wishing you a wonderful week with sunny weather!
Friendly Greetings from 🇧🇹
Spotify has a free music service offering and a premium service, whereas Apple Music is paid only.
I personally prefer Spotify for many reasons, mostly I think it’s a lot better. Plus I already pay $10/month for iCloud, which Apple Music should just be included with in my opinion.
Just tried this suggestion and cannot follow the first 2 steps as the settings icon is nowhere to be found on the screen. I had to use Spotify Preferences to access the settings.
Once there however, the High Quality stream is only available for the Premium users.
Based on this, I question the usefulness of such tips.