How to Boot Apple Silicon M1 Mac to Recovery Mode

Booting an Apple Silicon Mac into Recovery Mode is slightly different from booting into recovery on an Intel Mac. If you’re new to Apple Silicon Mac ownership, it can be helpful to understand how recovery mode works on the new Mac architecture.
For those who aren’t aware, macOS offers a handy recovery mode that may sometimes be necessary for various important troubleshooting measures like erasing and factory resetting the Mac, reinstalling macOS, backup restoration, etc. Until recently, the steps to enter recovery mode on Intel Macs was the same for all of those models. However, due to the changes in system architecture that power the new models, Apple has changed the way Apple Silicon M1 Macs boot into recovery mode.
Whether you’re an existing macOS user or someone who’s switching from Windows, you may want to learn this new technique. Here, we’ll be taking a look at the proper steps that will allow your Apple silicon Mac to boot into recovery mode.
How to Boot Into / Enter Recovery Mode on Apple Silicon M1 Mac
Pressing Command+R keys on your keyboard while booting up will no longer take you to the macOS Utilities screen if you’re using the new Apple silicon Mac, so let’s check out the new method of entering Recovery Mode.
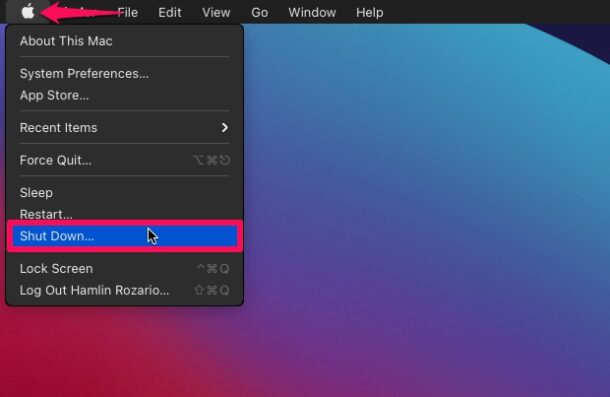
- First, you’ll need to shut down your Mac. You can do this by clicking on the Apple logo from the top-left corner of your screen and choosing “Shut Down” from the dropdown menu.

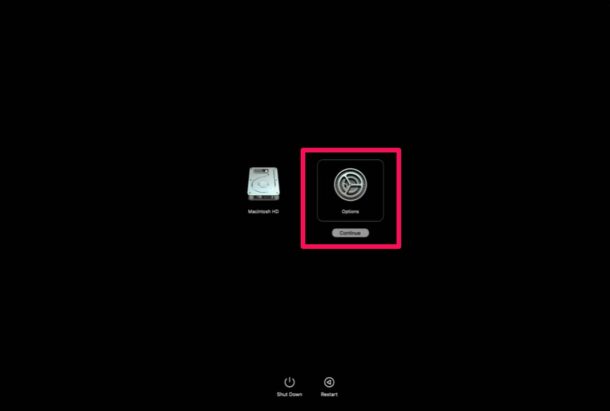
- Next, press and hold the Touch ID / power button on your Mac to boot it up. Keep pressing the power button even if the Apple logo shows up and let go of your finger when you see “Loading startup options” right below the logo.
- Now, the startup drive and options will be displayed. Hover the mouse cursor over “Options” and click on “Continue”.
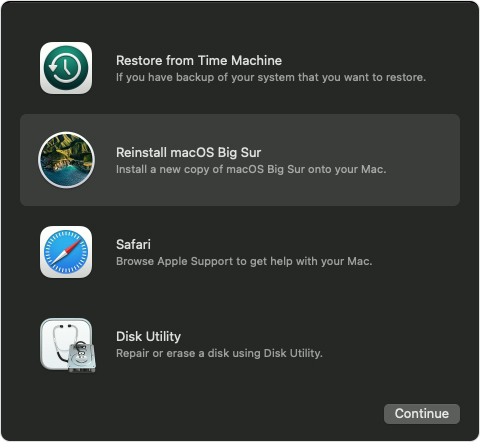
- This will take you to the macOS Utilities screen which is basically the recovery mode. Here you’ll have access to Disk Utility, Reinstalling MacOS, restoring from Time Machine, accessing the Terminal, and much more.

There you have it. Now you know exactly how to access and boot into recovery mode on your new Apple Silicon Mac.
From this screen, you’ll be able to reinstall the operating system, restore from Time Machine backups, repair or erase the disk, use the Terminal, access a web browser window, amongst other troubleshooting options. Whichever troubleshooting step you need to take, select the necessary option and click on “Continue” to go ahead with it, and you can check out the menu options too.
It’s worth pointing out that this method to enter recovery mode is not a software change related to macOS Big Sur, but rather a hardware-related one. These steps are only applicable to the Macs that are powered by Apple Silicon chips. However, if you’re reading this from an Intel Mac and are curious about the same procedure, you can learn how to boot your Mac into recovery mode on Intel Macs right here. Intel Macs can also hold the Option key during boot and selecting the “Recovery” partition too.
How to Exit Recovery Mode on Apple Silicon Mac
Once you’re done with troubleshooting, you may be wondering how to exit the recovery mode and boot your Mac normally.
All you need to do is simply click on the Apple logo located at the top-left corner while you’re on the macOS Utilities screen and select “Restart” from the dropdown menu.
However, depending on the operations that were performed in recovery mode, you may or may not need to manually exit out of it. For example if you erased the boot volume, there will be nothing to boot from, and if you’re reinstalling MacOS, then you’d need to let that finish first.
–
Two other common Mac troubleshooting steps like initiating force restarts on Apple Silicon and booting into Safe Mode on Apple Silicon Macs have also changed on the new Mac M1 architecture, so don’t forget to understand how those work too.
Did you manage to properly boot into the recovery mode on your shiny Apple Silicon Mac? What are your thoughts on this new method to access Recovery Mode and macOS Utilities? If you have any particular experiences, insights, thoughts, or related opinions, be sure to let us know in the comments.

this sucks.. it’s just words repeating the instructions which dont work.. the recovery brings you right back where you started. and “much more”? What much more; each opton is as seen and does nothing.
Thanks for these instructions — worked as advertised on a M1 MacMini
Many thanks for this heads up.
IIUC you are saying there is no longer a Recovery Partition?
If that is the case, then clearly booting into Recovery Mode is not possible. Instead users of M1 Macs will need to know how to use the array of choices dependent on their actual problem.
Guidance regarding use of the choice of Recovery Route would be very helpful.
There’s not a user accessible Recovery Partition but there continues to be Recovery Mode, no partitions because APFS not so much Apple Silicon, since APFS uses volumes rather than partitions.
I am looking in Disk Utility on an M1 now with all partitions and disks shown, Recovery is no longer an option, nor is it an option if you try to boot from another boot volume with Option key, so that’s why the approach here of holding down the Power button I guess is necessary.
macOS Big Sur on the M1 puts a “data” volume and a “Macintosh HD” volume and a sub-volume of ‘com.apple.os-update” all APFS under a broader “Container” under the drive.
I think we are getting into the weeds though, if you need to boot recovery on the M1 Mac, hold the Power button at boot, and you can select it as an option.
So, do we assume since touch id is not on the Mac Mini with the M1 we press and hold the power button on the back of the Mac Mini to get the same results? asking gor a friend
I have an M1 Mac Mini – assume I have to hold the power button on the back?
Yes, holding the Power button boots into Recovery on Mac mini, MacBook Pro both M1