How to Use Content Caching on Mac

Content Caching is a unique Mac feature that can be extremely useful if you have several Apple devices in your home. It can be used to save your internet data, speed up downloads, and even iCloud data access, by caching things like iOS, macOS, or iPadOS software updates on the Mac, which then get distributed from the server Mac to eligible devices on the network – rather than having to download them again from Apple. This feature used to be restricted to macOS server, but Apple pushed it out to consumers with the macOS High Sierra update a few years ago.
Ever since its introduction, advanced macOS users have been taking advantage of this feature to use a portion of their Mac’s storage as a local cache that stores Apple-distributed software and the other data that users store in iCloud. Let’s say you updated your iPhone to the latest iOS version. A copy of this software update is automatically stored in the content cache so that other iPhones connected to the same network can access the copy from this cache rather than re-downloading the update from Apple’s servers which uses your internet data.
Interested in trying the Content Caching feature on your macOS machine? We got you covered, let’s check out how it works.
How to Use Content Caching on Mac to Speed Up Downloads, Save Bandwidth, and More
As long as your Mac is running macOS High Sierra 10.13 or later, you will be able to enable and use Content Caching. Here’s what you need to do:
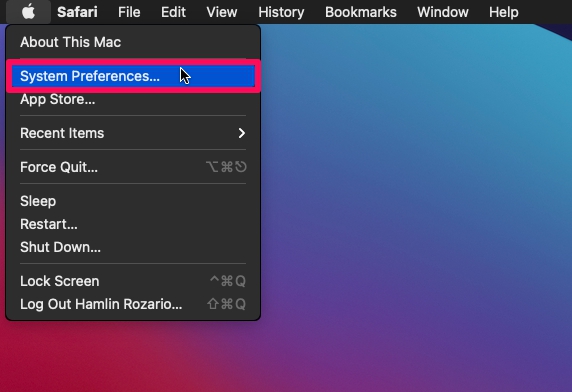
- Click on the Apple menu and choose “System Preferences” from the dropdown menu.

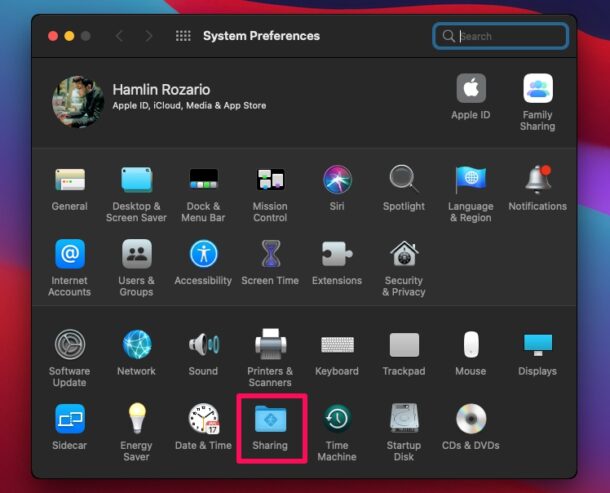
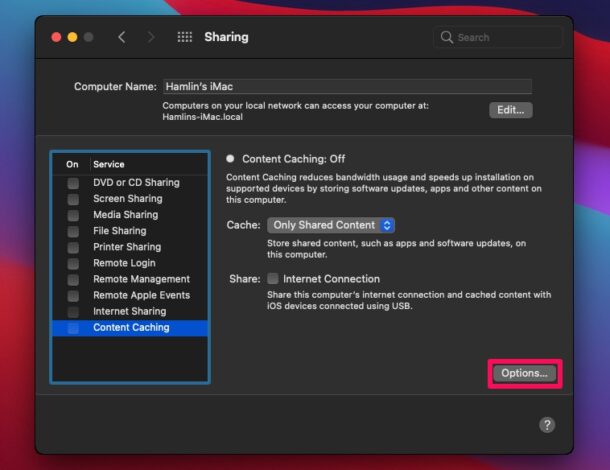
- In the System Preferences panel, click on “Sharing” located next to Time Machine settings as shown in the screenshot below.
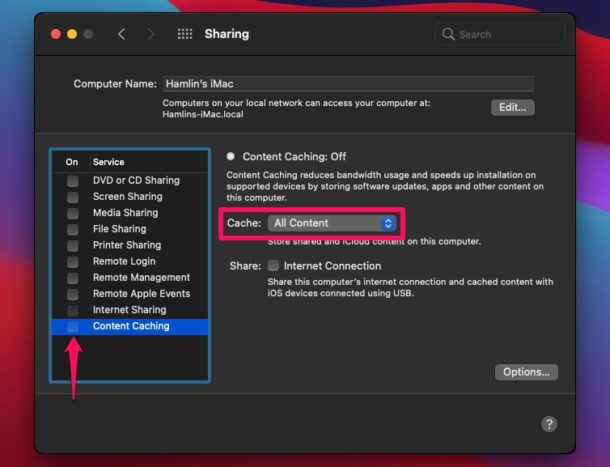
- In this menu, check the box next to Content Caching located under the list of services and wait for a couple of seconds until the indicator for Content Caching turns green. By default, both shared and iCloud content will be stored on the Mac, but you can change it.
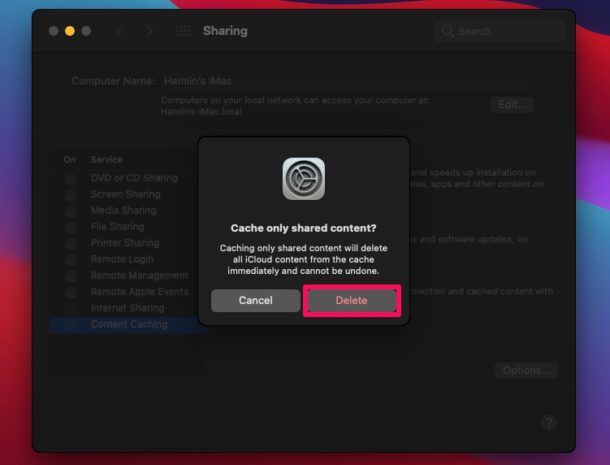
- Changing the Cache content setting to either of the two other options will bring up a prompt saying that the data that you don’t want to cache will be removed from the content cache immediately. Choose “Delete” if you really want to change your setting.
- If you want to choose the volume for the content cache or change the cache size, you can click on “Options” located on the right.
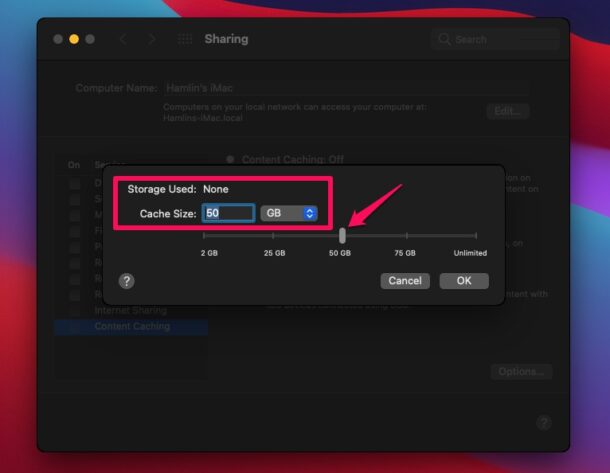
- Now, you can select the storage volume and use the slider to adjust the cache size or manually enter a value as required. Once you’re done making the changes, click “OK”.
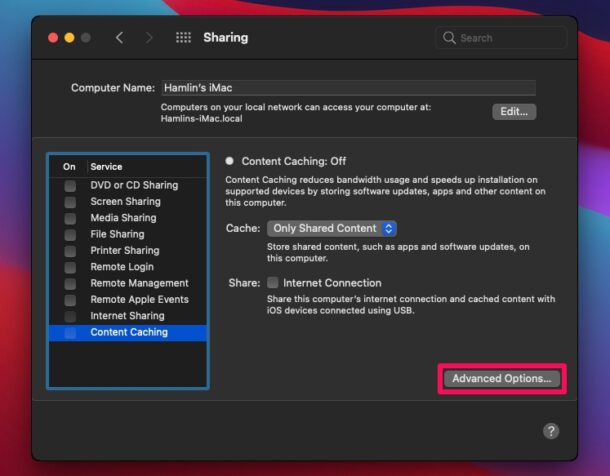
- Additionally, there are some advanced configuration settings that can be accessed by holding the OPTION key while you’re in the Sharing menu. This will change Options to “Advanced Options” as indicated in the screenshot here.
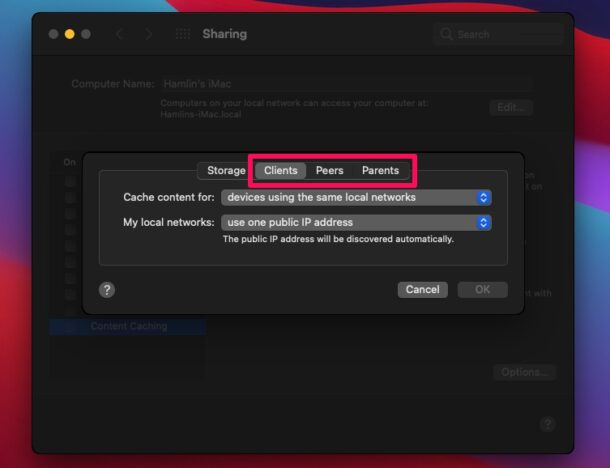
- Now, you’ll be able to configure the settings for Clients, Peers, and Parent IP addresses.
There you go. You’ve successfully enabled content caching on your Mac.
Your Mac is now the host computer, whereas the client devices could be iPhones and iPads running iOS 7 or later. Other Macs that are on the same network will also be considered as client devices. In addition to these, Apple TVs running at least tvOS 10 and Apple Watch running watchOS 7 and newer can be used as client devices too.
From now on, you only need to download software updates and app updates for a specific device once, after which the updates will be accessed from your content cache instead of using your internet connection. Note that you aren’t limited to Apple software, apps, and app updates with the caching service. You can check this Apple support page for a detailed list of the content types that are supported.
Users will be able to utilize content caching on networks consisting of a NAT environment for the host and client devices or on networks consisting of publicly routable IP addresses.
Do not forget that both the host and client devices need to be connected to the same local network to access the content cache.
How to View Content Caching Logs on Mac
If you want to see a log of Content Caching, what is being served, and what it’s doing, you can do that through the command line.
Launch the Terminal on the Mac running the Content Caching server, and use the following command string:
log show --predicate 'subsystem == "com.apple.AssetCache"'
The same log data is also available through the Console app if you’d prefer to use that.
Hopefully, you were able to learn about using content caching and enable the feature for your home or office needs. How many Apple devices will be utilizing the content cache that you just set up? What do you think of this feature? Share your personal experiences, and leave your valuable thoughts and opinions on this handy feature in the comments section down below.

Would you please tell me, do the downloads only get saved when they are downloaded using the device that has content caching turned on? I have an iMac and a Mac mini acting as a server. I have content caching enabled on the Mac mini, but most of my downloading happens on the iMac first. Content caching is not enabled on the iMac. What happens? Same question for every other non i-device that doesn’t have Content caching enabled… MacBooks, etc.