How to Split Screen on Mac

Using Split Screen on a Mac is easier than ever before in the latest versions of MacOS, including macOS Monterey, Big Sur, and Catalina. You can nearly instantaneously split screen two different apps, or two windows from the same app. Perhaps you want two browser windows to be side-by-side, or a browser window split screened with a text editor, or your email split screen with a calendar. Whatever your needs for using Mac split screen mode, it’s simple to use once you learn how it works.
Using Split Screen on Mac
- Open the two apps or windows you want to split screen on the Mac, if you haven’t done so already
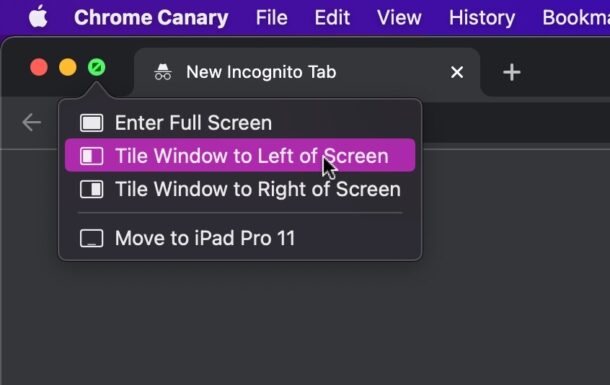
- Click and hold the green maximize button so a menu appears, then choose to “Tile Window to Left of Screen” or “Tile Window to Right of Screen” if you want the app to appear on the left or right side of the Mac split screen
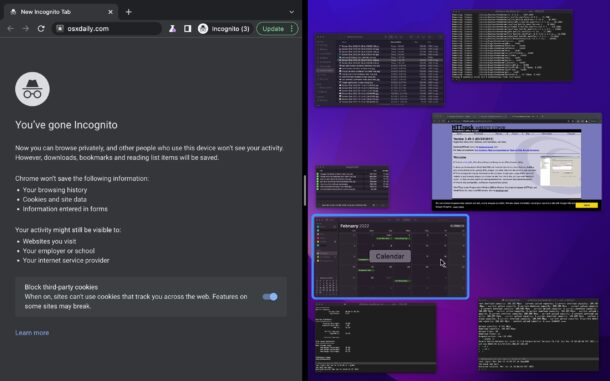
- Now use the Mission Control selector to choose the other window or app you want to split screen with and click on it
- Split screen mode is now active on the Mac with the two windows or apps you chose


Is that simple or what?
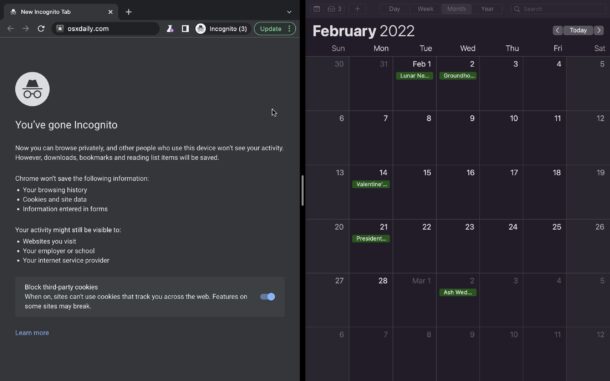
In this example screen shot, the Google Chrome web browser is in split screen mode with the Calendar app.
Accessing the Dock and Menu Bar in Mac Split Screen Mode
As you can see, both the menu bar and the Dock hide when in split screen mode on macOS.
You can access the menu bar in Split Screen mode by dragging the cursor to the top of the Mac screen.
You can access the Dock from Split Screen mode by dragging the cursor to the bottom of the Mac screen.
Exiting Split Screen on Mac
Exiting out of Split Screen on Mac is easy too.
Just move the mouse cursor to the top of the screen, then click on the green window button again.
The other window or app may stay in full screen mode after exiting split screen, but you can exit out of that by also returning the cursor to the top of the screen and then clicking the green window button again.
This approach to entering split screen on a Mac is using the relatively new tiling system for multitasking which works kind of like split screen mode on iPad works, and it differs slightly from split view in full screen on older Mac OS versions.
Of course you can always just resize two windows to be side by side to each other, and you can even be more precise with your window placements by using window snapping which lets you place windows next to each other with precision, but if you use the window approach you will continue to see the menu bar and Dock, whereas true Split Screen mode on the Mac hides both the menu bar, and the Dock, until the cursor is moved to the top of the screen, or the bottom of the screen.
Do you use split screen on Mac for using two apps side by side, or do you use the traditional window based method of simply resizing two (or more) windows to be next to each other? What do you think of split screen mode on the Mac? Let us know your thoughts in the comments about this feature, and if you have any related tips.


Very good introduction, this is helpful.
I didn’t have to use Mission Control (using Monterey). Just have 2 apps open, click and hold the green button on one to tile. Click in the other app and it will automatically tile to the other side.
To exit click into the app that was automatically tiled and press ESC key. Then do the same (ESC key) for the other app.
This will not work for me using the latest version of OS Monterey. When I long click on an app’s green button and move it to either side of the window, I get get the message ‘No window available’ and the screen freezes. I can’t access Mission Control.
However, I can get a split screen by having one app open and then dragging the second app onto it from Mission Control so that both are in the same window. Then click on either green button to split the screen.
My pleasure!
WHERE IS “MISSION CONTROL SELECTOR”….WHAT IS THE “MISSION CONTROL SELECTOR”
I’ve used an app called Divvy (from Mizage) for many many years; don’t remember how I found it but it’s invaluable. You can choose which apps you want open at the same time & easily decide how much screen space you want for each; the Dock and the Menu Bar remain visible.
Much easier than the new tiling system described above.
I can’t seem to get this tiling feature to show in Safari.
First you say open two windows. You assume people reading this know what or how to do that. Secondly you say: “Now use the Mission Control selector to choose the other window or app you want to split screen with and click on it” again assuming we know how to do that. Your instructions need to be more detailed so that even rookies like me can understand them.
I rate this Mac OS tip a D+
Here’s a tip which I use everyday since learning it:
Open System Preferences, click on Desktop & Screensaver. Then click on “Screen Saver” tab, toward the bottom of this window click on “Hot Corners”. “Active Screen Corners” menu comes up. For top left corner select “Mission Control” & press OK. Close System Prefs.
Drag mouse cursor to top left corner of your display & Mission Control opens at the top of your screen. You can drop an open app window from one of the Desktops to another, etc. (You might want to create additional Desktops first).
Alternatively, you can keep the Mission Control icon in your Dock & use that.