How to Use Tile Window Multitasking in macOS Monterey, Big Sur, & Catalina
macOS introduced a handy way to tile windows for multitasking, improving upon the split screen multitasking features that were available in previous MacOS releases. These new simple tiling window multitasking options are available from any window, and now you can easily choose to tile a window to the left or right side of the screen, or jump immediately into full screen mode.
This isn’t an entirely new feature in and of itself (Window Snapping and Split View have been around a while), but now it’s arguably easier to use than ever before, and it behaves similar to the Split View feature on iPad. The new Tiling feature is windowed multitasking without you needing to manually position everything, and it’s a great way to make use of any display, small or large.
Apple’s decision to use the same Split View name from iPad is no accident and it does exactly the same thing. By clicking one button you can move a window to the left or right side of the screen. And if you’d prefer you can even have that window fill the screen completely, too.
How to Tile Windows in macOS Monterey / Big Sur / Catalina
With macOS 10.15 Catalina or later installed, have the app that you want to use on-screen and ready to go.
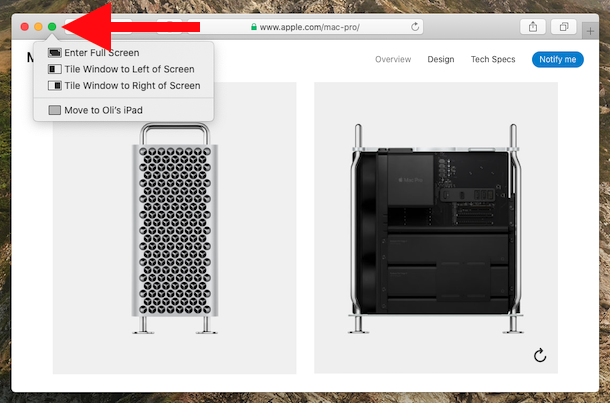
- Hover over the green button in the top-left of the window. You can also click and hold if you’d prefer.
- Choose where you want the app window to go. The options include:
- “Enter Full Screen”
- “Tile Window to Left of Screen”
- “Tile Window to Right of Screen”
You can then simply click another window or app if you want to have two appear side-by-side.
Using & Adjusting Tiled Windows in Split View in MacOS
Once you have apps and windows running in Split View you can interact with them like you usually would. You can also move them around too, see the menu bar, and exit at any time:
- Click and drag a window to the other side of the screen to swap positions.
- Drag the vertical line between the windows to adjust their widths.
- See the Menu Bar by moving the mouse pointer to the top of the screen
- Exit out of tiling / split view by clicking the green button in either window
This particular Tile Windows feature of Split View is available to macOS 10.15 Catalina and later, whereas earlier versions of MacOS still have Split Screen app options but they behave a bit differently and aren’t quite as easy to jump into. Similarly, you can use Window Snapping on Mac going back to many prior versions of system software, it’s just not quite as point-and-click as this new Tiling Windows feature.
If you haven’t yet already updated to macOS Catalina be sure to check our guides on what you should consider first, how to prepare, and how to update a Mac to Catalina. And then keep your eyes peeled for the hot new features – like the awesome Sidecar! – that we’re sure you’ll enjoy. As always, we’ll have an ongoing collection of great Mac tips and tricks to share along the way.
Do you use the new Tile Window features for split screening apps in MacOS? Did you use the prior split view method as well? Let us know your thoughts and experiences in the comments below.

These shortcuts work well
Make a keyboard shortcut to move windows to left or right:
Settings > Keyboard > Shortcuts > Apps > Plus symbol > Name: “Tile Window to Right of Screen” > assign your combo
For move to left: Plus symbol > Name: “Tile Window to Left of Screen” > assign your combo
Shortcut name may be different depending on language MacOS. For the right shortcut name. Hold alt on green symbol left upper corners on active window.
The main thing I miss about Windows is the capability to tile.
As always you can alter this behavior by pressing the ALT-key.
There’s only one issue with this feature. If you press the escape key in either of the windows, it exits split screen mode which becomes bothersome. Just a minor niggle though.
This was fixed in the later versions of macOS (using 10.15.7 and can’t duplicate the behaviour mentioned)
There is a MUCH better third-party app: SPECTACLE (by Eric Czarny). It allows you to place the windos Left, Right, Top, Bottom, Upper Left, Bottom Left, Upper Right, Bottom Right, 1st Third, etc. etc. It is a mystery why Apple doesn’t provide all those features by default…
Hovering the mouse over the green button is not enough. You need to also hold down the command key (10.15.4)