How to Enable Screen Sharing in MacOS Sequoia, Sonoma, & Ventura
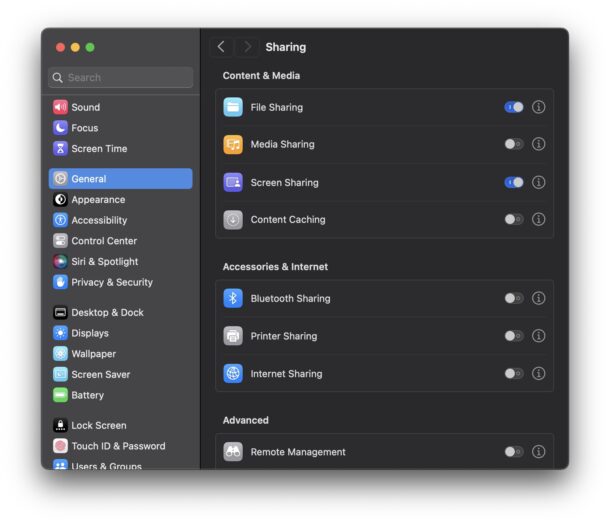
Screen sharing on a Mac allows users to remotely control or view another users computer, including their desktop, apps, and whatever else they’re doing on their Mac. This allows for many remote collaboration opportunities, along with easy remote assistance, troubleshooting, and remote management of computers.
Enabling screen sharing is a matter of adjusting a setting in MacOS Sequoia, macOS Sonoma and MacOS Ventura, which has moved in the latest versions of MacOS with System Settings compared to prior MacOS releases. Let’s review how to turn on this very useful feature on a Mac.
How to Turn On Screen Sharing in MacOS Sequoia, Sonoma, & Ventura
Enabling screen sharing on the Mac is easy once you know where to look:
- From the Apple menu go to System Settings
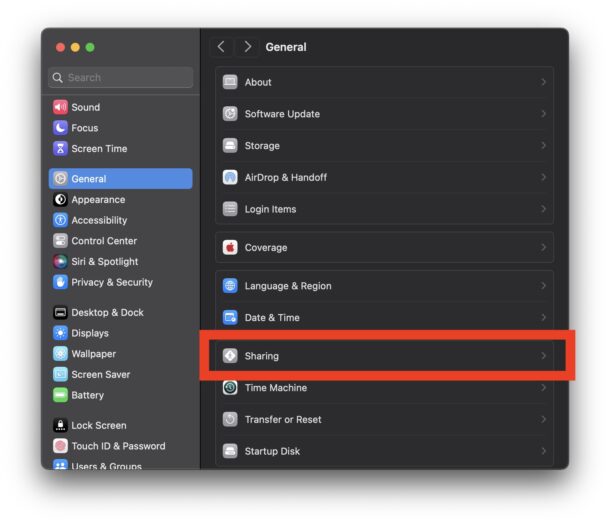
- Go to “General” and then go to “Sharing”
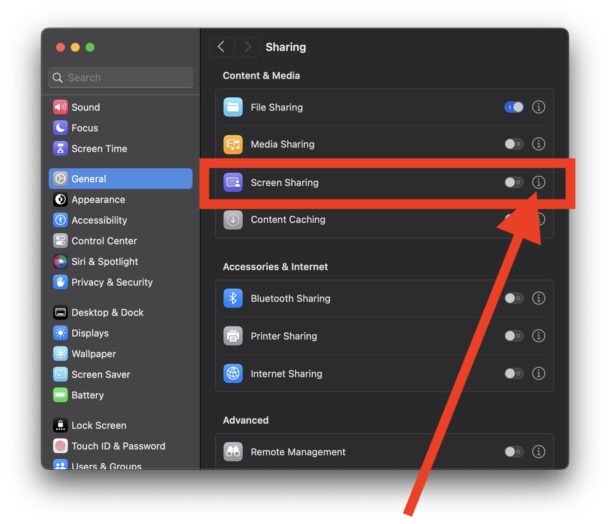
- Look for “Screen Sharing” and toggle the switch to the ON position
- Click on the little tiny (i) button next to Screen Sharing toggle to access additional settings options
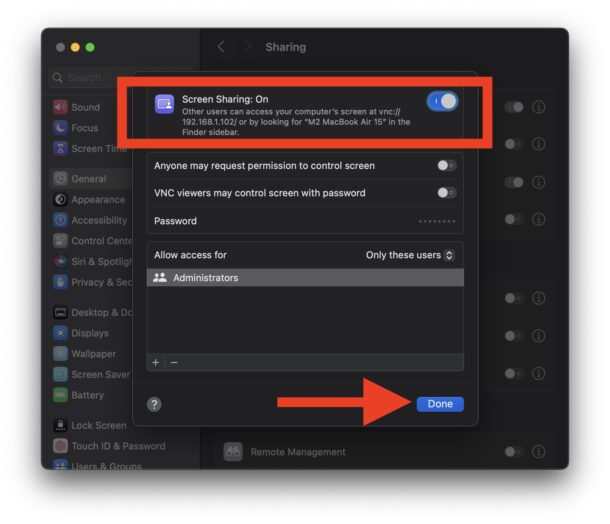
- Adjust any settings as you’d like, and be sure the toggle for “Screen Sharing” is in the ON position. Make note of the Mac name and/or VNC and IP address shown here because that is how users may connect to your Mac (they can also use your Apple ID).
- Click on “Done” to finish adjusting the settings for Screen Sharing

The Mac is now ready to accept screen sharing requests from remote users.
You can give people your Apple ID to connect to remotely by using the Screen Sharing app, or you can provide them with an IP address for use with Screen Sharing or any VNC client.
Remember, screen sharing will stay enabled as long as this setting is toggled on. If you do not want the possibility of someone remotely connecting to your Mac, you need to disable screen sharing.
How to Disable Screen Sharing on macOS Sonoma
Turning off Screen Sharing on the Mac is straight forward:
- From the Apple menu go to System Settings
- Go to “General”, and then select “Sharing”
- Find “Screen Sharing” and switch the toggle to the OFF position
How to Connect to Screen Sharing on a Mac
Any other Mac user can connect to the screen share by using the Screen Sharing app, available to be launched from the /Applications/Utilities/ folder, or by using Spotlight or Launchpad.
Once you open Screen Sharing, open a new connection and enter the Apple ID, IP, or hostname of the Mac you want to connect to.
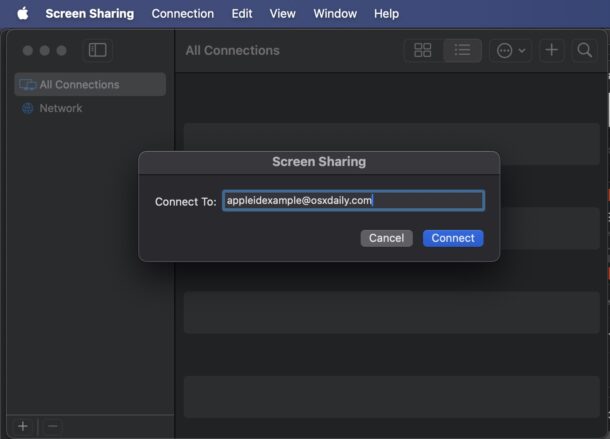
Again, to connect, you will need their Apple ID to connect remotely over the internet, otherwise the computer name or IP address if they’re on your local network, or conversely, you would need to provide any of that aforementioned identifying information for someone to be able to connect to your Mac.
For many Mac users, it’s easier to simply initiate a screen sharing session from within the Messages app, which does not require Screen Sharing to be enabled broadly for everyone, it simply turns the feature on for a specific session initiated through Messages. Nonetheless, enabling and using Screen Sharing through System Settings has benefits, including that any user from any other device can connect to the Mac by using a VNC client, assuming they have the Mac’s IP address to connect to.
Do you use Screen Sharing on the Mac? Let us know your thoughts and experiences.


I think this turns on automatically when you make the screen share request from iMessage, because I use this with family and they never enabled it through System Settings.
Has anyone else noticed this?
Yes, happens the same with me. Requests from Messages do not need to enabled it through System Settings.