9 Simple Finder Tricks to Improve Mac OS X
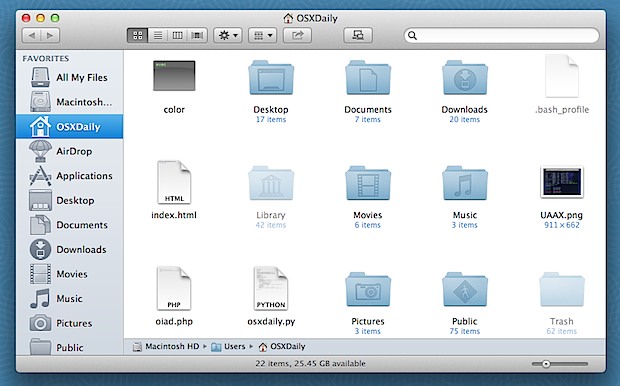
The Finder is how most of us interact with the filesystem on our Macs, and while the default settings are user friendly, there are some additional options that can be configured to make the Finder a much better experience. From the simplest things like showing the extension of documents, to revealing the status bar and having invisible items become shown again, you’re sure to get more out of the Mac Finder by making a few of these adjustments in Mac OS X.
1: Always Show File Extensions
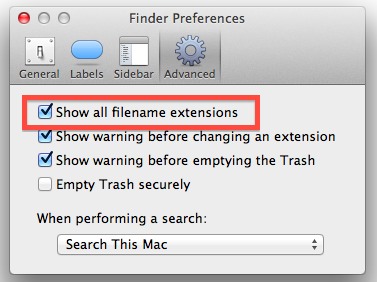
Tired of not knowing what’s a .jpg, .png, .gif, or whatever else just by looking at the extension? Show those file extensions and you can easily identify file formats just by looking at the name:
- Go to the “Finder” menu, then choose “Preferences”
- Back in Finder Preferences, go to the “Advanced” tab and check the box next to “Show all filename extensions”
2: Forget All My Files, Open New Windows to Home Directory
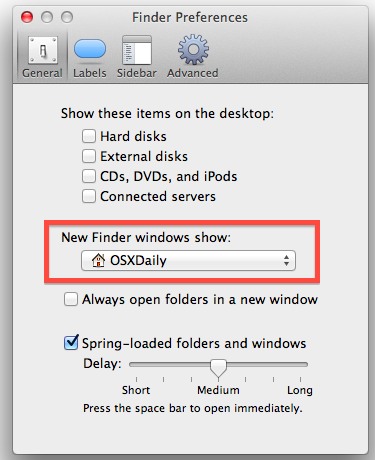
All My Files can be nice, but if you actually sort files by the folders yourself it’s usually just an extra step before you get to your home folder, let’s change that back:
- Open Finder Preferences by going to the “Finder” menu, then choosing “Preferences”
- Under the “General” tab, pull down the menu next to “New Finder windows show:” and select your home directory
3: Show the Status Bar
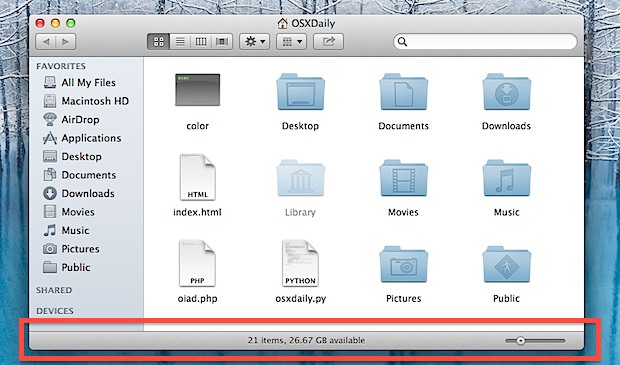
The Finder window status bar displays important information ranging from how much space is available on a Mac to how many files are in the current directory. This should be shown all the time, and it’s easy to do:
- From any Finder window, pull down the “View” menu and select “Show Status Bar”
4: Show the Path Bar
Ever wanted an easy way to see exactly where you are in the file system? Show the Path Bar, and you can not only see your full path but instantly jump forward and back by selecting the appropriate parent and child directories. This may be best for advanced users who are often digging around deep in the file system, but it’s so useful it must be included:
- From any Finder window, go to the “View” menu and choose “Show Path Bar”
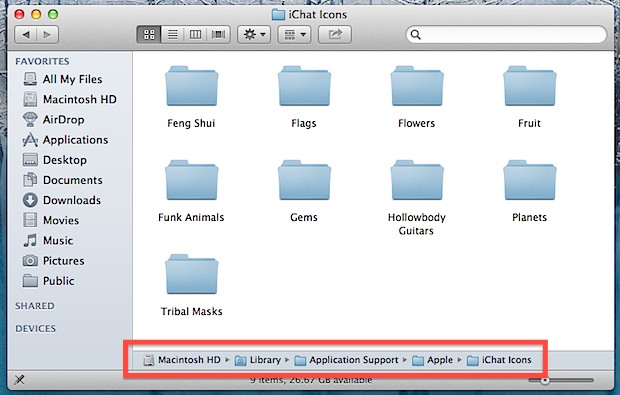
Remember, the Path bar is interactive! You can click on it to jump to locations, and even drag and drop things into it.
5: Show Your Home Directory in the Sidebar
With how often things are stored in the Home directory, it should probably be visible in the Finder window sidebar all the time. That’s an easy option to set:
- Open Finder Preferences from the “Finder” menu, choose the “Sidebar” tab
- Check the box next to your username and the home icon
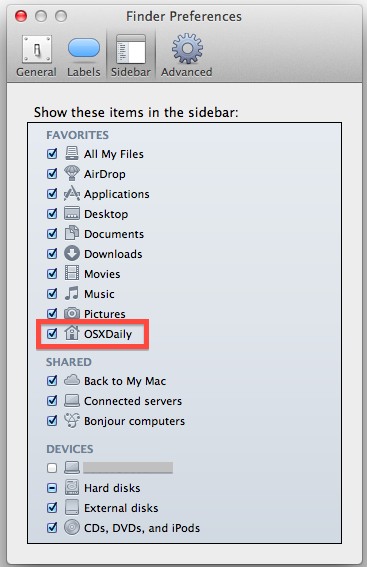
Now use drag & drop to arrange your Home folder in the sidebar to somewhere that makes sense, somewhere near the top works for me.
6: Customize the Tool Bar
The Finder window toolbar can be modified to add or remove frequently used Finder features. The back/forward buttons, arrange, and sharing features are great, but don’t forget to adjust this yourself if you want some more quick options:
- Go to the “View” menu and select “Customize Toolbar…”
- Drag commonly used actions into the toolbar (Path and Connect to Server are great additions)

7: Always Show the Users Library Folder
The Library folder is where preference files, caches, and user data is stored, but it’s now hidden by default. With a quick visit to the command line you can have the ~/Library/ directory always be shown again in OS X.
- Open Terminal and type the following command:
- Exit Terminal
chflags nohidden ~/Library/

8: Always Show Hidden & Invisible Files
Perhaps best reserved for advanced users and web developers, setting hidden files to always show in the OS X Finder is a huge time saver for anyone who frequently needs to access files that start with a . or are otherwise hidden.
- Open Terminal and enter the following defaults string:
- Exit Terminal
defaults write com.apple.finder AppleShowAllFiles -bool YES && killall Finder
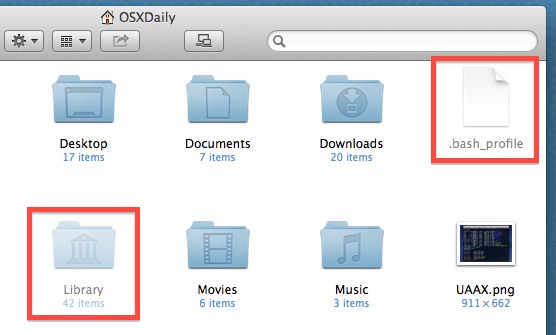
Yes, this also reveals the Library if you haven’t set it to be visible with the prior command. Note that hidden files icons are slightly opaque compared to a normally visible file.
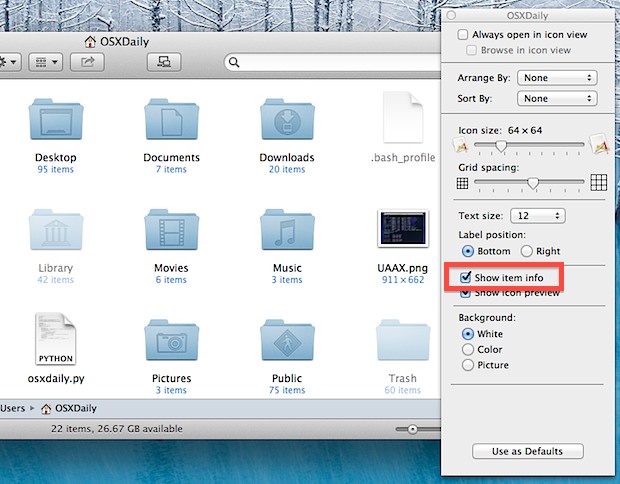
9: Show Item Info of Files & Folders
Having Finder tell you item info is incredibly useful, you’ll suddenly see how many files are in directories and image dimensions will become visible right from the Finder. This is a must-have option for anyone who works with graphics or images in particular.
- Right-click on any Finder window and go to “View Options”
- Check the box next to “Show Item Info”
- Optionally (but recommended) select “Use as Defaults” to apply the item info change to all Finder windows
Anything Else?
Did we miss something? What are ways can the Finder be modified to be even better and more useful? Let us know in the comments. And if you’re looking for some more advanced options to improve Mac OS X, check out this list of the best defaults write commands too.


Is there any way to share the finder preferences between computers without recreating in each unit
It should be noted that not all options will appear the same depending on which folder view you’re using: The View Options in Icon View has considerably more options than in Column View.
I have a directory called xx.template and finder displays this a file (basically a package).
Is there a way to switch this behaviour off?
Great inputs here – I came looking for the simple idea found by highlighting several files and finding out how much space they occupied – the wonderful simple solution – after highlight, Cmd Option (Alt) i . I did wonder why that same information could not simply be shown in the summary at the bottom of the finder, but was very happy to see that there it does give me the available disk space, which seems to be misstated when looking under “About this Mac” under details.
thank you very very much.. made my life easier..
As a reformed Windows user, one thing that constantly drove me crazy about finder was the absence of an “up” directory button. I realize this can be done other ways (i.e. with the path) but the up button was kind of a deal breaker for me. I then found a genius script on how to make your own. Simple, clean, supported by Apple and works fantastically well.
1) Copy the text below and save as a .scpt file:
tell application “Finder”
set the target of Finder window 1 to (container of target of Finder window 1)
end tell
2) Compile and save the script. This basically turns it into an application
3A) Optional – Find a nice up arrow icon on google and copy it
https://www.google.com/#q=up+arrow
3B) Change the icon on for the compiled script by going to ‘get info’ – right click file in finder, highlighting the icon (upper left), then pasting.
4) Open finder and drag the icon for the app to the toolbar while holding down the apple key. I recommend the far left. (FYI you can do this for any application)
Once done you will have a very useable up arrow function right where it is easy to access.
if you hold ”cmd” and click on finder up bar (where is tiny icon for this folder) then you see also ”up” in this
drop down list
I currently keep stuck on Tiger on a brave old iMac G5 and I use to watch the paths of my the folders, and browse through them, by clicking and pulling down the path-button of the toolbar of the window. Isn’t this available in earlier versions (I tried Leopard but had to give it up since I couldn’t the images of my scanner) ?
Sorry : ‘couldn’t view the images’.
Thanks for all the tips, and the comments too
For those who don’t want to mess with line commands, there’s another way to always show the hidden User Library. Show it, by clicking Option-Go To > Library, and create an Alias to it. The Alias will be always visible.
“Option-GoTo” – Awesome, thanks!
In Sierra it’s an option on the view options panel when you are in your home directory…
How do you still have icons in the sidebar? I thought they were extinct as of Lion?
#8 – Note that hidden files icons are slightly opaque compared to a normally visible file.
Shouldn’t this say “translucent” or “slightly transparent?”
Good writeup. I have implemented a few of these changes on my Air.
If by “improve” you mean “clutter,” then yes.
Totalfinder is a must have. No more multiple windows hogging the screen. Tabbed finder windows, I just cannot live without.
Unfortunately, you lose the ability to go full screen with this product.
Dragging commonly used items, apps, folders or utilities into the sidebar is a useful tip, instead of cluttering up the dock. Hold the command key, then drag your item into the finders sidebar. Sidebar effects is a great little tool to bring color and graphics back to the ugly, grey sidebar.
(FYI, in item 8, by “slightly opaque” you meant “slightly transparent”—its exact opposite.)
(or perhaps “slightly less opaque” was what you were looking for?)
Note, a Dashboard widget is available to show/hide hidden files.
I made a simple Toolbar App to open a file with sublime text. You can download it here. Just download and drag-n-drop in toolbar http://donatellosantoro.com/script/
Showing the path bar has been a complete revelation to me, this is definitely not solely applicable to advanced users …. I am dyslexic & have always struggled to understand/work with paths ….. Suddenly with one click of a button I understood the whole thing in the blink of an eye. Thank you so very much for helping in this way.
I suggest using “Path Finder” instead of Finder. It’s really worth the money as it is more compact, lists folders at the top automatically, supports tabs, etc.
No. 9 only works when in ‘View … as Icons’ format.
I would really like to fave my search in Finder be FILENAME by default or a finder preference. Yes, I know keyboard shortcuts like command-shift-F but I prefer to have by default or some setting what I use 90% of the time. Also, the App called TotalFinder is far better than Finder. Am surprised that Apple just does not listen to its devotees; that’s probably why Apple stock dropped so much.
I have found that XtraFinder is a great (and free) add-on for Finder that gave me the options I’d been wanting in Finder for a long time. Things like:
-Cut and Paste files
-Show folders at the top all the time
-Rename with F2
-Open files with Return/Enter
-“Automatically adjust width of Name column”
-Sort Recent Folders menu by last opened date
-Middle-click to open folder in new window or new tab
-Right-Click > New File… option
-New Terminal Here option
-Show Hidden Items toggle (no messing with the Terminal or command line for this)
-Tabs
XtraFinder integrates with Finder instead of replacing it, which I like. You can download it here: http://www.trankynam.com/xtrafinder/.
I’m not associated with XtraFinder, I just really appreciated learning about it because I had been wanting some of the features for so long.
Unfortunately, because it is free – the developer does not keep it current. There are long periods of time between updates and bugs crop up causing frustration…
Hi. Could anyone tell me how to apply settings to all Finder folders? When I change the icon size in one folder and then open another folder, the icon size is different. If I open another, it is usually different again. And is there any way to extend this to how I can sort all folders as well? Many thanks.
You have to select “use as default” when you make changes in the finder preferences, then all windows should act the same. Best to logout then log back in to makes sure the changes stick.
When viewing in list mode, go to view options, then check “calculate all sizes.” then “set as defaults.” This will calculate the size of the contents of your Finder window and show each one.
IS there any way Finder can display Folders first alphabetically, followed by files alphabetically?
Thanks!
Doug
I do that by selecting the View by Kind. It groups all the folders at the top, alphabetically, and then the files below that, also alphabetically.
Sort by Kind should come close, folders always go on top alphabetically followed by file groups
Useful tips.
But for many people the Path Bar is just annoying.
Fortunately, OSXDaily has a very good suggestion. ;)
In this old post (https://osxdaily.com/2007/12/02/show-full-directory-path-in-finder-window-title-bars/) there’s a way to show the full path in the Finder windows Title bar.
Of course it isn’t interactive, but in my opinion is a more elegant way to know “where” you are.
The trick is fully working in every O.S. (I’m using it on Mountain Lion right now in my computer).
Thank again! (twice)
a_
Showing the Path Bar is great for navigating backward. Just double-click the folder/directory you want to go to, and there you are!
Thanks for the recap, but Customizing the Tool Bar could be improve by dragging common folders and app too, useful !