How to Downgrade a Mac from OS X Mavericks to OS X Mountain Lion
Though we generally recommend staying on the latest versions of OS X, some users may find incompatibilities or problems associated with updating their Macs to OS X Mavericks, and for these unique circumstances it can make sense to downgrade the Mac back to a prior release version of OS X. For such specific cases, we’ll cover downgrading from Mavericks (10.9) back to OS X Mountain Lion (10.8). To accomplish a downgrade using this method, you must have made a Time Machine backup made prior to the OS X 10.9 upgrade / install. If you do not have a Time Machine backup prior to OS X 10.9 being installed, this particular walkthrough will not work for you.
Be sure to back up the current volume and all files before attempting the downgrade process, otherwise you may lose the files and data that was created between the original upgrade to Mavericks and this downgrade procedure.
Downgrading OS X Mavericks to OS X Mountain Lion
This will downgrade a Mac running OS X Mavericks (10.9) to OS X Mountain Lion (10.8). Yes, this also works to downgrade to OS X Lion (10.7), but Lion is buggy and we do not recommended it. If given the choice, always run OS X Mountain Lion or stay on OS X Mavericks instead.
- Back up the Mac with Time Machine before beginning, easily down by choosing “Back Up Now” from the Time Machine Menu, or at the very least manually back up your critical files – this is important do not skip this
- If the drive is not already connected, connect the Time Machine volume to the Mac which contains the prior OS X 10.8 backups on it
- Reboot the Mac and hold down Command+R to boot into the restore menu
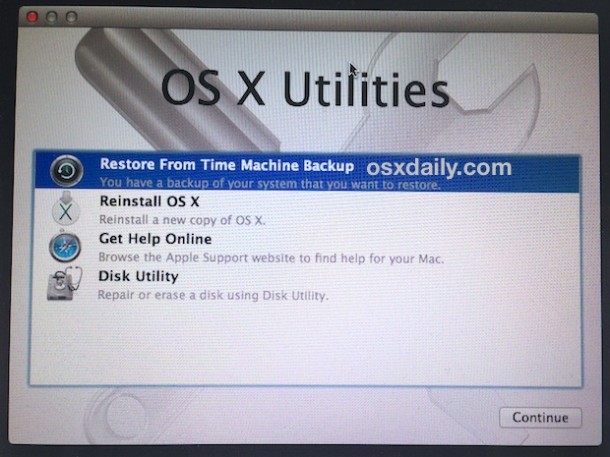
- At the OS X Utilities boot selection menu , choose “Restore from Time Machine Backup”
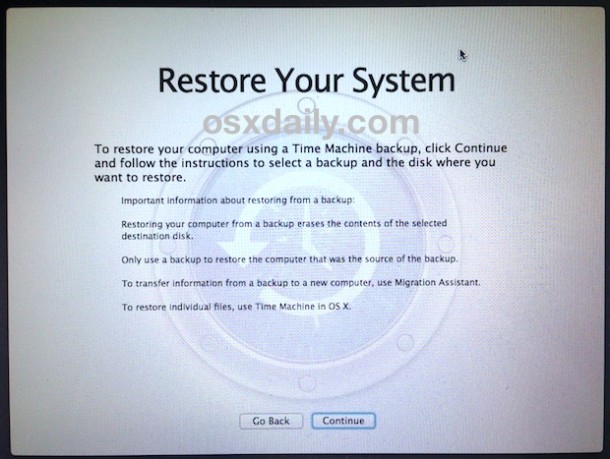
- Read the “Restore Your System” screen, understand what you’re doing, and click “Continue”
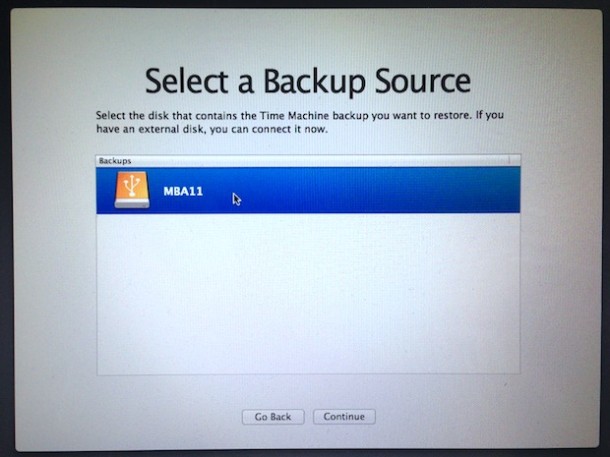
- Select the backup source – this should be the Time Machine drive that contains the OS X Mountain Lion installation
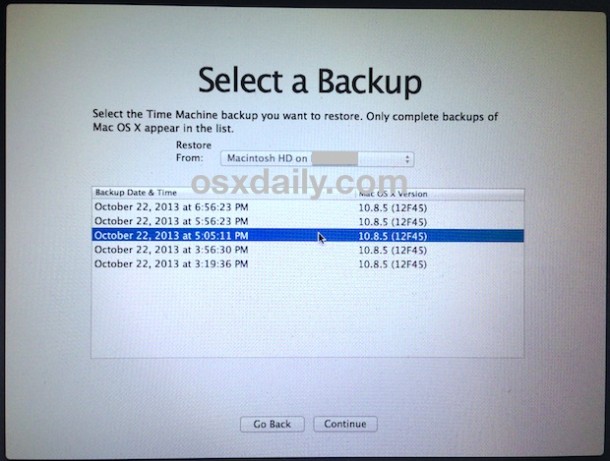
- Select a backup that corresponds to a date, time, and Mac OS X version that you want to restore to – be sure the Mac OS X Version is “10.8.x” to insure you are downgrading OS X back down to Mountain Lion, then choose “Continue”
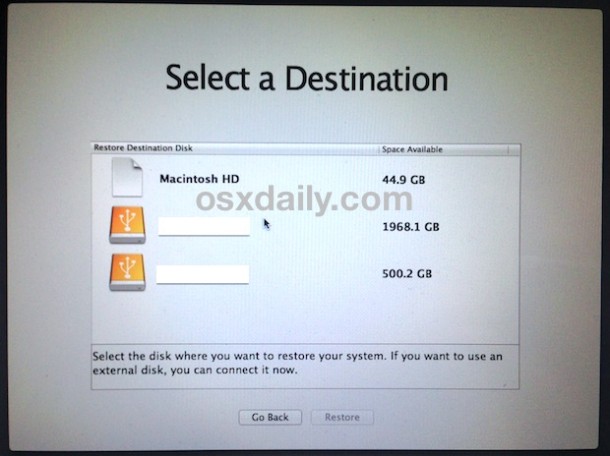
- At the “Select a Destination” menu, choose the primary Mac hard drive, typically named “Macintosh HD”, then choose “Restore” to begin the downgrading process
- Let Time Machine finish restoring from OS X Mountain Lion, the Mac will automatically reboot when finished downgrading from OS X Mavericks
When the Mac boots, you’ll be back to OS X Mountain Lion and everything will be restored to exactly how it was at the last backup made with Time Machine prior to upgrading to OS X Mavericks. Yes, that means you must have a Mountain Lion backup available or this particular method will not work to revert from Mavericks.
Now is a good time to restore your individual files created when running OS X Mavericks, either manually if you copied the files to a volume yourself, or through Time Machine.
Finally, another downgrade option would be to format the Mac and perform a clean install, similar to performing a clean Mavericks install, but using a prior version of OS X as the installer drive. That’s a topic for another walkthrough though.


First I backed everything up on time machine, and I made a manual backup of photos, music, downloads, and documents to another HDD.
Next I put in the install disk from OSX Leopard 10.5.. Mavericks will let you enter the install process right from the desktop on Leopard 10.5, but nothing past 10.5. (If you don’t have leopard you can probably get one off ebay, or find it on the internet somewhere.
The computer will restart into installation mode from which I erased the HDD. Then I installed 10.5 Leopard.
After the Leopard install you can upgrade to any version you want to. I used snow leopard because it only uses 1 gig of RAM.
My computer runs much faster again, like when I bought it. Sure there are some apps that don’t work, but I have everything I need here.
There is a way of getting your computer to go back to the operating system it started with. Without time machine. Do this while connected to the internet .
Hold down Command R on startup and a large world symbol should appear.. It will look for the operating system that is relevant to your machine and begin to install it..
I’ve seen it work.. a colleague found this by accident.
Cheers
Is there anyway to get mountain lion without habing a backup on time machine? I used to have 10.8 but never backed up using time machine during that time as I didn’t do anything too important, so my last backup is from 10.7 Lion. I only got updated to mavericks because my Mac broke down and Apple replaced my hard drive with one that had Mavericks pre-installed. Please help. Thanks!
@David Wrate
From what I’ve read in most places and what Paul said, basically you’re screwed. You will no longer have those documents as that would kind of defeat one of the purpose of restoring a backup. Imagine a user is restoring a back up because there are some buggy files that are preventing their system from running smoothly. If reverting to a previous (better) state kept the files from the “broken” state then its a pointless exercise.
It seems after restoration you can manually restore the missing files if you knew what they were beforehand and had backed them up separately on another drive. Apparently you can do the same through time machine but I’m not sure how.
anyone feel free to correct me on any errors in my explanation as I am not an expert but based on some research came to the above conclusion.
EDIT: I believe to restore the files from timemachine, just open up the time machine drive through finder and copy files over to your local drive’s corresponding locations.
Feel free to correct me on this.
Let us know what you ended up doing finally.
I’d like to downgrade but I have a concern about what happens if there is a four month gap between Time Machine backups: OS 8 Lion in August and my OS Mavericks yesterday.
If I rollback, what happens to all of my documents in the period of time between Aug and now?
This will not work to restore the 10.9 backed up settings and apps on to a 10.8.5 or earlier system.
Migration Assistant will not see the backup disk(s) created with 10.9, so a Time Machine disk with any 10.9 backup will not be visible in MA using 10.8.5 or earlier systems. Same will happen if you try to see a clone disk created with 10.9 system.
So if you are trying to revert back to 10.8.5, like I am, then your only chance to restore your 10.9 apps and settings is by manually copying files and folders, and THAT will take a long time and cumbersome detailed searches of want you need and where to find them so you can copy them.
I have been on the line with Apple Support for at least an hour and this was the result we reached.
SO, please be careful, the heading of this article is not very accurate, it is for restoring an older system backed up time machine by wiping the HD and restoring from Time Machine, exactly as Apple explains and intends. All changes made after the backed up machine cannot not be restored.
Correct, this downgrades OS X Mavericks to the prior installation of OS X Mountain Lion that was backed up. There is no way to move just the OS and leave settings from Mavericks intact in Mountain Lion.
Purchased 2012 27″ Imac, 2.7 Ghz I5, 16Gb Memory
OSX 10.7 Lion.
Machine was very fast, no problems whatsoever.
Upgraded to 10.8 ML – hangs on sleep and shutdown, lots of spinning wheels while unresponsive.
Upgraded to Mavericks 10.9 – even worse. Now machine frequently locks up to where I need to push the power button to restart.
Under lion my machine was up and running for months at a time.
Worst upgrade ever, even worse than Windoze.
Could you please change ‘easily down’ to ‘easily done’? I stalled on that for several seconds till I realised it was a typo.
I don’t use Time Machine, but rather, Carbon Copy Cloner to do my backups. I found that I could target disk mode a 10.9 computer and go into the Disk Utility, create a new partition (thus, deleting the previous one with 10.9) and then installing Snow Leopard on the computer. Which then, would allow me to boot up normally and then upgrade to Mountain Lion. For whatever reason, I couldn’t target disk mode and install Mountain Lion right away. I just happened to try Snow Leopard and that seemed to allow it to work and boot up right.
That’s the long work around I’ve found.
Could you please go over that again in simple steps.
Yes. I’ve had to do this a handful of times already (I have clients that upgraded right away without considering anything).
So let’s say you have a computer that you’ve recently upgraded to Mavericks. You don’t like it anymore, and you want to go back to Lion, or Mountain Lion, whatever. You’ll need to Target Disk Mode the computer with another one that you have. I have a 2008 MBP that I used for this to downgrade my 2011 MBP.
When you target disk mode it, you’ll see the drive on the desktop of the computer. In this case, it’s on my desktop (2008 MBP). I go to Disk Utility, select the drive (the 2011 MBP) and just delete/replace the partition, so it wipes it clean. Once that’s finished, I can either put the Snow Leopard disk into the 2011 MBP and install it, OR I can keep the target disk mode thing going and migrate a backup that I have on an external drive of Snow Leopard (I always keep different cloned backups of different OS’ on my external hard drives). I did this, because it’s faster to clone over an external hard drive backup onto a computer than installing from a disk. So I just do that onto that freshly wiped 2011 MBP. Once that finishes, I eject the 2011 MBP that had been connected/target disk moded and restart THAT computer. It’ll start up as a Snow Leopard drive. Then I can just install Lion or Mountain Lion via a USB stick of that OS.
Hopefully that makes sense. When I use the term ‘clone,’ I’m referring to using that as ‘copying over’ inside of the Carbon Copy Cloner app. I don’t use Time Machine normally.
It’s a good hour/2 hour process though for all of this.
Hi, im on a mac 2009, trying to downgrade 10.9 back to 10.8
when hold down Command+R on Reboot. IT does not give me OS X Utilities boot selection menu. just gives me my login menu.
Any help please
thanks
Be sure to hold Command+R early enough in the boot process to get the OS X Utilities menu. You can also try to boot into the Recovery partition to start the recovery by holding down “Option” and selecting the Recovery drive
as soon as i push the restart, im holding the Command+R
still just goes to login menu. i have my mac pro in raid 0 with 2 ssd’s and trying Recovery partition by holding down “Option” all that comes up is 2 hard drive’s ssd 1 and ssd 2
nothing else.
There is currently an issue with Mavericks and scanning. Many print drivers have not been updated for 10.9 yet.
Thumbnails for video files are not showing avi on os x mavericks i do my best to fix but its saem …but i install os x lion .10.8.5 its showing avi but on os x mavericks not i need help thankyou very much
MacBook Pro
will this also get me back to the iWork version i liked?
Ives needs to go away from software, what a disaster this upgrade was, personally.
Do I have to leave Apple (go pure unix and x-windows i guess)
If you have downloaded the newest version of iWork apps, the previous versions are not affected, unless you have intentionally gotten rid of them.
Have you tried it? Because I found the new versions ruthlessly overrode iWork ’09
iWork ’09 is kept in a different folder in Applications.