Whether you are a new Apple developer or an experienced Cocoa engineer with roots in NeXTStep, you will understand the need to back up your hard work. Integrating Xcode with subversion not only allows you to back up your code, but it also enables you to keep a history of changes that you can revert back to or compare your code against. This is called version control. This article assumes that you already have your own subversion repository that you have read and write access to. If you want to setup a subversion server of your own, I suggest consulting the almighty google for a wide range of articles on how to accomplish this task. Read on for screenshots, details and lots of fun. Read more »
As the release of iPhone OS 4 nears I thought it would be an opportune time to talk about why I’m personally excited for iPhone OS 4. As an amateur (up and coming!) developer and an avid user of the platform, I am more than ready for the unveiling of the latest incarnation of iPhone/iPad platform. Unfortunately iPad users will have to wait until this Fall before they can leverage a lot of the enhancements. It sounds like the wait will be well worth it!
Update: iPhone OS 4 has been announced, and it’s called iOS 4.
Want to use an external Bluetooth keyboard with the iPad? You don’t have to use Apple’s official iPad keyboards, instead if you already own a Bluetooth keyboard the chances are good that it will be compatible with the iPad. If you’re looking to do a lot of typing on the iPad then it’s hard to beat a real external keyboard, as the touchscreen is generally just slower and less accurate for many iPad users. To get a Bluetooth keyboard connected to iPad, all you need to do is pair the device to the iPad and adjust a few iOS settings, we’ll walk through exactly how to do just that.
Every once in a while you’ll come across a video that has audio syncing problems. Sometimes it’s minor where the sound track and dialogue is off by a few milliseconds and it’s barely noticeable, other times it can be off by as much as a few seconds and this makes watching the video almost impossible. Rather than ditch the video, you simply need to fix the audio track so that it syncs with the video track, and that’s what we’re going to cover here.
We’re going to use VLC to easily re-sync audio tracks to a video, by either offsetting the audio forwards or backwards. It sounds more crazy than it is, and it’s actually really easy to do with VLC on Mac, Windows, and Linux, here’s how….
You can quickly compare any two images side-by-side by using Mac OS X’s QuickLook feature.
* Select the two pictures within the Finder that you want to see side-by-side
* Hit the Spacebar to enter into QuickLook mode
* Click on “Index Sheet” at the bottom of the Quick Look window (it’s the icon with four tiled windows)
* The Escape key exits side-by-side view, and hitting Spacebar again or clicking away from the window exits QuickLook mode
Assuming you have the screen resolution to support it, there’s no reason you can’t compare four or even twenty images side-by-side with this method. This is a really handy tip for photographers and graphic artists.
You might be asking yourself, what’s mouse acceleration? Essentially mouse acceleration is an algorithm that is deployed in an attempt to make mouse movements feel “natural”.
For many PC users, when you first use a Mac, it becomes quite obvious that the mouse is behaving very differently. It will feel sluggish, unpredictable and unresponsive (to varying degrees depending on the user). This type of acceleration “curve” (as they call it) is useful when using a trackpad device, but very problematic when using a “high performance” mouse such as a logitech gaming mouse. I was recently reminded of how problematic the OS X acceleration curve can be while playing the recently released (for the mac) Half-Life 2. Trying to navigate a first person shooter while mouse acceleration is enabled is a nightmare!
You can now check your iPhone’s data usage on the AT&T network, but the ability to do so is aimed at helping users select a reduced data consumption plan rather than just providing an interesting service to subscribers.
Checking your iPhone or iPad data usage
To quickly check iPhone data use, dial *3282# (translates to *DATA#) and you will get a free text message with information about current data consumption. This works fine on the iPhone but won’t work on the iPad because it doesn’t have the phone capabilities, so you’ll want to use the method below instead.
To check your iPhone or iPad wireless data usage:
* Go to the AT&T wireless site
* Login with your wireless info
* From the Account Summary page click on ‘View Past Data Usage’
* You’ll be able to see a graph of data usage, select dates or go with the 6 month default
The usage graph is intended to make it easier to determine which of the new data plans you’ll need for your iPhone.
New wireless data plans from AT&T
Here are the new AT&T iPhone Data plans, they start on June 7th (iPhone 4 availability starts June 24):
* Data Plus – 200MB of data for $15/month. Additional 200MB costs another $15
* DataPro – 2GB of data for $25/month. Additional 1 GB of data is $10
* Tethering – Requires DataPro, plus an additional $20/month
It looks like the $30/month unlimited data plan is a thing of the past, and I imagine once the existing iPhone contracts are up users will be pushed into one of the set data plans. Those who bought the 3G iPad aren’t immune from the changes either, the unlimited iPad data plan looks to be going extinct as well. Directly from AT&T:
For new iPad customers, the $25 per month 2 GB plan will replace the existing $29.99 unlimited plan. iPad customers will continue to pre-pay for their wireless data plan and no contract is required. Existing iPad customers who have the $29.99 per month unlimited plan can keep that plan or switch to the new $25 per month plan with 2 GB of data.
If you have an existing unlimited data plan with AT&T you can likely renew the contract and get a new phone, but be sure to look at your contract and check iPhone 4 upgrade eligibility.
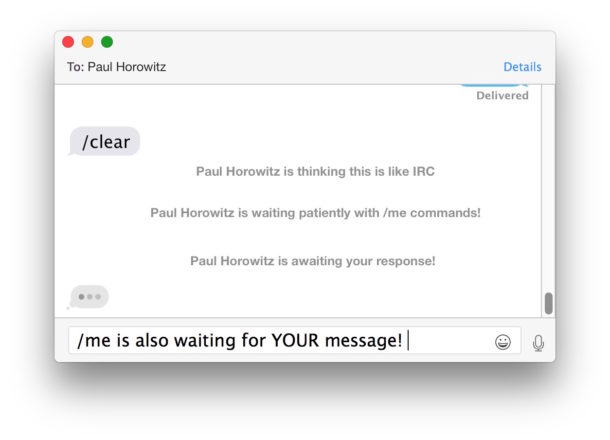
Did you know you can broadcast IRC-style notification commands in Messages for Mac? Indeed you can, even with Messages in modern MacOS releases.
This fun trick was originally discovered with iChat (back when Messages was known as iChat, remember that?) and it’s fair to say that many people never knew about the uses of an IRC like command to broadcast a notification type of message…
Spyware is generally something you don’t have to worry about on the Mac, but TheLoop is reporting that a company named ‘7art-screensavers’ is releasing malware on the Mac platform with a series of free screensaver downloads. Apparently the screensavers themselves do not include the spyware, but they attempt to download and install the “OSX/OpinionSpy” app during the screensaver installation process. TheLoop describes the spyware behavior as follows: Read more »
Finding the numerical IP address of a website or domain URL is pretty easy. We’ll use a terminal utility called nslookup, the command can be used to discover whatever domain resolves to a specific IP. This works for Macs with OS X but also in other unix varieties and even Windows DOS prompt too.
When you have extended information displayed under icons with the Finder from the ‘show item info’ Finder preference, you’ll occasionally run into an annoying truncation with used and available disk space.
I came across this quote which I think summarizes quite well why the iPhone is such a great device:
“If there’s a single feature that elevates the iPhone from the rest of the pack, it’s the way that it urges and enables me to maximize the amount of time I spend thinking and doing and creating, each and every day. I’ve got ten minutes while I wait for a burger to arrive, three minutes at the post office while as a clerk explains the concept of a “forever stamp” to the unenlightened, six minutes waiting in the subway…it all adds up. I leave the house with my iPhone in my pocket, and I come home with new photos, new drawings, a few tiny things written, many pages of books read, and a better sense of the news of the day.
I accomplished (okay, “accomplished”) all of that in crumbs of time that otherwise would have gone to waste. I don’t get that sort of effect from other phones…”
I couldn’t agree more. What other device can you carry around in your pocket and do so much with so easily? The iPad is too big for a pocket, the iPod Touch isn’t connected enough, and any other cell phone doesn’t even come close. This is why the iPhone is so great.
I’ve always been a fan of the Mac Mini, a powerful machine in truly tiny form factor. Here’s a particularly awesome Mac Mini setup, with dual displays being powered using both the Mini-DVI to DVI adapter and a Mini DisplayPort to DVI Adapter ports. I didn’t know you could drive dual monitors on a Mac Mini using that method, but here’s proof that you can!
The Google Chrome browser is an excellent choice, because not only is it fast and powerful, but it sandboxes Flash to prevent the plugin from going totally nuts, and it offers tons of customization options.
If you’re an avid Chrome user, you likely would appreciate using Chrome in full screen mode, and fortunately, you can do just that.
I’m kind of annoyed when I click a web link and it happens to be an iTunes Store link… iTunes then opens and it takes me out of my browser. I searched around for an easy solution and came across a method that reliably stops iTunes from launching when an iTunes App Store or Music Store link is clicked from a web browser.
If you don’t want iTunes links opening the application from the web, you are not alone, so we have published a nice how-to guide on preventing iTunes from launching every time you click on any iTunes web link. Read more »
Code completion is one of the more useful features when you’re developing since it allows you to write code faster. While Code completion should be activated by default in newer versions of Xcode, it’s easy to enable and use if it isn’t. You can also improve the usability of Xcode’s code completion with a great third party plugin, skip to the bottom of the article for that.
Enable code completion in Xcode
* Within Xcode, go to Preferences
* Click on the “Code Sense” icon
* Look for the “Code Completion” section and select ‘Immediate’ from the “Automatically Suggest” drop down menu
* Click “OK”
Using Code completion in Xcode
Once enabled, Xcode will now offer code completion based on what you have typed and offer suggestions for completing the syntax.
* You accept the code suggestion by pressing the Tab key or Return
* You can see a full list of completion suggestions by hitting the Escape key
It’s interesting to note that Apple says Code completion is disabled by default, but in newer versions of Xcode it seems to be enabled by default instead.
Improve Xcode code completion with Auto Assistant plugin
Code completion isn’t perfect in Xcode, but that doesn’t mean there aren’t solutions from third parties. A very helpful Xcode plugin for developers is called Xcode Auto Assistant, and it offers the ability to popup the completion list automatically, all the time, when a character it recognizes is entered. The behavior then becomes closer to how things like Coda, BBedit, Espresso, etc handle code completion. The plugin is a lot more consistent than what Apple offers by default, although I wouldn’t be surprised if this is changed soon with an update to Xcode. Until Apple adjusts the behavior, you can download the plugin from Google Code here.
After you download the Auto Assistant plugin, you’ll need to drop the plugin into the following directory: ~/Library/Application Support/Developer/Shared/Xcode/Plug-ins If /Plug-ins/ does not exist, just create the directory. Relaunch Xcode and the plugin is installed and works immediately.
The networksetup utility allows you to join any available network, whether or not it is a router connected through Ethernet, a wi-fi router that is or is not broadcasting an SSID, and whether or not it has any password encryption required.
Since most networking is done with wireless communications these days, we’ll focus on joining to wi-fi through the command line of OS X with networksetup utility. Read more »
Who would have guessed that by adding a little bit of velcro to your iPad it would become so versatile? The video is a bit goofy, but I have to admit using some velcro to mount an iPad onto your car dash or wall is a brilliantly cheap and easy way to get your iPad anywhere. Of course the downside is that your iPad will have velcro stuck to the back of it when it’s removed.
 Whether you are a new Apple developer or an experienced Cocoa engineer with roots in NeXTStep, you will understand the need to back up your hard work. Integrating Xcode with subversion not only allows you to back up your code, but it also enables you to keep a history of changes that you can revert back to or compare your code against. This is called version control. This article assumes that you already have your own subversion repository that you have read and write access to. If you want to setup a subversion server of your own, I suggest consulting the almighty google for a wide range of articles on how to accomplish this task. Read on for screenshots, details and lots of fun.
 As the release of iPhone OS 4 nears I thought it would be an opportune time to talk about why I’m personally excited for iPhone OS 4. As an amateur (up and coming!) developer and an avid user of the platform, I am more than ready for the unveiling of the latest incarnation of iPhone/iPad platform. Unfortunately iPad users will have to wait until this Fall before they can leverage a lot of the enhancements. It sounds like the wait will be well worth it!
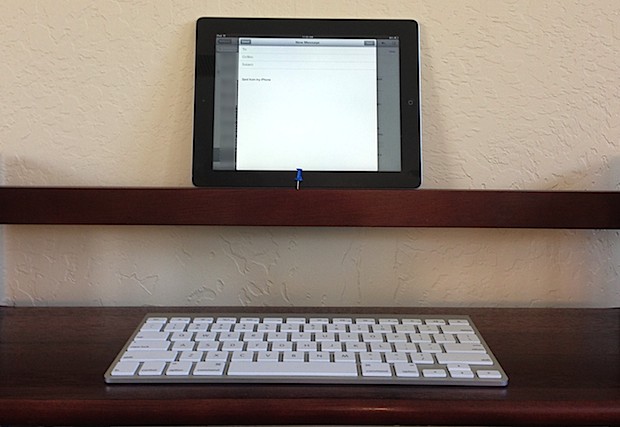


 When you have extended information displayed under icons with the Finder from the ‘show item info’ Finder preference, you’ll occasionally run into an annoying truncation with used and available disk space.
  I came across this quote which I think summarizes quite well why the iPhone is such a great device:


