Change File Permissions in Mac OS X
![]() You can instantly change file permissions in Mac OS X without getting your hands dirty in the command line by using the Finder instead. All you need to do is access the “Get Info” panel for the file, folder, or application in question. These instructions demonstrate locating the file permissions manager, and how to adjust privileges for items found in Mac OS.
You can instantly change file permissions in Mac OS X without getting your hands dirty in the command line by using the Finder instead. All you need to do is access the “Get Info” panel for the file, folder, or application in question. These instructions demonstrate locating the file permissions manager, and how to adjust privileges for items found in Mac OS.
It’s worth mentioning that you can also use this trick to quickly view current file and folder permissions and ownership details in the Mac OS X Finder. To view permissions, just use the Get Info panel as described below but don’t make any modifications. Mac OS X calls permissions “Privileges”, but they mean the same thing.
How to Change File Permissions on Mac
This is the most user friendly way to view or adjust file permissions in Mac OS X, it works with anything found in the Finder file system, be it a file, binary, application, or a folder. Here’s what you’ll want to do:
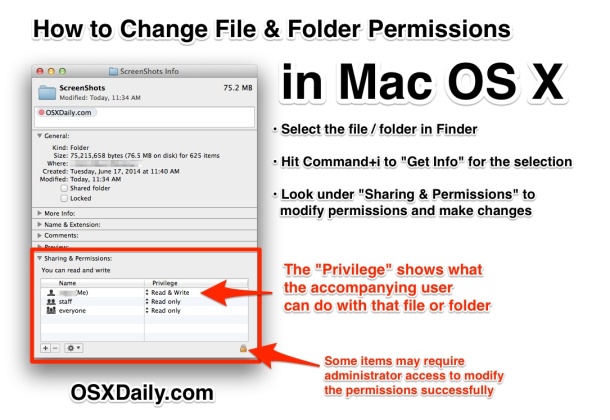
- Select the file or app in the Finder you want to edit permissions for
- Hit Command+i to “Get Info” about the selected file (or go to File > Get Info)
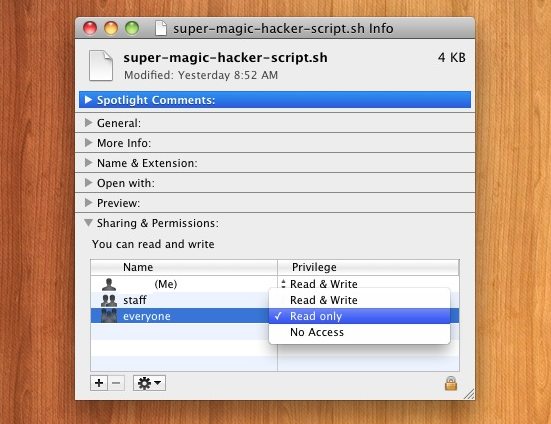
- At the bottom of the Get Info window, you’ll see “Sharing & Permissions”, select the arrow to drop down the options
- Adjust permissions* on a per user basis, the options being: read and write, read only, or no access

*Note that with certain files, apps, and folders, you may need to click on the little lock icon in the corner of the Get Info window, this will require a login to grant access from the administrator to be able to modify the permissions for the selected item.
When finished, just close out of the Get Info window. The changes to permissions happen immediately as you select items from the privilege option dropdown menus.
Permission Types & Explanations of Limitations
The permissions options are fairly self-descriptive in their naming, but here’s a quick overview in case you’re new to the concepts on a file level:
- Read & Write: The user can both read the file, and write to the file (make changes, modify the file, delete it, etc)
- Read Only: The user can only read the file, and is therefor unable to make changes to the file
- No Access: The user has no access to the file at all, meaning the user can not read the file or write to it
When you’re finished setting the desired permissions and privileges, close the Get Info window and the changes will take effect immediately.
Notice that you can’t make files executable through this the Get Info panels, you’ll still need to pull up the terminal for that.
One of our readers pointed out that you can use Get Info to adjust file permissions on remote files using the Mac OS X built-in FTP client, which is pretty convenient if you’re without a separate FTP app but you’re remotely needing to change privileges on something.
Generally speaking, if you’re not sure what to set, you shouldn’t mess around with file permissions since it can change the way a file or application responds to a given document. This is particularly true with system files and applications, as permissions can mean the difference between some apps working and some not. If you’re digging around because of frequent errors regarding access to files or ownership, try using the Recovery Mode method of repairing user permissions that works with Mac OS X 10.7, 10.8, 10.9, 10.10, macOS 10.12, 10.11, 10.13, etc, which can usually sort out those problems automatically without any manual modification of files.
You can also modify permissions from the command line using the ‘chmod’ command followed by flags or sequences and a file name, but that’s really a topic for another article.


What if I want to change file permission for all files in once? I moved all my files from one account to another but the permission still stays in the old one. I have a simulator, with the size of 97GB and containing thousands and millions of small resources. It’ll take me maybe more than a week to change each of them seperately.
[…] can change a files ownership through the same Get Info panel that lets you adjust permissions in the OS X […]
HELP! Disk Ownership changed to “CUSTOM”in 10.7.3 combo update. I am locked out of my internal disk and cannot find a way to unlock it or change the disk ownership permissions. No access.
Tried to use a terminal fix posted on support website, but no joy.
I have an ext HD running 10.6.8 but can only boot in using option command at login. Reinstalling System failed. I’m trying to avoid wiping disk and reinstalling OS 10.7
try Boot into Recovery Mode (Command+R at boot) and repair permissions
Unfortunately I can not get this to work. It does say it changes the file permission but when I go to the other user account and try to use the file it still says that user does not have the proper permissions. I pull up info again and it does say the user has read & write permission, it just won’t allow them to use the file. I have tried it with multiple files of different types. Still won’t work.
You likely need to authenticate with the lock icon to change the permissions in your case. But keep in mind that if a file or folder is in a protected state, say in a private user folder, or behind a locked drive, or encrypted with something like FileVault, the file will not able to be used by anyone, regardless of permissions set.
thank you
Should also point out that if you are changing the permissions on a folder (or disk), the Actions (the gear icon) allows you to apply the permissions you are setting to the folder to all contents of that folder. Actions also allows you to revert if you start making changes and then decide to cancel them.
Thanks for this hint.
Unfortunately you cannot make a file executable in this way. For that task, you need either use the command line or tools like the great Forklift.
Regards,
Michael
Good point, I wonder why this is not included? I didn’t know there was a UI for making any permissions changes so that is nice to see, but it is missing a few crucial aspects.
For all those wondering, you can make a file executable with:
chmod +x filename
You do this with scripts and the like, and occasionally with contents inside an app that are not launching correctly.