Enable Remote Login to Start SSH Server in Mac OS X
 Remote Login is a feature in Mac OS X’s Sharing preferences that allow remote users to connect to a Mac in a secure fashion by using the OpenSSH protocols. Essentially, Remote Login starts an SSH server on a Mac, which includes the ability to accept incoming SSH connections, and is the secure replacement for telnet. Additionally, this feature includes and enables the SFTP server, which is the secure replacement for FTP, and finally it also enables SCP, for secure remote copying of files. If this sounds complicated or confusing, it’s really not, and we’ll walk through exactly how to quickly enable and set up the SSH server on a Mac so that it can accept inbound secured ssh, sftp, and scp connections.
How to Enable SSH & SFTP Server in Mac OS X with Remote Login
By starting the “Remote Login” service, you enable SSH and SFTP servers in Mac OS X. These instructions are the same for enabling remote login and accompanying SSH servers in MacOS Mojave 10.14, MacOS High Sierra 10.13, macOS Sierra 10.12, OS X El Capitan 10.11, Yosemite 10.10, OS X Mavericks 10.9, 10.8 Mountain Lion, 10.7 Lion, and 10.6 Snow Leopard.
- Open System Preferences from the Apple menu, and click on the “Sharing” preference panel
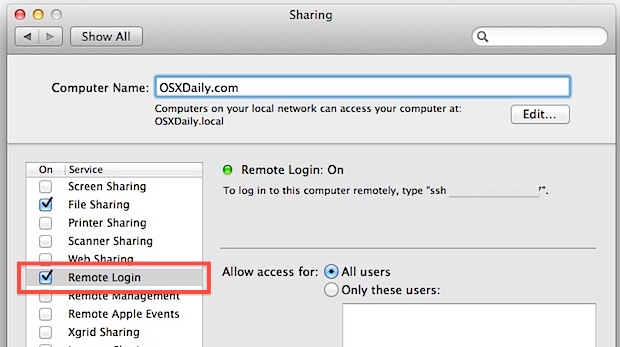
- Select the checkbox next to “Remote Login” to enable it, like the screenshot indicates
Clicking the checkbox will instantly start the various remote login servers, including sftp and ssh.

If you want to limit incoming SSH access to certain users, you can do so in the same preference panel by ticking “Only these users” and then manually adding them by clicking on the + icon. This brings up a list of Users & Groups on the Mac that you can select from. Think of this as an extra security step, although SSH by default is quite secure as is due to the nature of the protocol.
Now that the SSH server has been enabled, you can verify they have enabled if you’d like. The easiest way to do this is to visit Terminal app and type either ‘ssh localhost’ or ‘sftp localhost’, which, if all is running as intended, should return something like this:
$ sftp localhost

The authenticity of host 'localhost (::1)' can't be established.

RSA key fingerprint is b3:42:27:4a:b6:22:86:4b:c6:21:32:47:4b:8b:18:0d.

Are you sure you want to continue connecting (yes/no)? yes

Warning: Permanently added 'localhost' (RSA) to the list of known hosts.

Password:
Connecting to localhost isn’t too useful though, and this is called Remote Login for a reason, because it allows for secured connections to remote Macs through either the SSH command line interface, SFTP through any modern FTP/SFTP client, or with a direct file transfer by using the scp command from the terminal of other Macs or unix machines. We’ll focus primarily on the SSH and SFTP side of things because that is generally what the most commonly needed.
Connecting to the Mac SSH Server Remotely
Now that you have SSH up and running, connecting to it remotely is easy. The great thing about this is you can now connect to the Mac from virtually any other operating system, all you need is an SSH client. SSH clients are bundled with Mac OS X and Linux so there are no downloads necessary there, you can just open the Terminal and use the ‘ssh’ commands, but iOS users can use Prompt and Windows users can get PuTTY (its free).
1) From the Mac functioning as an SSH Server:
First you’ll want to grab the IP of the Mac running the server, this let’s another user/client know where to connect to:
- Get the Macs IP address – Go to “System Preferences” and “Network” to retrieve the IP
2) Connecting to the Mac with SSH from another computer:
Now with servers IP address, the Mac can be connected to:
- We’ll assume you’re using the Terminal in Mac OS X, so using the IP address that you just found, use the following command syntax:
- This is what it would actually look like, using paul as the username and 192.168.0.25 as the server IP:
- You will be asked to accept an RSA key to your known hosts list, so type “yes” and then you will be asked for the users password
- You’re now remotely connected to the Mac via SSH
ssh username@ip.address
ssh paul@192.168.0.25
You’ll now be logged into the Mac through SSH, this can be done remotely or over a local network, and all traffic to and from the machines is securely encrypted.
Terminal savvy users might also find it useful to know that you can enable and disable SSH server from the Mac command line as discussed here.
Connect to the Mac through SFTP
Because Remote Login enables both SSH and SFTP, you can also now connect to the Mac securely through the sftp protocol. This can be done through the Terminal, or through third party SFTP apps like CyberDuck, Transmit, Filezilla, or even from Mac OS X itself to transfer files to and from the Mac from any other location. A direct SFTP service link would look something like this: sftp://192.168.0.100
From the Terminal and command line, you would use the following command syntax to connect to the SFTP server:
sftp user@remote_host
If you want to use SCP instead, the procedure is the same except you use ‘scp’ as the commands instead.
A few things to remember here: your local IP address (on a LAN) is different than your external IP address (to the outside world). The easiest way to get a machines external IP is by going to a site like ‘whatismyip.org’ but keep in mind that if the Mac is behind a router with a firewall, you would have to open the ports on the router to be able to access it. That process is different depending on the router and firewall in use, so it wouldn’t make much sense to cover it here.
Finally, breaking away from Mac OS X and going to the mobile world with iOS, you can actually SSH into iPhones and iPads too by setting up servers on iOS devices too, but it’s a bit more complicated and requires a jailbreak to be able to enable the servers and gain access to the iOS command line.
The inclusion of SSH, and thereby SFTP, through Remote Login also explains why Apple ditched the FTP server in Lion onward onward (this remains the same in Mojave, High Sierra, Sierra, El Capitan, Yosemite, Mavericks, and Mountain Lion, though you can still install ftp if you really need to through Homebrew or by compiling it yourself), as they opted for the infinitely more secure and encrypted SSH and SFTP options, and bundled it within Sharing’s “Remote Login” option as part of the entire SSH package.
Thanks to Izdexic for the post idea via comments
If you have any helpful tips or information pertaining to SSH on a Mac, share with us in the comments below!


Hi, thanks for this nice article. I loved it. Just starting to get on it.
One question.
How do you handle logins which is like “Paul Smith” as suppose paul@192.168.0.25?
Thanks
Why don’t you put a like button?. I only have time to click that not to write this comment!.
where can we find the password for ssh remote login?
The SSH remote login password and login information is the same as the user accounts on the Mac you are connecting to.
For example if your Mac login is “test / password123” then you would use that same login information when connecting to that Mac through SSH.
Hope that helps!
[…] line to remount the drive, the entire process can be completed remotely if necessary through SSH, and without ever having to physically disconnect a drive from the Mac. This is infinitely useful […]
[…] “Sharing” panel will directly impact what you see as running, whether it’s to activate the SSH and SFTP server and enabling remote login, turning on and off file sharing for Macs or Windows or both, screen […]
[…] it would be best to use fast user switching to initiate a new login with another user account, or to use the ssh server and perform it on another local Mac. Using pkill on your own active username will cause all […]
[…] reports indicate the attack specifically created an open SSH connection on the targeted Macs, potentially allowing for remote […]
[…] you’re familiar with SSH, have Remote Login’s SSH server enabled on the target Mac, here’s all you need to […]
[…] be an invaluable trick for troubleshooting purposes, remote systems administration and management through SSH, and a number of other […]
[…] because we set a custom port. If the server you are connecting to uses the default port 22 (like the OS X SSH server does) you won’t need to do […]
[…] up passwordless SSH logins is a great way to speed up connections to regularly accessed remote Macs and unix boxes. Because OS X doesn’t include the ssh-copy-id command, you will have to use […]
[…] the default shell in Terminal app, in addition to changing a users default login shell for when logging in remotely with SSH or otherwise. Here’s how to do […]
[…] SSH and the Terminal and is more advanced than the email method mentioned below. You will need to enable SSH server on the target Mac beforehand for this to work, this can be done quickly through System Preferences > Network > Enable […]
[…] for several reasons. For one, the command line aspect makes it easy to use through a remote SSH connection, but perhaps more useful is dd’s low-level functionality which is generally faster than […]
Nice tip. Here’s how to make a quick SSH Proxy with Firefox:
Setup client:
ssh -C2qTnN -D 8080 user@ssh_server
Now go to Firefox -> Preferences -> Advanced -> Network Settings and fill it in with SSH server info
Test it, check IP, done!
I have this enabled at home so I can tunnel my traffic through it from public wifi spots, works like a charm.
BTW this is a great app for making it easy:
http://projects.tynsoe.org/en/stm/
[…] Update: Our much more detailed guide on Remote Login and SSH Server’s is here. […]