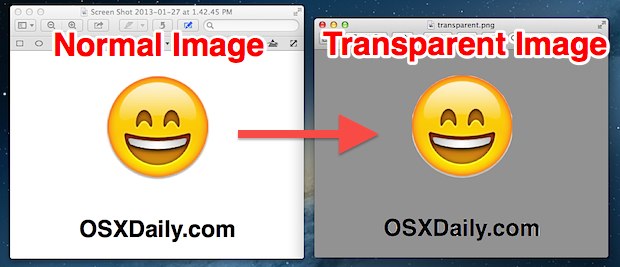
Make a Transparent Image (PNG or GIF) Easily with Preview for Mac OS X

It’s extremely easy to make an image transparent with the help of Preview app, the built-in image editing app that comes along with all Macs with Mac OS X. Do note creating transparent PNG or GIF images this way works best on images with uniform colors in the area you want to become transparent. The more complicated the image and color variation, the more work you will need to do with the alpha tool to make a portion of the image transparent.
How to Make a Transparent Image on Mac with Preview
You can turn any image transparent with Preview, though you’ll find the resulting image must be saved as an image format that supports transparency.
- Open the image in Preview
- Click the Toolbox icon in the toolbar of Preview app to reveal the image editing tools
- For earlier Mac OS X Preview versions: Click the little pen icon in the toolbar to reveal the image editing tools
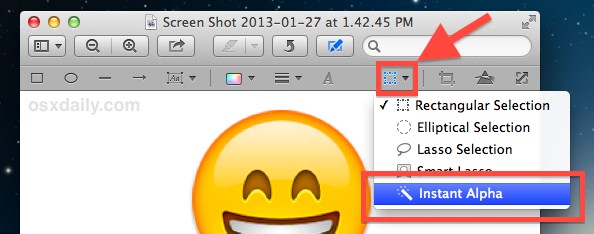
- Select the “Instant Alpha” tool, which looks like a magic wand in the Editing Tools menu bar (in earlier Preview versions it is contained under the Selection pulldown menu if the image is smaller than certain widths)
- Click and hold on the part of the image you want to turn transparent, and while still holding move the cursor up or down to either select more or less of the image to turn transparent – anything that is red is what will become transparent
- Hit the Delete key, or go to the Edit menu and select “Cut” to remove everything that was highlighted red with the Alpha tool (note: if the original image was a format that does not support transparency, you will be asked to convert the document, choose “Convert” to proceed” as expected
- Repeat as necessary for other parts of the image you want to become transparent


To get the finer details transparent it can help to zoom in and out of the image using Command+Plus and Command+Minus keys.
If the original file was a PNG or GIF and you are satisfied you can just save as usual, but in a lot of cases you may not want to overwrite the original file. Instead, you can save the newly transparent image as a copy by using “Export” or “Save As”.
Exporting the Image as a Transparent PNG or GIF
PNG files are much higher quality than GIF, and for most uses you’ll want to use a transparent PNG, but we’ll cover both how to create and save as either transparent GIF or PNG anyway.
Saving a Transparent PNG
- Go to File and choose “Export”
- Select “PNG” from the pulldown menu, and check the box next to “Alpha” to insure the image maintains it’s transparency
- Save as usual, maintain the .png file extension

Saving as Transparent GIF
- Go to File and select “Export”, then Option-click on the file formats menu to reveal “GIF” as an option
- Check the box for “Alpha” to preserve the image transparency, then save as usual with a .gif extension
Because you’ll need to perform manual adjustments with the alpha tool, this would not work on a group of files, though you could batch convert them ahead of time to PNG or GIF, then open each individually to make them transparent.
The video below walks through the process of turning an image into a transparent version of itself, including cleaning up areas that didn’t get immediately grabbed by the alpha tool by using zoom. This is demonstrated in an earlier version of Preview where the Editing Tools button was the Pen rather than the modern Toolbox icon, otherwise all else is the same:
You can make transparent images in Preview for Mac with nearly any version of the app this way, whether you’re in a modern macOS release, or an earlier Mac OS X version, the Preview app can create transparent gifs and transparent PNG files easily. Just remember to look for the Toolbox button in modern Preview versions and the Pen button in earlier Preview releases.


This is so cool! Thanks for sharing!
This worked for me today. Thank you SO much!!
I don’t get it. When I do step 5, the image is simply deleted. It doesn’t become transparent, it’s just gone.
I am having the same issues. I tried it about 6 times, and end up with a black box every time
The “wand” icon has been moved to the out of the drop down and is now on the toolbar. https://discussions.apple.com/thread/7883406?start=0&tstart=0
This Instant Alphay feature is no longer available in Preview that comes with 10.12.x (which is Preview Version 9.0 (909.18)
Does NOT work with latest ios
It just makes the background black where it has been deleted. Yes the Alpha is turned on
Agreed luke, just black with Catalina. No transparency available any longer.
Sweet, thanks… very simple and the funny thing a windows guy gave me this simple logo to modify because he knows the Mac is just better in these things… my quick search since I didn’t know how to do it, lead me here. Thanks for posting!
Thank you SO much! This was super useful for editing my logo to use for a banner in Canva. Thank you xxx
Agree with wow comments about simple – thanks to your explanation. The magic wand moved in Preview, but the rest works as described. Huge thanks!
Thanks!
I can’t see the edit icon with the pen on a rectangle in osx el capitan, even under annotate. Have they removed this feature?
Am very disappointed with El Capitan – this new $3000 laptop is virtually useless. Used to be an Apple fan, when it all just worked.
Thank you!! I love it when people make things so simple for me. This worked like a charm!!
I’ve been using this for years for signatures, so I can just paste the signature image on a document and don’t have to print, sign, scan, send. Also the occasional image. However, recently I’ve noticed that the foreground becomes translucent and if you paste it on another image. You can see a little bit of the background image through the foreground of the transparent png. Any idea? Thanks.
Thanks! Appreciate the post.
It works under Yosemite, from the view menu select “show markup toolbar” select wand (second from left in the tool bar) and select teh portion of image and then cut as described above. Great !
I am using Yosemite. The option Instant Alpha does not appear in that drop down list.
Thank you. It worked like a charm!
Every time I export to png, tiff or jpeg, I still get a black background, rather than transparent. Is there some preference I need to set?
wow.. its so simple… i thought i need to download some photoshop to do it.. thanks..
Has apple done it again and removed an interesting feature ?
I no longer find the instant alpha in Preview Version 7.0 (826.4) (MacOS 10.9.2) ???
I have nothing under “Smart Lasso”, even when I open a PNG file which should support Alpha layer.
Instant Alpha is still in Preview under OS X 10.9.2, you must open a file and show the Edit Toolbar first though, then select the magic wand to use.
I really love using Preview for all kinds of things (Some rudimentary image editing, resizing, merging multiple pictures into one image, combining PDFs, deleting pages from PDFs etc). Thanks for telling me about this feature, too! :)
Didn’t even know i could do that. Thanks
@Koolmajicguy: Wow, do you even think about being a bit less of an azzhole when pointing out mistakes?
“If you select a”
Wow, do you guys even proofread before posting?
Sometimes we miss things, but that’s what you’re for!
Thanks for catching the typo!
Good Tip!! I will use it …