How to Enable & Control Access for Assistive Devices & Apps in Mac OS
![]() Assistive Devices and Assistive Apps are applications and accessories which can control parts of the Mac and MacOS beyond the normal scope of app limits. While it’s primarily thought of as an Accessibility feature, it’s also commonly uses for general apps too, ranging from screen sharing functions, to apps that require microphone access, to even web browsers and many popular games. Because of it’s widespread usage
Assistive Devices and Assistive Apps are applications and accessories which can control parts of the Mac and MacOS beyond the normal scope of app limits. While it’s primarily thought of as an Accessibility feature, it’s also commonly uses for general apps too, ranging from screen sharing functions, to apps that require microphone access, to even web browsers and many popular games. Because of it’s widespread usage
many users may need to enable assistive devices and apps, but what was once called “Assistive Devices” and controlled within the Universal Access / Accessibility control panel has since moved to a new generalized location in MacOS.
Let’s see how to enable it in the latest version of Mac OS X, and also how to control and modify what apps can use the Assistive Device features.
How to Enable Assistive Devices & Assistive App Support in Mac OS
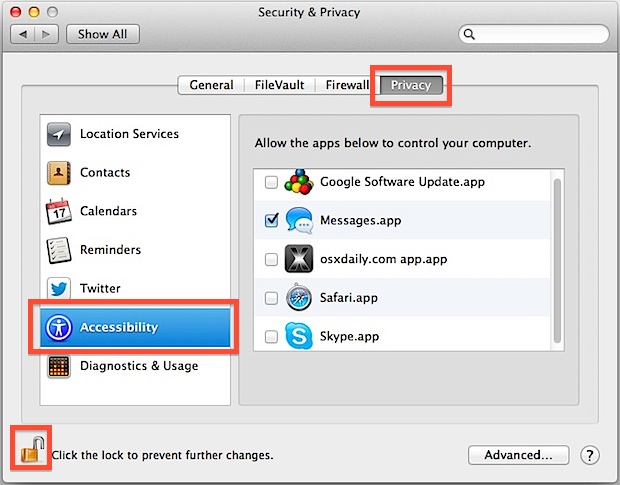
- Open System Preferences from the Apple menu and go to the “Security & Privacy” panel
- Choose the “Privacy” tab
- Select “Accessibility” from the left side menu options
- Click the lock icon in the lower left corner and enter an administrator password to gain access to the apps with assistive privileges
(Note that older versions of Mac OS X can find this setting in System Preferences > Universal Access > checking “Enable access for assistive devices”)
The list displayed shows exactly what apps can control the Mac using the Assistive Devices feature set. As mentioned above, this may include access to the camera, microphone, screen, keyboard, or other such functions of a Mac. If you see something in this list you do not want to have such access, or you don’t see an app you do want to have assistive access, you can easily control both, which we’ll cover next.
How to Control What Apps Have Assistive Access in Mac OS X
Most applications that want access to the Assistive Device panel will request permission upon first launch. This arrives in the form of a pop-up dialog box with a message saying “Appname would like to control this computer using accessibility features.” with an option to “Deny” the request. Note that if you deny the app, you can add it again later or toggle the setting easily by going to the Privacy control panel.
Let’s focus on controlling what apps have or do not have assistive accessibility functions on the Mac by using the Privacy > Accessibility control panel. This is done easily:
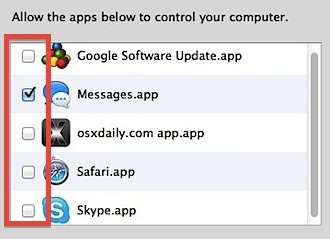
- Add a new app to Assistive Devices control by dragging and dropping the application into the window, typically from the Finder /Applications folder
- Revoke Assistive Device access for any application in the list by unchecking the box alongside the respective application name
You may find some apps in the accessibility list that you did not expect to see here, and if you see something curious consider the features of the app that may request more control over the Mac in order to function. For example, many popular games will require access to the Assistive Devices abilities so that an online game can properly use voice chat or screen broadcasting. This is true with nearly all Steam games, ranging from Team Fortress 2 to Civilization V, and Blizzard / Battle Net games like StarCraft 2 and World of Warcraft. Note these games will continue to function without Assistive Access, but their feature set for online communication and sharing may be limited, and thus if you’re playing games and find the voice chat features aren’t working, this setting or app-specific access could very well be the reason why. The same usually applies to other apps as well, and similar fine-tuned control is now available to iOS devices as well for apps attempting to access everything from location data to the microphone and camera.
If you’re wondering why this feature is now in the “Privacy” control panel, it’s likely a more appropriate place considering the heightened abilities such apps and devices can have access to on a Mac. Additionally, becacuse the feature has wider spread usage beyond general universal access functionalities, it makes sense to broaden its controls to more generalized privacy preferences.
This change first appeared in Mac OS X Mavericks and persists today in MacOS Mojave, Catalina, Yosemite, El Capitan, High Sierra, Sierra, and presumably onward.

I’m having an issue when I try to add things to allow them access… I tried dragging them from Finder folder and from the Desktop to the accessibility list, but they won’t appear… Am I doing something wrong?
The problem I am having with the Accessability is that the program I am trying to allow is “whited-out” and I am unable to click it
i can’t see accessibility in privacy settings
It would be nice if some developers figured out where this is located. Their apps link me to the Accessibilty pref pane, which is NOT where I need to make the necessary selection. No, it’s not a huge inconvenience, but it’s still their responsibility to learn where the proper link is located.
That is exactly the inspiration for this tip, it seems many apps send users to the wrong area which creates a lot of confusion as to how to turn on the assistive functionality.