How to Copy an ISO to a USB Drive from Mac OS X with dd
![]() If you have downloaded an ISO image of another operating system, say Ubuntu Linux or Windows 10, and you wish to turn that ISO image file into a bootable USB installer drive using a USB flash drive or USB key, you’ll find the most reliable way to copy or ‘burn’ the ISO to that target USB volume is by turning to the command line of Mac OS X. There are alternative solutions, but this command line approach using dd requires no third party downloads, it is quite fast, and is consistently reliable in producing bootable volumes out of ISO files.
If you have downloaded an ISO image of another operating system, say Ubuntu Linux or Windows 10, and you wish to turn that ISO image file into a bootable USB installer drive using a USB flash drive or USB key, you’ll find the most reliable way to copy or ‘burn’ the ISO to that target USB volume is by turning to the command line of Mac OS X. There are alternative solutions, but this command line approach using dd requires no third party downloads, it is quite fast, and is consistently reliable in producing bootable volumes out of ISO files.
It’s important to note this is somewhat advanced and should only be used by Mac users who are thoroughly comfortable with the command line. By using sudo dd, there is little margin for error, and a wrongly implicated disk identifier could result in permanent data loss. That risk makes this method not appropriate for novice Mac OS X users, instead, those users should turn to the simpler approach of using Disk Utility to burn an ISO the traditional way instead.
How to Copy an ISO File to a Target Drive Using ‘dd’ in Mac OS X
This will erase the target volume, replacing whatever data is on the destination drive with the ISO contents. There is no confirmation, therefore it is critical you use the proper drive identifier and proper syntax to avoid erasing the wrong thing. You should back up the Mac with Time Machine before beginning.
- Attach the target USB drive to the Mac if you haven’t done so yet, then launch Terminal
- Type the following command to print a list of attached volumes on the Mac:
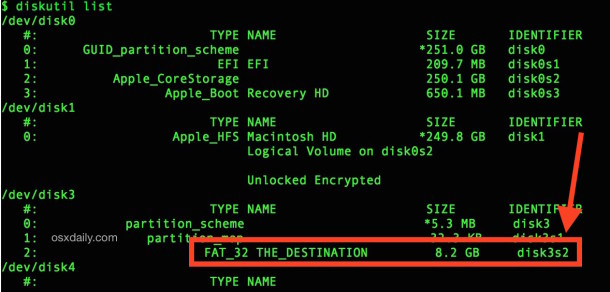
- Locate the USB volume name of the target drive (in this example, “THE_DESTINATION”) and make note of the identifier (in this example, “disk3s2”)
- Unmount the target volume using the following command, replacing the identifier as appropriate:
- You’re now ready to format the target drive and ‘burn’ the ISO to that USB volume – this will erase all data on the target drive replacing it with the ISO, this can not be undone – it is absolutely critical that you target the proper identifier to avoid unintended data loss. Assuming you know what you’re doing, replace the iso path with the ISO to burn to the intended target identifier volume using the following command:
- When you’re certain the syntax is proper, hit return and enter the administrator password, the copy process will begin immediately
diskutil list
This may look something like the following, it will be different on every Mac:
$ diskutil list

/dev/disk0

   #:                       TYPE NAME                    SIZE       IDENTIFIER

   0:      GUID_partition_scheme                        *251.0 GB   disk0

   1:                        EFI EFI                     209.7 MB   disk0s1

   2:          Apple_CoreStorage                         250.1 GB   disk0s2

   3:                 Apple_Boot Recovery HD             650.1 MB   disk0s3

/dev/disk1

   #:                       TYPE NAME                    SIZE       IDENTIFIER

   0:                  Apple_HFS Macintosh HD           *249.8 GB   disk1

                                 Logical Volume on disk0s2

                                 Unlocked Encrypted

/dev/disk3

   #:                       TYPE NAME                    SIZE       IDENTIFIER

   0:   	    partition_scheme                        *5.3 MB     disk3

   1:        	   partition_map                         32.3 KB    disk3s1

   2:                  	  FAT_32 THE_DESTINATION         8.2 GB     disk3s2

/dev/disk4

   #:                       TYPE NAME
sudo umount /dev/(IDENTIFIER)
Again using the above example, which is not universally applicable:
sudo umount /dev/disk3s2
sudo dd if=/path/image.iso of=/dev/r(IDENTIFIER) bs=1m
For example, with a Windows ISO named ‘Windows10_x64_EN-US.iso’ on the desktop, the syntax would be:
sudo dd if=~/Desktop/Windows10_x64_EN-US.iso of=/dev/rdisk3s2 bs=1m
Note that an ‘r’ signifier is placed in front of the disk identifier, this makes the command much faster. The ‘bs=1m’ at the end is for blocksize, which also speeds up the process. Neither of these adjustments are necessary to copy the ISO to the disk image successfully, it just results in a notably faster experience.
There is no progress bar so just wait it out, how long the ISO copy process takes depends on a variety of things, including the speed of the Mac, the speed of the target volume, and the size of the ISO file being copied or burned to the destination.
When finished, you can eject the volume, it’s ready to go.
diskutil eject /dev/(IDENTIFIER)
For what it’s worth, this works to copy ISO images that aren’t boot volumes and installers too. For example, if you made an ISO yourself of a volume, you could use the above command sequence to copy that ISO to another volume as well.
We’ve covered a similar dd trick, but the modifications outlined here make the above process faster and more reliable for some users. This method should work fine in all versions of OS X, regardless of what’s running on the Mac.
If you know of another method to quickly turn ISO images into bootable install volumes, do let us know in the comments!

I had to dd the entire usb disk (e.g. /dev/disk5) not disk5s2 or whatever. Otherwise the grub menu would come up when trying to boot the ProxMox ISO.
sudo dd if=/Users/jamshid/Downloads/proxmox-ve_8.3-1.iso of=/dev/disk5 bs=1m
You can print the progress of the copy operation using the option status=progress, which you can include after if of=/dev/diskX
you can add status=progress to get a real time view of the data being written
Re: …status=progress…
Thanks!
Sample output from that:
469762048 bytes (470 MB, 448 MiB) transferred 35.013s, 13 MB/s
Even now in 2020 this solution is valid and works like a charm. Thanks so much!
The instructions appear to be incorrect, at least on macOS Mojave 10.14. My USB key was /dev/disk4 with /dev/disk4s1 being the FAT partition. The .iso file needs to overwrite the raw disk, not the FAT partition, so the commands I used were:
$ diskutil unmount /dev/disk4s1
Volume UBUNTU on disk4s1 unmounted
$ sudo dd if=ubuntu-18.04.2-live-server-amd64.iso of=/dev/rdisk4 bs=1m
834+0 records in
834+0 records out
874512384 bytes transferred in 193.158841 secs (4527426 bytes/sec)
$ diskutil eject /dev/disk4
Disk /dev/disk4 ejected
I can confirm this correction. This way it working.
/dev/rdisk3 – is the disk
/dev/rdisk3s2 – is a partition (the second) on the rdisk3 disk.
You should not write in the partition but in the disk itself. So the correct command is Antman’s above.
incorrect.
mine was /dev/disk2 (with /dev/disk2s1 and /dev/disk2s2 partitions). I unmounted /dev/disk2 and used it for the dd output also. it worked!
Exactly! Thank you, I didn’t notice there is misleading information in the article. I followed the steps but I was not able to boot laptop from such USB drive.
Dear osxdaily.com, please correct it right in the text or add some note, even it is almost 7 years old, because playing with “dd” can be dangerous for beginner. “dd” is great legacy tool still worth to be familiar with, instead of fancy but untrusted GUI tools downloaded from Internet. Thank you.
It’s funny, now on OS Sonoma 14.5 the partition is just /dev/disk5. There are no disk5s0, disk5s1 or something like this. It’s just /dev/disk5 mounted to /System/Volumes/…
Hi Everyone,
OK once more for clarity.
I have found that as with most things in UNIX/BSD/Mac
Write a script to do the work – get everything right for nearly all situations – and then you should be able to repeat it without errors.
So using The “Disk Utility” seems to have stopped working ever since Sierra came out. That is on Apple or Microsoft Lawyers.
Using ‘diskutil’ is not always possible if you have an fairly old MacOSX version, because it did not exist until more recent MacOSX versions.
What should work all the time is ‘dd’ to a raw disk.
However a USB stick has to be inspected by the Mac as it tries to mount it for consumption by the Mac.
The issue here is the USB stick needs to be formatted at the level of a disk, ie. Some sort of format header – that tells the Mac things like
Media type, Capacity and the TYPE of data formatting.
Media type would be – its a USB SAN disk that looks like a normal SSD (it is writeable) or it looks like a NON-erasable disk (Some USB sticks have a slider that disables writing or at least tries to inform the OS that it should not be written to).
Capacity is subtle – the main issue is the way that the USB data area is addressed. Given that there are a few names that apply: GUID is the latest name and there are others, so you have to get this right.
Capacity is rated as XX MBytes. The type of Data formatting – is quiet the important bit.
Shoving a USB stick into a Mac and running any version of ‘Disk Utility’ provides info such as exFat, HFS+, etc.
In the following 3 could be any drive letter from 2 up to 9 for instance.
So addressing the drive /dev/disk3 with a terminal command like this
ls -al /dev/rdisk3*
you will maybe see /dev/rdisk3s1 and /dev/rdisk3s2
* means anything that looks like a device that could be your USB stick. You need to copy stuff to /dev/rdisk3.
So when you see a USB stick complain about things – do nothing.
Just ignore that problem – it is an artefact of the MacOSX and what types of disks it likes to mount. You do not want to mount stuff that is supposed to be plugged into another machine with another OS – installed or about to be installed. Ignore it. It will not get mounted but the Operating system still knows it is there and you can address/access it using the ‘dd’ command.
If the ISO image is indeed correct – it will have all the above information at the beginning of that file – it wants to make itself presentable to another machine and OS.
I believe that you need only use DD ‘dd’ to copy it.
It is possible to use HDUTIL to fiddle it but I do not think it is required.
You need to ‘dd’ it to the raw drive : eg. /dev/rdisk3
That is the best way to look at, and clone to, the USB disk.
/dev/rdisk3s1 /dev/rdisk3s2 etc. have matching /dev/disk3s1 /dev/disk3s2 entries.
What are those s1 and s2 things – – – they are slices ‘s’ for short.
Sections of the disk. Each section has a purpose and you do not need to know much about them if all you want to do is clone an ISO file to a USB disk.
If you want to see all the raw disks on the system, type into terminal
ls -al /dev/rdisk*
Assuming you need to clone a file to rdisk3
PREFIX:
sudo
COMMAND:
dd if=/Users/Admin/myWin10.iso of=/dev/rdisk3 bs=1m
Now I could write a script called clone2USB which could contain
#! /bin/bash
# clone2USB
sudo dd if=/Users/Admin/myWin10.iso of=/dev/rdisk3 bs=1m
OR I could write a better script
#! /bin/bash
# clone2USB
echo “Please Type in the name of the ISO file you want to CLONE ”
read -a CLONE
echo “ls -al /dev/rdisk*”
ls -al /dev/rdisk*
echo “Please Type in the number 2 or 3 or 4 or 5 etc to TARGET”
echo “In General … Never choose 0 or 1″
echo ” ”
read -a TARGET
echo sudo dd if=”\”$CLONE”\” of=/dev/rdisk$TARGET bs=1m
echo “If this is correct type an upper-case Y”
read -a YORN
if [ “$YORN” = “Y” ]
then
echo “Typing in a control-T sometimes typed as ^T”
echo “Can be useful to monitor the progress of the following”
echo “sudo dd if=”\”$CLONE”\” of=/dev/rdisk$TARGET bs=1m”
sudo dd if=”\”${CLONE}”\” of=/dev/rdisk$TARGET bs=1m
fi
OF COURSE you need to create this script in a users directory commonly located /Users/USERNAME/bin/clone2USB
which can be created using the following terminal commands
mkdir -p /Users/USERNAME/bin
vi /Users/USERNAME/bin/clone2USB
or use TextEdit to create it and save it to that directory
AND OF COURSE you need to make the script runnable/executable
using
chmod u+x /Users/USERNAME/bin/clone2USB
AND FINALLY OF COURSE you need to try it out in the terminal session.
/Users/USERNAME/bin/clone2USB
or perhaps just a plain
clone3USB
You do need to be familiar with the TERMINAL because the BASH shell is kinda tricky. I have tried to cover most situations.
I have also used scripts to build a set of external mirrored drives
which have 2 x 4 TB drives from ‘LaCie’ with a large partition setup as a mirrored array where there is a TimeMachine backup and a separate backup co-existing with that and a pair of Recovery partitions which can have different versions of the MacOSX recovery data installed. So I can boot off the drives in Recovery mode.
I know there will be comments – this group seems to have a lot of problems for this section to be so huge. My background is based on years of experience with many OS’s mainly LINUX and MacOSX with a bunch of other OS’s thrown in. I have the Pro version of VMware and I like to get various versions of OS’s up and running so that I can help with Disaster Recovery. As a Senior Linux Systems Admin I sometimes have to recover data – I hate it when companies push their need to save cash down to the bone and the flesh they peal away is related to ensuring backups.
I like to think about the advances being made in storage etc. but when push comes to shove, they do need to at least try to recover files for staff and customers. I know one staffer who asked for 2 files to be recovered – every work day for 60 working days – and never got them back. He lost faith and his data is probably off on his own disk where he controls the backup and recovery from birth to death.
That user has no faith in the big backup solution and so he will protect his data and not share it. His data might have given someone a clue about a disease cure – but without sharing it never can happen.
I would recommend “Discmaker X”. It’s much simplier if you want to make a bootable USB-Stick with MacOS.
Hi!
This is really nice but unfortunately it did not work for me, both from the standard iso and using hdiutil to convert to img. I have a distant past in sysadmin so I tend to exclude errors and I tried a few times.
Consistently the usb is not bootable on the Dell Inspiron 14 but the crazy part if that if I follow this howto and unetbootin I almost get it to work:
http://fgimian.github.io/blog/2016/03/12/installing-windows-10-on-a-mac-without-bootcamp/
The usb is bootable and the installation starts but then I get an error 0x8007000D “cannot open D:\sources\install.wim” and it turns out the file is bigger than 4GB so FAT32 can’t address it all.
TL;DR:
either I cannot see the USB stick from the Dell laptop or I cannot get it to open D:\sources\install.wim because the usb is formatted as FAT32
I also tried to format with exFAT using diskutil but again the usb cannot be seen at boot
any idea? thanks!
I tried doing a bootable usb on Mac with the terminal commands and after it copied and ejected, the usb disappeared completely. It does not appear as bootable device, it does not appear in the disk utility app. Also I am beginner at working with terminal, but from what I can see, the stick as I know it (16gb) does not appear either.
[IMG]http://i63.tinypic.com/2guxgrc.png[/IMG]
Any clues?
You.
Totally.
ROCK.
Thank you for posting this.
i have found a utility smaller the masterize image iso. to usb from mac.
name is unetbootin, find
I can not make this work on macOS High Sierra Version 10.13.2
The instructions appear to work when I read the command line, but the thumb drive ends up empty and unformated and uninitialized.
I tried it 3 ways:
bs=1M
bs=1m
No bs.
All look great on the command line, but the thumb drive gets unformatted and macOS High Sierra refuses to see it. When I plug in the drive I get this message:
“The disk you inserted was not readable by this computer. Initialize…, Ignore, Eject
I select Initialize and Erase the thumb drive as Mac OS (Extended (Journaled). I repeat my script and get the same bad results. I also have tried MS-DOS (FAT) and that also fails.
/bin/ksh ~/bin/CentOS_thumb.ksh
sudo diskutil unmount /dev/disk3s1
Password:
Volume ThumbsUp on disk3s1 unmounted
sudo dd if=/Users/steve/Public/Linux/CentOS/CentOS-7-aarch64-Netinstall.iso of=/dev/rdisk3s1
load: 1.46 cmd: dd 9428 uninterruptible 1.22u 12.19s
538348+0 records in
538347+0 records out
275633664 bytes transferred in 128.380321 secs (2147009 bytes/sec)
538348+0 records in
538347+0 records out
275633664 bytes transferred in 128.380346 secs (2147008 bytes/sec)
768656+0 records in
768656+0 records out
393551872 bytes transferred in 183.050061 secs (2149969 bytes/sec)
sudo diskutil eject /dev/disk3s1
Disk /dev/disk3s1 ejected
StevesiMac2017
steve@StevesiMac2017: ls -l /Users/steve/Public/Linux/CentOS/CentOS-7-aarch64-Netinstall.iso
-rw-r–r–@ 1 steve staff 393551872 Dec 11 09:10 /Users/steve/Public/Linux/CentOS/CentOS-7-aarch64-Netinstall.iso
you should try using /dev/disk3 (or /dev/rdisk3) instead of the full volume path on the DD command – this will likely result in the volume being formatted correctly and readable under osx after its complete.
So in your example it would be;
sudo dd if=/Users/steve/Public/Linux/CentOS/CentOS-7-aarch64-Netinstall.iso of=/dev/rdisk3
i had the same problem, and that was my solution which worked.
I get to a point and an error comes up: /path/image.iso: No such file or directory
I have the same issue; I’ve tried typing everything in twelve ways to Sunday but have yet to get the disk image to copy onto my USB.
Drag and Drop the file into terminal, your typos will not exist
Good old dd , I should have known this would solve my issue, thanks for the reminder, I haven’t used dd in at least 15 years.
Except I was using in on linux to create windows boot disks back then….
Sometimes its hard to build a better mouse trap I guess, I struggled with unetbootin, but got no love.
Now back to basic dd and it boots fine on a dell laptop.
There’s a unix command to pipe dd into a progress checker but I don’t remember what it is.
First off thank you for the tips.
I was not able to unmount with “sudo umount”
instead I used “sudo diskutil unmount /dev/disk4s1” in my case.
Also much thanks to the commenter for the “control+t” command for checking the progress!
The transfer is complete now so I’m going to check if the usb will boot.
This was so simple I wonder why installers exist
I tried this procedure as I can not upgrade my Snow Leopard to Yosemite using a DMG file downloaded from the appstore a while back (no longer available for re-download). Says it cannot be verified or my have been corrupted during download. I also have an ISO file but, after the burn to USB stick is completed (normally) using either the DMG or ISO files, I get “The disk you inserted was not readable by this computer.” Diskutil Verfy tells me that it has “Invalid B-treenode size” and Repair fails. I have tried this several times with different USB sticks and a DL CD RW and two different Macbooks (both with Snow Leopard)with same result. I eventually gave up (it’s very time consuming) and ordered a Bootable USV install Upgrade from eBay. I would like to know, however why the procedure failed in case I may need to try it again.
Thanks
ctrl-t during the dd will give you how much it’s done (it sends SIGINFO)
I use DCFLDD (DC Forensic Lab dd) , I like it because it shows you the progress percentage and dd does not which drives me nuts
I’m a PC guy and had the problem of downloading .iso files to my MAC and unable to xfer them to my USB drive for load in my PC. HERE’S YOUR QUICK FIX!!!
Upload the .iso to dropbox, save it onto the drive from you MAC, xfer. Peace. No TERMINAL needed.
This is not even the topic at hand. Glad your issue got solved but didn’t have anything to do with this subject.
Thanks, I haven’t seen a detailed tutorial like this.
I think sometimes disk images can be compressed or have headers, which is why this doesn’t always work. I usually mount the disk image and then “diskutil list” to find the mounted disk image and the target disk, then I “sudo dd if=/dev/DISKIMAGE of=/dev/TARGET bs=1m” and it 90% works.
So… I messed up big time
I couldn’t get umount to work, but the alternative worked. (diskutil unmount /dev/IDENTIFIER)
Lauras-MBP:~ laura$ sudo umount /dev/disk2s1
WARNING: Improper use of the sudo command could lead to data loss
or the deletion of important system files. Please double-check your
typing when using sudo. Type “man sudo” for more information.
To proceed, enter your password, or type Ctrl-C to abort.
Password:
umount(/Volumes/USB): Resource busy — try ‘diskutil unmount’
Lauras-MBP:~ laura$ diskutil unmount /dev/disk2s1
Volume USB on disk2s1 unmounted
I followed the directions. When I tried to boot the computer from the external device, it says “Missing operating system”
Hi There, thank’s for the tutorial
I got a problem after it
I finished it and when i tried to reboot I got the white screen of the death and the circle with the diagonal bar.
Even if I try to boot the recovery mode or anything
In the single user mode it’s tell me that he can’t find a bootable partition but when I check my drive it’s telling me that it’s fine.
I remove my Drive from it’s case and try to plug to another computer and it’s correct, everything is in it
I have a Time Machine Backup on my other hard drive.
Macbookpro unibody Late2011, Elcapitan, intel i5,Samsung SSD840 evo, HDD Seagate 500go
I run out of Ideas if you guys could help me
There is progress with dd. You should use signal USR1 and kill the procecss with it. Then it will should you stats in terminal where dd runs. Ex: kill -USR1 12345
12345 is process id from Ex: ps aux | grep dd
I think I may have screwed this up I used the sudo dd but totally forgot to direct it to my USB is there anyway I may have screwed up something on my drive?
i’m also assuming that, after I convert the iso to an .img.dmg file, that I am to then manually change the file name to delete the .dmg portion of the suffix, is that correct?
please keep this discussion alive… I have tried everything several times over, double checked, triple checked, quadruple checked all of my work and my USB drive still comes up as unreadable. I am using a Mac mini late 2011, OS 10.11.x. i’m assuming that the disk should be readable after it’s formatted and before I reboot, is that correct?
I’m having the same problem :( Did you solve it?
I try “sudo umount /dev/…”, but get only “Resource busy — try ‘diskutil unmount'”. How fix this?
sudo diskutil unmount /dev/diskX
Could not get this to work. I suspect that your use of a partition device (/dev/rdisk1s1) instead of the disk device (/dev/rdisk1) is the issue, as you are using disk images not partition images.
The instructions at http://www.ubuntu.com/download/desktop/create-a-usb-stick-on-mac-osx do work
hdiutil convert -format UDRW -o ~/path/to/target.img ~/path/to/ubuntu.iso
diskutil list
(determine the device node assigned to your flash media (e.g. /dev/disk2))
diskutil unmountDisk /dev/diskN
sudo dd if=/path/to/downloaded.img of=/dev/rdiskN bs=1m
diskutil eject /dev/diskN
Works. You’re awesome.
I am trying out using an external Harddisk to install Win8 on Mac, all the steps above appeared to work during the process, however Mac cannot detect the bootable drive.
can the bootable disk be mounted again? Seems like it doesn’t work for me and is it required to reformat before trying again?
thanks!
Thanks! The best tutorial that I found…100% working for me
Thanks for the wonderful tip.
seems working
MACs-iMac:~ mac$ sudo dd if=/Users/mac/Downloads/CentOS-7-x86_64-Everything-1503-01.iso of=/dev/rdisk1s1 bs=1m
7240+0 records in
7240+0 records out
7591690240 bytes transferred in 474.486823 secs (15999792 bytes/sec)
MACs-iMac:~ mac$
Hi,
I have a PC and a Mac. As always, my windows has crashed. So, I bought a lower version of windows and downloaded it on my Mac but the problem is I can’t create bootable USB from my PC because windows won’t start. Can I create a bootable USB from my Mac for my PC using this method?
Something else to add that makes the process easier; dragging the source .iso file to your terminal window will input the file path for you.
Looks like you have to convert the iso into img first.
Didn’t work for me ether. The thumb drive after that is empty and not formatted even though it says the transfer was successful.
3830+1 records in
3830+1 records out
4017000448 bytes transferred in 1102.431775 secs (3643763 bytes/sec)
But then when you reinsert the usb thumb drive OS says “The disk you inserted was not readable by this computer.” and offers to initialize it.
I have the exact same problem! Someone please help!
didn’t work usb was not bootable
You burned the ISO wrong, try again
Doesn’t work for me either. I tried 3 different thumb drives, and downloaded both the official Windows 10 ISO direct from Microsoft, and tried a pirated ISO. I also tried converting both of the ISO’s to images as well. Neither will boot in my PC, in any of the 3 thumb drives, using the ISO or the IMG.
I also used the same drives and the same method to create two different bootable Linux drives, which both work fine. So the process is obviously correct, but there has to some other variable here.
For the purposes of thoroughness, I tried 1 Sandisk, 2 PNY, and 1 ADATA drives.
This did not work for me on 10.10.5 (2012 Mac mini). I tried every variation I could think of:
– Partitioning the USB drive as GUID, MBR
– Formatting as “Free Space,” HFS+, ExFAT, FAT
– dd to diskn, rdiskn, disknsm, rdisknsm
Nothing worked. Some combinations produced a drive that contained the files from the iso, but it wouldn’t boot (did not show up in EFI when holding down Option, nor in System Preferences / Startup Disk). Others were unreadable altogether.
Good thing I have an external Blu-ray drive. I managed to dig up an old blank CD and burn it. Booted just fine. Who says optical media is dead??
Here is the correct way to burn a usb with diskutil. This article left out that the .iso needs to be converted to an .img an apple puts on at the end a .dmg (it’s an apple thingy). OS X 10.11.2
http://www.ubuntu.com/download/desktop/create-a-usb-stick-on-mac-osx
hdiutil convert -format UDRW -o filename.iso (backspace and change to .img) filename.iso
Here is how it looks, (copy and paste filename)
hdutil convert -format UDRW -o ubuntu-15.10-desktop-amd64.img ubuntu-15.10-desktop-amd64.iso
Instead of typing in ~/home/usr/ an so on when in the terminal cd to working directory or where you downloaded the iso file then the command for dd if=filename.iso of=/dev/rdiskn (where n is the number) bs=1m.
In apple’s dd if=filename.img.dmg of=/dev/rdiskn bs=1m
Hope this helps
Now THIS was helpful! Totally the missing info from the article. Brain-racking, hours-Googling problem, grumble mood thanks!
I also needed this step. My commands were:
diskutil unmountDisk /dev/disk2s1
sudo dd if=~/Desktop/lubuntu-16.04-desktop-i386.img.dmg of=/dev/rdisk2 bs=1m
Have done all of that but than I can not enter my password.
thx for help.
Just a suggestion using dd; you can send a SIGINFO to dd, to find out the progress; the best way is to press “ctrl + t” and dd will display the current progress.
Great advice, thanks!
I have followed the above procedure but I always fail.
What I have done is create a partition first on the usb using “free space” then execute the sudo dd command (same as the above instruction) on the usb primary drive (disk2 in my case).
Yes, I found that using the disk name + partition in the dd command (eg, disk2s2) is not creating a bootable drive that will work on the intended PC-The dd does complete ok though. Tonight I am going to try just referencing the primary disk identifier (eg disk2) to see what happens.
Thanks for that suggestion, you are correct, does not boot if targeting the partition (as suggested in this article). Instead, you must target the disk. Don’t forget to use the `r` prefix too.
For latest version of Debian I used:
`sudo dd if=debian-live-9.5.0-amd64-xfce.iso of=/dev/rdisk4 bs=1m`
It is a really feasible solution. Thanks a lot.
how do i know when it is finished? It has been a few hours, but the flash drive is still blinking and after entering the password, i never received a complete message. .iso is about 4.8GB SUSE Linux.
thanks,
When dd is complete you will be returned to the command prompt, if the disk is still blinking (writing) it has not finished yet. Depends on the speed of the drive, and other things really, but it can take a while to burn an ISO to a a usb flash disk.
If you press ^T in the terminal, it will send a SIGINFO signal to dd which will print out the current progress.
Great tip! This should be added to the article.
it’s a great tip thank you :)
THis is great. Seems so simple that I am suprised there isnt a simple GUI app for mac to do this behind the scenes. Wouldnt this implementation be trivial?
The Disk Utility app that comes with OS X can burn an ISO in the GUI on Mac
https://osxdaily.com/2009/09/11/how-to-burn-an-iso-on-your-mac/
That only works for CD/DVD media, not to USB. Unless something has changed recently. Very recently. :)
https://github.com/gingerbeardman/dd-gui
The ‘r’ prefixing the identifier signifies the raw data under the visible file system, which is necessary to make the output volume bootable. It’s also faster because it’s block aligned IO. Basically, rdisk goes directly to the disk, disk goes through the fileystem.
man hdiutil has more details if you’re curious which has this
” Since any /dev entry can be treated as a raw disk image, it is worth noting which devices can be accessed when and how. /dev/rdisk nodes are character-special devices, but are “raw” in the BSD sense and force block-aligned I/O. They are closer to the physical disk than the buffer cache. /dev/disk nodes, on the other hand, are buffered block-special devices and are used primarily by the kernel’s filesystem code.
It is not possible to read from a /dev/disk node while a filesystem is mounted from it, but anyone with read access to the appropriate /dev/rdisk node can use hdiutil verbs such as fsid or pmap with it.Beware that information read from a raw device while a filesystem is mounted may not be consistent because the consistent data is stored in memory or in the filesystem’s journal.”
Can you explain the significance of the ‘r’ in front of the disk identifier?
The ‘r’ is for ‘raw’, basically it’s faster and more direct than just using the disk identifier. You can use either, or one or the other, as far as I know there’s no benefit other than speed.
Cholingo details this quite a bit below, referencing the man page for hdiutil, thanks for that!
> The ‘bs=1m’ at the end is for bitesize
I would suggest “block size”. It is the size of the chunks of data that are written, in bytes.
This is good I used to use dd all the time and still do in some occasions, but, I have found two better solutions which are easier for the average Mac Joe too.
WINDOWS: For making a bootable Windows installer from OS X I’ve found the absolute easiest method is to use Boot Camp Assistant, works every time and you can feed it an ISO and you’re good to go. It even works with the Preview versions too
http://windows.microsoft.com/en-us/windows/preview-iso
LINUX: For making Linux installers from ISO files, I like unetbootin, which can streamline the process of downloading the ISO of your choosing and burning it to the destination of choice for an installer.
http://unetbootin.sourceforge.net/
STORAGE & MULTI-BOOT: You can triple boot OS X, Windows, Linux, just be sure you have a big hard drive. Windows 10 is very storage hungry I wouldn’t attempt less than 50GB for Windows, you can get away with less for Linux. Best used on a 512GB+ SSD, overall.
Great information, thanks! Trying out unetbootin now.
Is there a link with addtional detail on using Boot Camp Assistant to create the bootable USB for Windows?
It’s quite easy, you’ll need a Windows 8 or newer ISO (windows 10 works fine), and a large enough USB key to support the file size, I’ve used a 16GB for Windows 10 and it was fine. Then open “Boot Camp Assistant” in OS X (/Applications/Utilities/ folder) and go through the steps, Apple makes it very automated and it works quite well. We’ll cover it in detail perhaps in a future walkthrough.
Great tool, thanks for information!
> For making a bootable Windows installer from OS X I’ve found the absolute easiest method is to use Boot Camp Assistant, *works every time*
Yeah right … unless it doesn’t even show the option to create a bootable usb thumbdrive EVEN AFTER ONE MANAGES TO MANUALLY EDIT THE .PLIST FILE. Stupid utility.
Agreed – Boot Camp Assistant is way too inflexible, wants a very rigid workflow, and gives no diagnostics, logging, progress indicators or debug options. It has a bunch of platform-specific capabilities that are hidden but strictly enforced, requiring PRAM resets to fix and .plist edits to workaround.
It also has virtually no built-in Help or tutorial, instead shuttling you off to articles on Apple’s site that may or may not apply to the version you’re using.
bs=1m is the block size, if you get an error you can use bs=1M. with a capital M, you are able to see the progress by hitting ctrl+t, this will show how many blocks have passed, blocks being 1mb in size it’s easy to see.
Regards.
That ctrl+t tip tho! I have been struggling with dd for years waiting for huge images to burn. There was another trick which involved two terminals and a screen command or something. I cannot recall. This is so simple though! Thanks for that!
Theo – you saved me here! Great tip about Bootcamp Assistant
Thanks!
unetbootin doesn’t always work, and so I would say that dd can be easier since you don’t have to create multiple bootable USBs before you get one that works. Yesterday I was trying to use a bootable Ubuntu disk to remove partitions on drives in one of the servers that I work on for work, and unetbootin created bootable USBs wouldn’t work in the servers. However, the dd created bootable USBs worked just fine.
I used unebootin and found not all files loaded, does not work all the time, and created endless frustration and many hours. It seems for no issues dd is the only way to be certain of success. Would not load gnome through unebootin
Yes – this. I have an old Hackintosh that is almost useless now (still on Snow Leopard in 2019 useless) and I’ve been trying to flash Ubuntu onto a usb…no 3rd party solution worked but this article and good ol command line did the trick.