How to Record Video on Mac with Webcam & QuickTime
Ever wanted to record a video on a Mac using the computers built-in camera? Maybe you want to capture a special moment as a movie, record a quick video note, record a movie for social media, or for any other purpose. Whatever the reason, you can easily record video on Mac using the front facing FaceTime camera and a built-in app.
There are a few different ways to accomplish video capture on a Mac, but we’re going to focus on recording video with QuickTime Player and the Mac computers webcam, because the software is bundled on all Macs and virtually every Mac has a built in camera to record from. This end result will be a movie file being saved that can be shared, uploaded, edited, or used however you’d like.
How to Record Movies on Mac
- Open QuickTime Player in Mac OS, it’s found in the /Applications folder
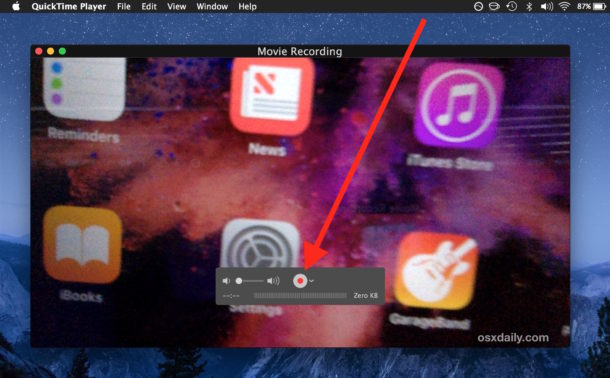
- Pull down the “File” menu and choose “New Movie Recording”
- The FaceTime webcam will activate and show on screen, click the red record button to start recording your movie
- When finished recording, hit the Stop button to end the recording
- Optionally, trim the video to shorten it
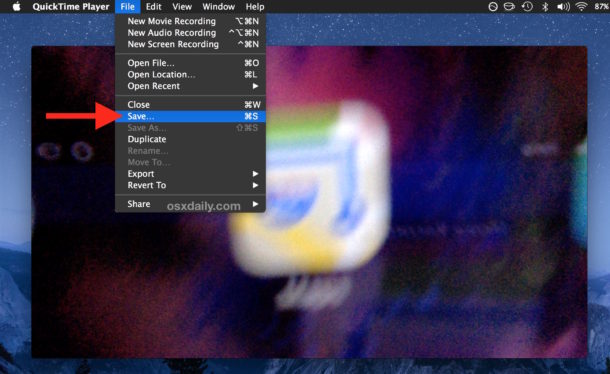
- Go to the “File” menu and choose “Save” (or Export)
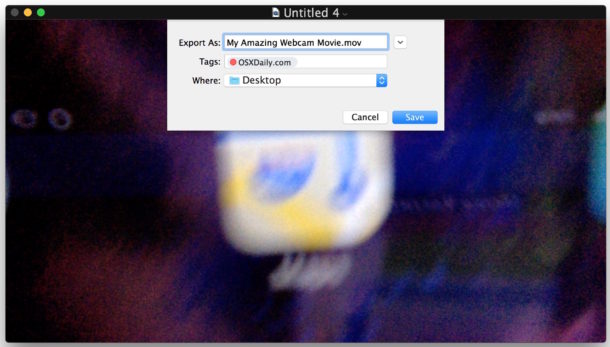
- Give the recorded movie a name and save the recorded movie to the location of your choice

The default movie file type recorded will be a .mov QuickTime file but you can save it as another format if desired, or convert it to a different video format later if you’d like. The .mov file format is widely compatible and will upload directly to any social media site and be immediately viewable by any Mac, iPhone, iPad, Windows, or Android user with an appropriately modern media player.
Resolution of recorded movies depends on the model of the Mac since each Mac has a different FaceTime webcam camera with different resolution, but generally speaking you can expect somewhere between 480p and 720p resolution for most Mac webcam recordings. If you want higher quality footage like 1080p or 4k, you might want to consider recording 4k video with an iPhone or iPad instead.
QuickTime Player is a powerful app that has a lot of great features and recording abilities, including an excellent screen recorder for capturing videos of the Mac display, a similar option to record an iPhone or iPad screen, and even the ability to record sound and audio using the computers built-in microphone.
For what it’s worth, you can also capture video directly on the Mac with iMovie and some third party apps too, but QuickTime is so fast, easy, and efficient, that if all you’re looking to do is capture a quick movie, it’s by far the simplest choice.

Great tip, thanks. No more laborious uploads for me!
But how do I make sure the recording is default saved to an external drive where I have more space?
Wow this is a great tip. Honestly I am not aware that you can do such things using Quicktime. I thought it is a mere media player only! Before, I am using Acethinker Screen Grabber Premium on my mac to record it. But I will definitely check your tip. Thanks!
SoRrY
i am so sad
sorry
This does not work when recording a long video (60 minutes or so) There seems to be some sort of bug with Quicktime when doing this.
I can not get Quicktime to record video on my new MacBook 2016. I have hooked up my camera and Quicktime does recognize the camera, but it will not record video.
Please help!
I can not get Quicktime to record video on my new MacBook 2016. I have hooked up my camera and Quicktime does recognize the camera, but it will not record video.
Please help!
Thanks for the tip, I’ll make sure to check that app!
In VLC, make sure the subtitle file is in the same folder and has exactly the same name as the video folder. Or in makeMKV App import all files and combine into a MKV file. Then play in VLC. You can have multiple video, audio and subtitle tracts all in one MKV container file they play like any movie file.
I have an old macbook so it doesn’t work
I’m still looking for a way to record a piece of an existing video so that the subtittles I’d downloaded separately show on screen, but alas, VLC doesn’t seem to perform this task as it’s supposed to.
Is it possible to use QuickTime instead, as in, play the video in question, whether in QuickTime or VLC, and record a small part of it that could be played separately afterwards?
Amazon do a ‘talking’ card – in the UK it costs about 10 US dollars, and works perfectly. You get almost 30 seconds recording time.
Allen
How can I record my voice on a Christmas card that I want to send to my niece.
Is that possible?