How to Record Podcasts on Mac with GarageBand
Interested in starting your very own podcast? It turns out that all you need is Garageband and a Mac. Whether you want to record audio on your Mac for a podcast, or perhaps just a personal voice recording, you’ll find Garageband to be useful for this purpose, and it’s just one of a variety of ways to record podcasts on the Mac.
You might have already listened to various podcasts on the internet, but it’s really not that hard to record, edit, and create one on your own. In fact, it’s perhaps even more simple than making a fancy video for YouTube, depending on the software that you use for recording the podcast anyway. Thankfully, Apple’s GarageBand app makes this process easy, and it’s available for free for Mac users. So, ready to use your Mac to create and record a podcast? Then read on, and you’ll be mastering your podcast with Garageband shortly.
How to Record Podcasts on Mac with GarageBand
Before you get started, make sure you’ve installed the latest version of GarageBand from the Mac App Store. You’ll also need a microphone, either internal or external (external microphones are recommended for podcasts as they provide higher quality audio). Assuming you have Garageband downloaded and a microphone connected to your Mac, just follow the steps below to start recording audio.
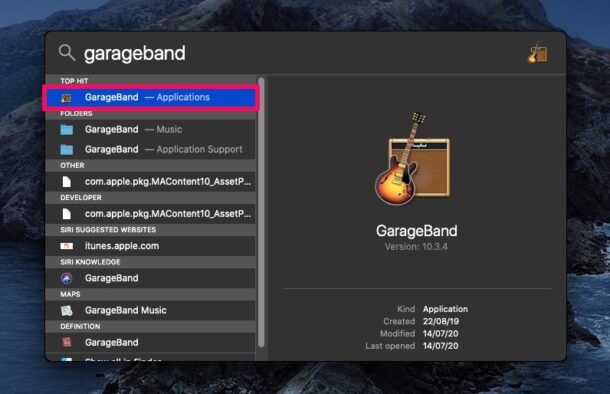
- Open GarageBand on the Mac, either through Dock, Applications folder, Launchpad, or Spotlight.

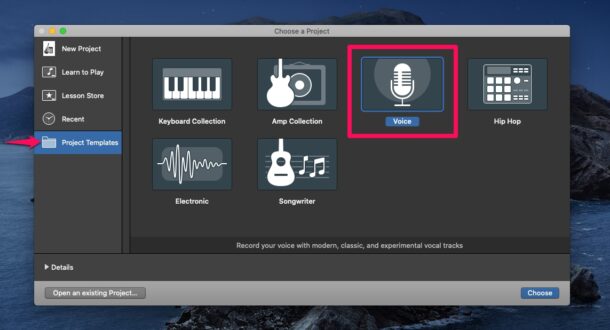
- Once GarageBand opens up, select “Project Templates” from the left pane and choose “Voice” template as shown in the screenshot below.
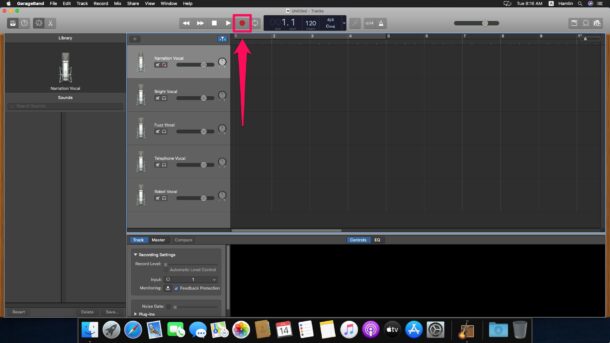
- The project window will open up now. Click on the record icon located at the top of the window to begin recording your voice / podcast.
- When you’re done recording the audio clip you need, click on the record icon again to stop it. You can play this recorded clip by using the playback controls right next to it.
- Optionally, record additional audio clips using the same method detailed above
- You can rearrange, edit, trim, and modify the voice recording to arrange the podcast if desired, otherwise just let the single audio track stand alone (many of the most popular podcasts are a single long audio recording)
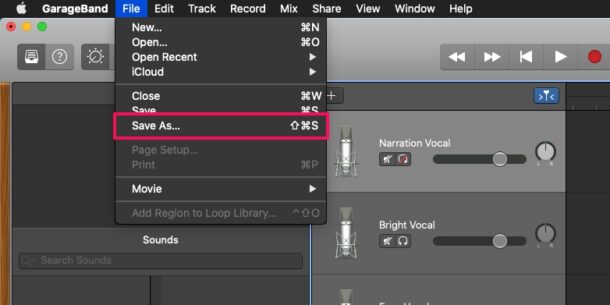
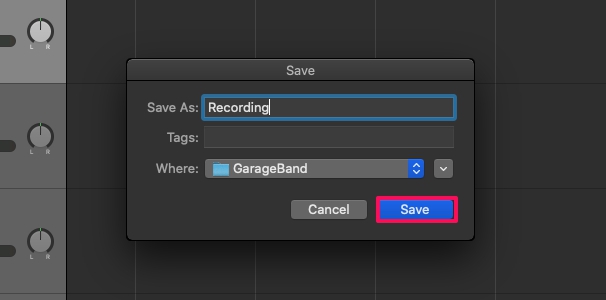
- Once you’ve previewed the recording, you can save the recorded file by clicking File -> Save As from the menu bar.
- This will open a pop-up on your screen. Give a name for the recorded clip and choose the file location. Click “Save” to confirm your changes.

There you have it, you’ve successfully managed to record your podcast using GarageBand on your Mac.
You can either go with the flow and let a single audio track be the entire podcast (as some of the most popular podcasts in the world do, JRE being one of the most notable), or you could record as many audio clips as you want in a similar way and combine them together in GarageBand to create your very own podcast. You can even import audio recorded from the Voice Memos app on iPhone, iPad, or Mac if you’d like to. And if you recorded a podcast guest remotely by recording a phone call, you can easily import that into Garageband for inclusion or editing as well.
Editing your podcasts can be as simple or as complex as you want it to be, but overall editing audio is a completely different step. We’ll cover some specifics of editing in a separate article if you’re interested, and you can always check out more Garageband tips. You can also add a radio-style jingle and other extra audio effects to your podcasts with GarageBand.
For people who’re completely new to audio recording, GarageBand might seem a bit complicated. Or perhaps, you just want a simple tool to record your voice. In these cases, you can always try Voice Memos app or even use the built-in QuickTime player app to quickly record voice clips from Mac. Once recorded, you can use Garageband, or any third-party audio editing software of your choice, to combine the clips and create a podcast.
If you want your podcast to sound particularly good, you’ll need to connect a studio-quality USB microphone, either dynamic or condenser-type for recording your voice. Sure, you could use an XLR microphone too, but that requires you to purchase a separate audio interface which isn’t cheap. You can check out external podcast microphones on Amazon if you’re in the market for one.
And of course, once you’ve recorded your podcast, you might want to upload it to the world to share, right? That process is different per service, but Apple (https://podcasters.apple.com), Spotify (https://podcasters.spotify.com), YouTube (https://studio.youtube.com/), and the myriad of other podcast directories, each have their own unique procedure for uploading podcasts (YouTube being a predominantly video site will require the audio to be uploaded as a video, but you can easily just attach a simple picture to the audio track using iMovie).
Happy podcasting! Did you record a podcast using GarageBand for macOS? What are your overall thoughts on this? Do you prefer a third party app? Share your thoughts, experiences, tips, and other relevant opinions in the comments!

I’m considering a video podcast from n LinkedIn. Recommendations for that?
iMovie works pretty well for recording videos and making simple edits
Garageband for MacOS is a versatile and powerful program for all sorts of recording. I love it. I think it can be done on an iPhone with Garageband too.