How to Automatically Empty Trash in Mac OS After 30 Days
For those Mac users who often dump items into the Trash but forget to empty it on a regular basis, you can enable a new feature in MacOS which allows the Trash to automatically empty itself after 30 days. This can be a particularly nice feature if your Trash can is constantly bloated and taking up a lot of storage space, as the files that are removed will be removed themselves after the elapsed time period passes.
This auto-empty Trash feature requires macOS Sierra 10.12 or newer, earlier versions of Mac OS do not have the ability to automatically remove items from the trash can.
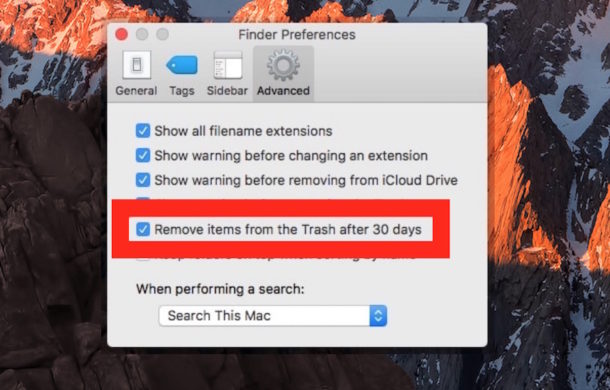
How to Remove Items from Trash Automatically After 30 Days in MacOS
- From the Finder in MacOS, go to the “Finder” menu and choose “Preferences”
- Go to the “Advanced” tab and check the box for “Remove items from the Trash after 30 days”
- Exit out of Finder preferences
Once this feature has been enabled, individual items in the Trash in Mac OS will essentially have a 30 day timer where they are counting down until they are automatically deleted. In other words, each file will delete itself automatically after the 30 days pass individually, the Trash doesn’t just empty itself once every 30 days.
You can still manually empty the trash as well.
This has no impact on the Trash aside from deleting the contents automatically, for items and files that have yet to be delete you can still use the Put Back feature, and you can also still use features like Delete Immediately if you don’t want to wait for the 30 days to elapse to trash an item permanently.
Keep in mind that trashing a file is irreversible, if you remove a file you didn’t intend to delete, it will be gone for good unless you made backups with Time Machine or otherwise.
As usual, if you decide you don’t want this feature in use, you can disable it later.
Stop Emptying Trash Automatically in MacOS
- From the Finder in MacOS, go to the “Finder” menu and choose “Preferences”
- From the “Advanced” tab, uncheck the box next to “Remove items from the Trash after 30 days”
Some users may have enabled this feature unintentionally during initial MacOS setup or when configuring some of the various other features on the Mac.
The feature is similar to the delete after 30 days feature of iOS Photos Recently Deleted album, where pictures are placed in a delete queue and then removed automatically once the time runs out.

Will it also delete the junk mail along with the trash?
Thanks
No, this only deletes what is contained or found in the Trash
I use time machine! Did so when my Mac encrypted my data. But I could not verify my back using time machine
I decrypted my MacBook Pro hoping it would allow me to verify my backup…but it didn’t…any ideas?
Some may have unintentionally chose to put Desktop and Documents in iCloud. When will you address a simple direction to reverse this?
You go to the System Preferences app, the iCloud pane, then click the Options button at the top right, then deselect the option Desktop & Documents Folders, then Done.
Me personally I do not use that because I don’t trust iCloud for anything important, but you can do what you want with your documents!
Possible to automatically empty trash on any version of osx by using rm -rf ~/.Trash/* in a cron or periodic job with root permissions.