How to Change System Font to Lucida Grande in MacOS Mojave
Do you wish your MacOS Mojave Mac was using Lucida Grande as the system font, back like it did years ago? There’s no need to rub a genie bottle for such a wish, because developer Luming Yin has created a simple utility that modifies the system font in MacOS Mojave to be Lucida Grande, rather than the default system font of San Francisco. And yes, it works with the Dark Mode theme!
The appropriately named “macOSLucidaGrande” tool serves the simple function of switching the macOS system font from the current San Francisco font to Lucida Grande, which was the default system font for many years in Mac OS. It does this without making any modification to system files, but you will need to restart the Mac for full changes to take effect.
There are also a few font quirks you may encounter throughout the OS and in some apps when using Lucida Grande, so it’s not perfect, and it’s certainly not for everyone. In fact, many users might not even notice the difference between the two system fonts in the first place. But if you are one of us who has always loved Lucida Grande, then you might just appreciate having it back again in MacOS Mojave as your system font, so grab the free tool from Github below and enjoy.
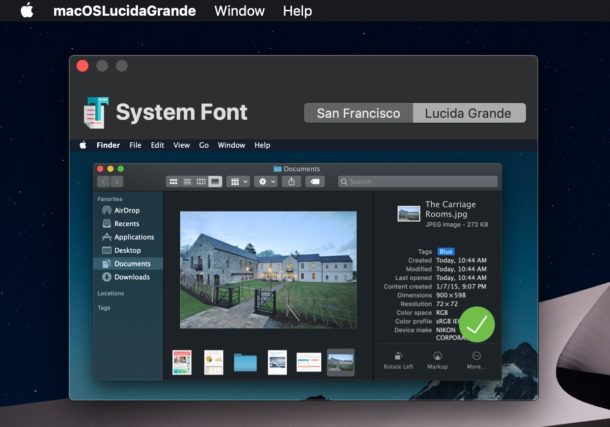
Download the app and launch it, choose the Lucida Grande tab, then click the big green button to change to Lucida Grande. Restart the Mac for changes to take effect everywhere with the system font.
Switching back from Lucida Grande to San Francisco is just a matter of reopening the app, choosing the San Francisco tab, and then clicking the big green button again. Restart once again, and San Francisco will be the system font again.
The difference between the two fonts is subtle, so many users might not notice a difference and probably shouldn’t bother with this tool for that reason.
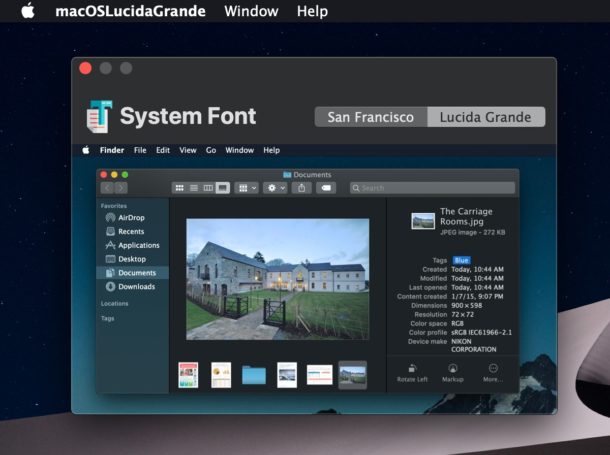
For example, here’s San Francisco (the default):
And here’s Lucida Grande:
Similar, but slightly different, with Lucida Grande being a bit wider on spacing / kerning.
The animated gif below attempts to show the difference between the two in a Finder window:
The developer notes two main issues with Lucida Grande in MacOS Mojave with the current release of the tool, repeated below:
Truncated text may overlap in Safari and Firefox in macOS Mojave (10.14), macOS High Sierra (10.13), macOS Sierra (10.12) and OS X El Capitan (10.11)
When typing in a password input field in the OS, like iTunes account, there is no * sign appearing when typing a character. The password is typed completely and it is accepted, but password field appears blank before submission (Issue #2).
The overlapping text is most notable when you have a ton of tabs open somewhere, like in Safari or Terminal, but can be seen elsewhere too. The password input thing can be confusing if you’re not aware of it, otherwise it’s going to look like you’re not typing in a password (kind of like how Terminal does not show passwords being typing, but that’s intentional at the command line).
San Francisco is the default system font in Mojave and has been the default system font since El Capitan. We’ve discussed this utility for this purpose before, and the same tool works with changing system fonts in High Sierra, El Capitan, Sierra too. Meanwhile, Yosemite users can self-troll with Comic Sans as a system font if they’d like, but who who knows why you’d want to do that.

Here I am discovering all this font info when all I want is to make the font larger for my 74 year old eyes and the ONLY info on the net is the control plus or minus for the page content which is not what I want. I want the search bar font larger and the titles at the top would be good.
So where do I go to enlarge the existing font San Francisco which I am perfectly happy with.
Be aware that this can cause unpredictable results. I made this change and the result was that I could no longer install software packages because the password verification failed for my password.
It was painful for me to figure out about 3 weeks later.
I installed “macOSLucidaGrande” when it first came out. The main reason for me doing this was that Lucida Grande has the numerals mono-spaced. I haven’t found another proportional font that has this. The advantage is that when I have a list of files in a folder that have numerics at the start, e.g. dates, then, in Finder, they are all lined up evenly to make the column easy to read. I wish Apple would use a proportional font that has monospaced numerals as its system font. That is my only issue with the San Francisco font.
I still try my hardest to use Input as my system font. Font Bureau used to give away a free version modified to be a system font, along with instructions, but haven’t supported it in several versions. The whole of Font Bureau has changed as well.
http://input.fontbureau.com/systemfont/
Maybe folks can figure out how to manipulate Input Sans into Lucida Grande above.