How to Add a Volume to APFS Container in Mac OS
![]()
For Macs using the APFS file system, you can add a new volume to an existing APFS container by using Disk Utility in MacOS. APFS is somewhat unique in that it allocates disk space on demand, meaning a containers free disk space is shared (compared to HFS+ or FAT where disk space is partitioned into defined allocations).
You can treat APFS volumes sort of like a Mac-specific partition, and you can even install different MacOS versions onto unique volumes, sharing the same available disk space between the Mac OS releases.
How to Add a New Volume to an APFS Container in MacOS
Be sure to backup with Time Machine or your backup method of choice before modifying any disk.
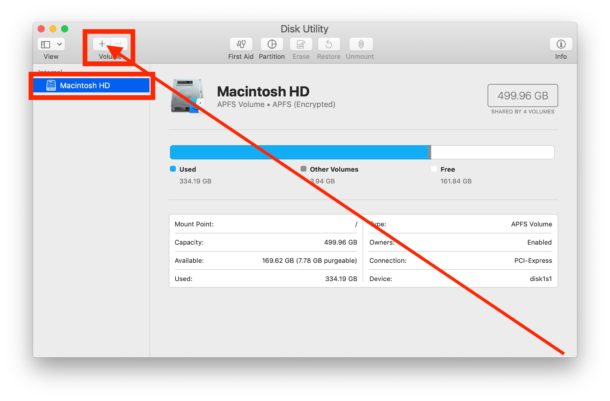
- Open the Disk Utility application, found in /Applications/Utilities/
- Select the disk you want to add the new volume to from the sidebar, then click the [+] Plus “Add Volume” button in the menubar
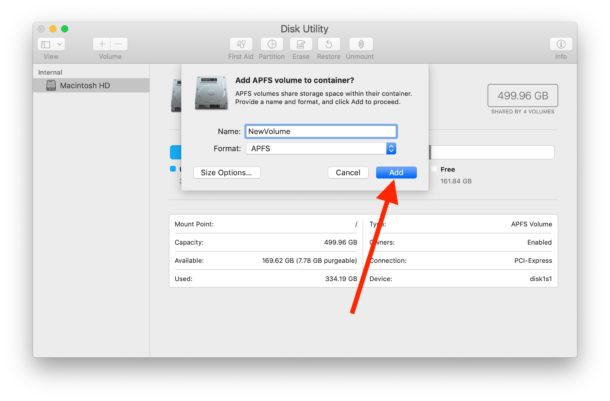
- Give the new volume a name, and optionally choose a format
- Optionally, click on “Size Options” and set accordingly:
- Reserve Size – this will insure a minimum amount of storage for the new volume
- Quota Size – this will insure a maximum amount of storage capacity for the new volume
- Click on “Add” to add the new volume to the APFS container
![]()
Now that you have a new APFS volume, you can do whatever you want with it.
You can the new APFS volume like a MacOS specific disk partition, or you can even install another MacOS system software version onto the new volume, as long as that MacOS release is compatible with APFS (any newer release like Catalina, Mojave, High Sierra and later).
For one example of using APFS volumes in containers, some users create a new APFS volume and use that new volume to run beta software, like to install MacOS Catalina beta onto, though be absolutely certain you backup all of your Mac data before doing so.
Note that you can not install Linux, Windows, older Mac OS X releases, or other operating systems onto an APFS volume. You can however install Windows 10 on a Mac using Boot Camp as detailed here. Installing Windows, Linux, or an older Mac OS X release will involve creating a new partition on the drive rather, since it is not possible to install those operating systems onto an APFS volume.
Naturally you can also delete an APFS volume from a container in Disk Utility too, by simply selecting the volume you wish to remove and clicking the minus button and confirming that you want to delete the APFS volume from that container.

But what if I want to install Mojave on a macOS Monterey Disk? Monterey uses APFS 2, while Mojave uses APFS 1. Are there issues with Mojave on APFS 2 volumes/containers?
“Note that you can not install… older Mac OS X releases”
Typo?
No it’s correct. APFS volumes can be used to install a separate compatible MacOS version (usually High Sierra, Mojave, Catalina), but the older pre-APFS Mac OS X releases will not work in that scenario and instead would need a separate drive partition instead. This is all assuming the Mac is compatible with these versions of MacOS / Mac OS X in the first place too, since generally most Macs can not install an older OS version than what they shipped with originally. For example, if the Mac came new with Mojave, it wouldn’t be able to run a release earlier than that, but you could place Catalina onto an added APFS volume, thereby allowing both Mojave and Catalina to be on the same drive. APFS volumes can be thought of sort of like a partition except the disk space can be shared between the volumes.
Hope that helps to explain things a bit more!
I guess, much easier to delete it from Disk Utility.