How to Disable the Built-in iSight Camera on a Mac
 Most new consumer Macs come with a built-in iSight / FaceTime camera which can be used for all sorts of fun, ranging from live video chatting in FaceTime, Skype, and iChat, to horsing around in Photo Booth, to using third party apps like Gawker to capture time lapse photography of whatever is going on. That hardware camera is located at the top of the screen as the little black dot on the MacBook Air, MacBook Pro, and iMac.
Despite the many fun and harmless uses of the hardware Camera, there are some security concerns with having a built-in camera particularly in academic and institutional settings, and because of this some System Administrators have taped covers over the iSight and even removed them from the machines entirely. Thankfully, there’s a much easier way to disable the built-in iSight camera, all you have to do is move a file.
Disabling the Built-in Hardware iSight / FaceTime Camera on any Mac
This completely disables the Mac camera, preventing all usage of the built-in hardware camera on any Mac in all versions of OS X. Keep in mind that no apps will be able to use the hardware camera at all once this is complete, at least until the process has been reversed.
- First, we will create a relatively hidden backup folder for the file. If you don’t want the folder hidden from the GUI, just remove the . in front of the directory name. Launch the Terminal and type the following command:
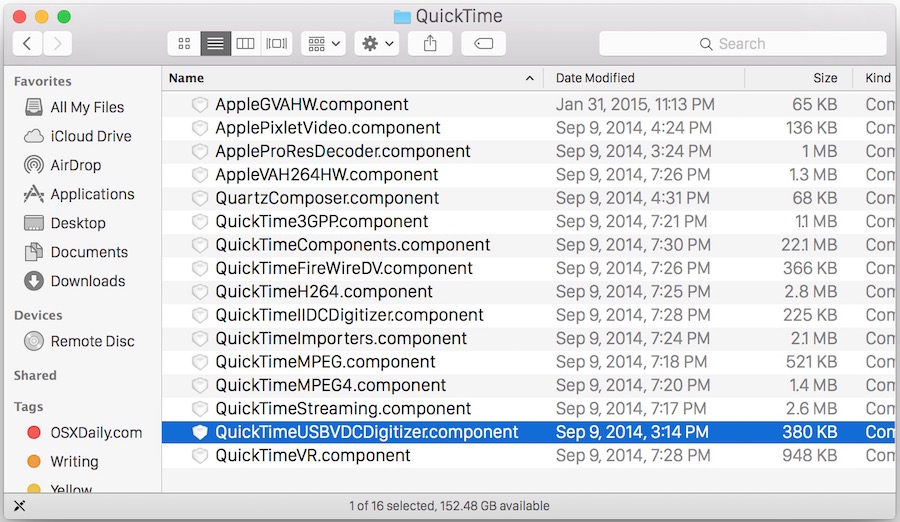
mkdir /System/Library/QuickTime/.iSightBackup - Next, we will move the QuickTime component that allows the iSight to be accessed into the backup directory we just created. Type the following command:
sudo mv /System/Library/QuickTime/QuickTimeUSBVDCDIgitizer.component /System/Library/QuickTime/.iSightBackup/
(In case it’s not clear, there is a space between the two directory paths) - Reboot the Mac (a reboot is required to unload the component)
- That’s pretty much it, if you want to enable the iSight again, simply move the QuickTimeUSBVDCDIgitizer.component file back into the main QuickTime directory at /System/Library/QuickTime/
Now any program that attempts to access the iSight will be unable to, instead the user will get the familiar message that the iSight hardware is already in use by another program, or the error message saying the camera is not connected and can’t be found:

If you’d rather avoid the command line, you can follow the same rough instructions above but using Command-Shift-G in the Finder to access the ‘Go’ command. The only downside to doing it through the Finder is that you can not create an ‘invisible’ directory to place the file in, so you’ll have to put the component elsewhere.
This works in all versions of OS X, from modern releases like OS X Yosemite, OS X Mavericks, to much older versions of Mac OS X software. The camera component has stayed the same, and simply moving it from the folder is sufficient to prevent it from working completely.

Option 2: Use Tape to Cover the Camera
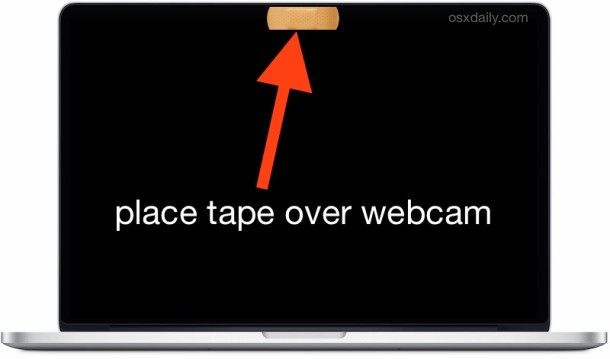
Of course, you could always manually intervene with the hardware and disconnect or detach the actual camera too, or, as you’ll often see at some security related groups and InfoSec conferences, place some tape over the webcam. The tape strategy obviously won’t disable the camera but it at least prevents an image from being seen or captured, which is often the desired result of many users. The tape strategy is so ubiquitous with individuals in security fields that there must be something to it… and it’s easy!

Remember, the camera on MacBook laptops and iMacs is basically front and center at the top of the display, look carefully and you’ll be able to locate it.
If tape isn’t an option, and the above intervention method is too complicated, you can always use a third party script to do this for you, though it’s untested and it’s up to you whether or not you want to try it: TechSlaves iSight Disabler Script. Apparently, that works by changing permissions of the components.
This tip is an elaboration on one found at Mac OS X Hints, which tells you to delete the QuickTimeUSBVDCDIgitizer.component file. Instead of deleting it, we’d rather relocate it elsewhere so you can easily enable the iSight / FaceTime again in the future if you want to. Ultimately, it’s up to you.


actually, nothing is working for me…
To make it work on Mac El Capitan and newer follow these instructions:
via
https://techslaves.org/isight-disabler/#comment-10364
I doubt that removing the kext file will stop any malware. All that being said, removing the kext file is sufficient to prevent adobe flash and other less nepharious apps from gaining access to the camera.
The tricks above only disable the camera in Quicktime, and photobooth. The command line utility iMageSnap still can access the camera.
Other than covering the lens, I disconnected the ribbon cables, at the motherboard. I started with the camera, and then proceeded to the microphone. Now my macbook air is blind and deaf so long as no camera is plugged into USB. Should I feel the need, I can buy a clip on barrel camera for a measly $20.
If you remove the camera kext file it can not be accessed from anywhere on the Mac
That statement is about 65% correct, at best.
I have created an app that automates the whole process. However, it won’t work in OS X El Capitan without first disabling SIP.
You can use a Band-AID to cover the camera lens. Make sure the cloth part, not the sticky part, covers the lens. This way if you need to use your camera, simply remove the band-aid and you will not have a sticky blurry mess on your lens. Put the band-aid back after using your camera.
A good non-techie fix, and perhaps the only good one if you want to reverse the process (which in fact I don’t). About six months ago I suddenly found real-time pictures of myself popping up on my laptop screen while I was working in an outdoor café. Scary (someone knows exactly where I am, and I’m someone without a smartphone or GPS), and it took about three or four clicks to stop the pictures coming back. Worse still, within a week or so the spying started again. A knowledgeable friend said ‘cover the lens with an oblong Band-Aid’. And since I don’t want to use the bloody photo lens at all, ever, for any purpose – for that matter, I didn’t even know it was there, on a plain old eight-year-old MacBook – the silver/grey pen solutions would work just as well, and look a lot less unsightly. But in any case I’ve never been bothered by Facetime intrusions since then – good old Band-Aid! Just a bummer that we have to intervene like this in the first place….
Actually those software fixes are ineffective at best. I discovered that most of them only prevent a few specific apps from using the camera (FaceTime, Photobooth, etc). Usually apps like Imagesnap can still gain access to the camera.
The best solution is to take a silver, or gray paint pen and color over the lens. Problem solved!
I just put a trimmed down post-it over the lens.
My iSight camera goes on and off randomly, which is starting to make me feel a bit paranoid. I have tried switching users, but the light stays on. I have tried restarting the computer, but once it is up and running again, the light comes back. I have tried what the article recommended, but after the first step I get a “permission denied”. This also happens during the second step. I ran sophos antivirus, but it turned up with nothing. In the event that this is caused by a RAT or something similar, I’ve placed a sheet of paper over the camera. Could anyone give any advice on how to find out whether or not I have a virus, and how to fight it?
very unlikely that you have a virus, but you could have something like FaceTime or iChat video open
I came back here (through a search) because my built-in iSight camera once again worked. I had disabled it by moving the QuickTimeUSBVDCDIgitizer.component file elsewhere some time ago. Sure enough, when I checked it was in its usual place again. And, it was also in the place to which I had moved it! How do I permanently disable it?
How do I reenable a camera that I disabled a while back cant seem to reenable, cant find it now to re enable, thanks?
when I use the terminal method and enter either of the two codes, I get a “permission denied”
My webcam turns on at random times, which makes me suspect I’ve got a RAT. I’ve already taped a piece of paper over the webcam, but I’d like to make it a little more permanent. Any thoughts?
prefix the commands with ‘sudo’ and you wont get the permissions error
removing CoreMediaIOServices.framework actually does not affect iChat at all it seems.
Lion iSight disable as cited above does not work. Taking out the whole CoreMediaIOServices.framework breaks too much.
How to disable iSight in Lion?
to disable
sudo mv /System/Library/PrivateFrameworks/CoreMediaIOServices.framework/Versions/A/Resources/VDC.plugin/Contents/MacOS/VDC /System/Library/PrivateFrameworks/CoreMediaIOServices.framework/Versions/A/Resources/VDC.plugin/Contents/MacOS/_VDC
to activate
sudo mv /System/Library/PrivateFrameworks/CoreMediaIOServices.framework/Versions/A/Resources/_VDC.plugin/Contents/MacOS/VDC /System/Library/PrivateFrameworks/CoreMediaIOServices.framework/Versions/A/Resources/VDC.plugin/Contents/MacOS/VDC
to activate
sudo mv /System/Library/PrivateFrameworks/CoreMediaIOServices.framework/Versions/A/Resources/VDC.plugin/Contents/MacOS/_VDC /System/Library/PrivateFrameworks/CoreMediaIOServices.framework/Versions/A/Resources/VDC.plugin/Contents/MacOS/VDC
Why is there not a simple option to deactivate the cam.
Whats so difficult?
why not ask steve jobs, wait hes “dead”. why not ask apple ceos about their contract with the dept of homoland security why apples dont include broader direct user controls to mod their own laptops and computers?
There is–put a small piece of scotch tape over the lens when not in use. Hack that!
QuickTimeUSBVDCDigitizer.component is note a file but a folder with subfolders:
0 drwxr-xr-x 8 root wheel 272 15 aoû 2009 ./
0 drwxr-xr-x 3 root wheel 102 24 sep 2007 ../
8 lrwxr-xr-x 1 root wheel 28 15 aoû 2009 CodeResources@ -> _CodeSignature/CodeResources
8 -rw-r–r– 1 root wheel 932 18 jui 2009 Info.plist
0 drwxr-xr-x 3 root wheel 102 15 aoû 2009 MacOS/
0 drwxr-xr-x 21 root wheel 714 15 aoû 2009 Resources/
0 drwxr-xr-x 3 root wheel 102 18 jui 2009 _CodeSignature/
8 -rw-r–r– 1 root wheel 456 18 jui 2009 version.plist
here’s a quick workaround for those of you who just want to use a USB webcam like a logitech. I had the same problem which I worked around by opening PhotoBooth and selecting the built in iSight camera, effectively tying it up so that the other application only found the logitech cam available and used it by default. no config at all… good luck.
Doesn’t work on me… i remove the file and then i open photo booth and it’s still wotking
Tried to enable iSight. Followed directions. File showed up correctly. Tried to run different apps that make use of the camera. Not one worked.
hello there i have followed these instructions to disable the isight camera. i have since tried to reinstall the files but the camera is still disabled and the mac doesn’t recognise any camera in the USB ports. any suggestions? is there something i can download and reinstall from?
Wow, you guys thought students are so dumb that they won’t go around searching for something to remove this hack? As far as I know, students are already circumventing surveillance on their computers, yet making sure the school tech dudes don’t notice anything (some create a for-remote-desktop desktop where all their school work is open complete with a seperate dock from their gaming/non-school desktop). Sure, the Apple remote desktop programme also log system activity, but preventing the non-school applications from the logging is not hard. Pretty sure students would be exchanging the iSight file around. By the way, creating another partition with its own Mac OS X installation is a matter of 40 minutes.
On the hand, that is one cool trick, enough to keep friends confused for several hours (assuming they did not read this article).
here are the instructions to take off the ISIGHT
Quick it is cool. aNY
There is a way to “hack” this if someone disabled it.
1. Find the QuickTimeUSBVDCDIgitizer.component file
1. Go to System >> Library >> Quicktime
2. Open that folder in terminal (cd)
3. do (ls -la) to see all files/folders that are hidden (and other ones too)
4. Once you find the file, open the containing folder (probably hidden folder)
2. Make a new directory here:
Home folder >> Library >> Quicktime
(mkdir -p ~/Library/Quicktime)
(it might already exist)
3. Copy the QuickTimeUSBVDCDIgitizer.component file there.
4. Open photo booth to check if it works.
5. You are done.
—–
This took me about 5 minutes to figure out and “hack”.
Thanks. great!
I bought an external usb camera to use with my MacBook running Tiger (with all latest updates) because when I conference with friends or associates I am not always sitting directly in front of my computer (external keyboard).
I seem to have a conflict with the two cameras and want to disable the internal iSight cam.
However, the above instructions do not seem to apply to my MacBook.
There is no QuickTimeUSBVDCDIgitizer.component file anywhere I can find on my computer.
Any thoughts or comments on this?
latest quicktime update needed
Will this be reversed anytime a Quicktime update is installed?
I would imagine many schools would be pleased with this technique rather than pulling out the units camera hardware