How to Install Mac OS X Lion Using Target Disk Mode

Another method to install Mac OS X Lion on other personal machines is by using Target Disk Mode, this allows you to use one Mac as the installation drive to install OS X 10.7 directly to another Mac via Firewire or Thunderbolt. This is fast, prevents redownloading which saves bandwidth, and works flawlessly. This tip was sent in by Randy, so a huge thanks to him for the tip and accompanying screenshots.
Quick note: Personally I find it easier to create and use a Lion install USB drive or even a home-made Lion installation DVD, if you have access to a USB key or DVD burner those would be my recommended methods. That isn’t viable for everyone though, so this article will show you exactly how you would install OS X Lion on another Mac using Target Disk Mode only.
Requirements:
Before getting started, be sure to have the following.
- At least two Macs – one to serve as the installer, and the recipient Mac where Lion is going to be installed on
- All Macs must have FireWire and/or ThunderBolt and support Target Disk Mode, as well as the accompany cable to directly connect two Macs:
- Mac OS X Lion downloaded from the Mac App Store on one of the Macs
- At least 4GB of spare disk space to create an install partition
Confirm that you meet all the requirements, and then let’s begin partitioning a hard drive so it can serve as a Lion installer for other local Macs.
How to Install Mac OS X 10.7 Lion Using Target Disk Mode
Important: This technique modifies a hard disks partition table. Generally nothing should go wrong, but it is always wise to have a recent backup of your hard drive before making any changes to drive partitions.
The first part of this walkthrough will be familiar to anyone who has read our Lion installation guides by using a bootable USB drive or making a bootable installer DVD, you need to find and locate the InstallESD.dmg file:
- Locate “Install Mac OS X Lion.app” inside your /Applications folder, right click and select “Show Package Contents”
- Open “Contents” and then ‘SharedSupport’
- Double-click on InstallESD.dmg to mount the image
- Now launch “Disk Utility” located in /Applications/Utilities/
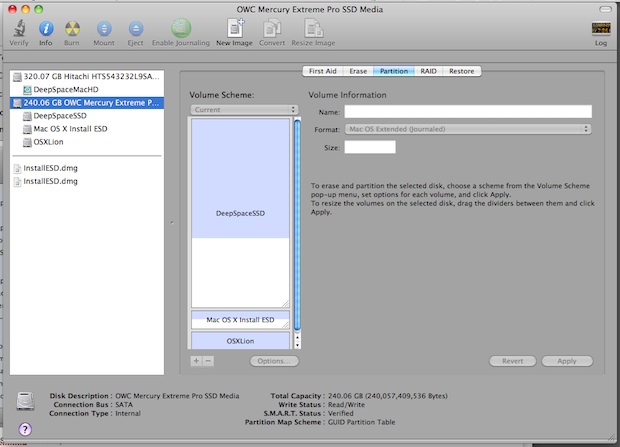
- Select the hard drive you want to use to create a boot partition on, and then click on “Partition”
- Click the plus icon to create a new partition, name it “Mac OS X Install ESD” to match the mounted Lion dmg

- Note: alternatively to the following, you can restore the mounted DMG to the newly created partition.
- Now we need to show hidden files in Mac OS X Finder, you can do this with the following two commands:
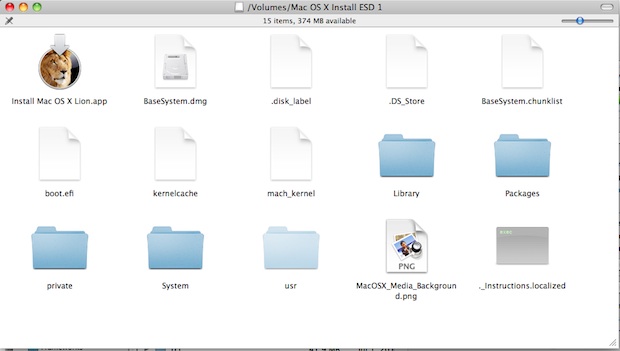
- Now back in the Mac OS X finder open the previously mounted Lion installation DMG and you will see all files like this:
defaults write com.apple.Finder AppleShowAllFiles TRUE
Now you have to restart the Finder for changes take effect with the following command
killall Finder

- Select everything except for .DS_Store and copy all of the files over to the partition you previously created – getting all of the files is necessary, this is why enabling hidden file support is important
- Let all files copy over to the drive partition
Now the Mac OS X Install ESD partition is ready to use by other Macs via Target Disk Mode.
On the Mac with the OS X Lion Install Partition:
- Open System Preferences and click on “Startup Disk”
- Click on “Target Disk Mode” to reboot the Mac into Target Disk Mode ready to be used as another Macs hard drive
Once the Installer Mac is in Target Disk Mode, connect it to the other Mac via Firewire or ThunderBolt, then:
On the Mac where you want to Install Mac OS X Lion using Target Disk Mode
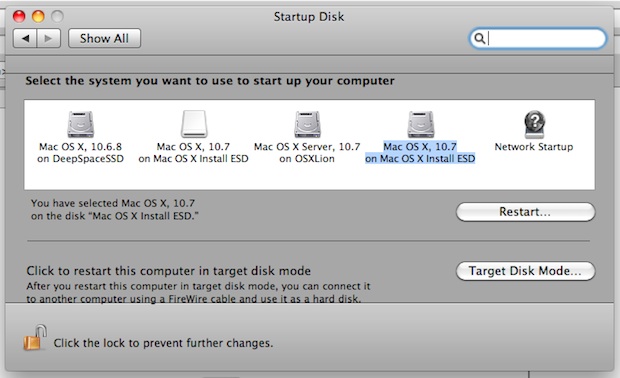
- Open ‘System Preferences’ and click on “Startup Disk”
- Select the Installer Macs partition named “Mac OS X Install ESD” as your boot drive and restart

The recepient Mac will now boot from the Mac OS X Lion installer partition via Target Disk Mode (TDM). TDM is really fast thanks to FireWire and ThunderBolt speeds and this is probably the quickest way to install Lion on another Mac without just downloading it again from the App Store.
Finally, for those wondering about licensing, Apple has said that one purchase of Lion can be installed on all of your personal Macs, so as long as you are using this method to install Lion on just another Mac that you own, you are ok.
Thanks again to Randy for the great tip!


Cool :-) Is there anyway to install Mac by running directly from InstallESD.dmg without burning to disk?
There is no Shared Support directory on my version of Lion. Nor is there InstallESD.dmg.
I can’t seem to find the “Install Mac OS X Lion.app” any ideas? thanks!
Me too, searching furiously because I really need to do this to fix up a dead mac and I don’t have the discs but have Lion on my other machine. That file isn’t anywhere to be found! I’m attempting to redownload from the app store though…
WARNING! DO NOT USE THIS METHOD TO UPDATE FROM SNOW LEOPARD!
ONLY NEW INSTALLATION then use migration tool after you have booted into Lion!
MBA’s will have ThunderBolt…
I must be missing something here, because the easiest way to install on another computer would be to launch it in target disk mode, then run the install app from your other dekstop. There is an option to choose which disk to install it to, so why is this needed? What’s with all the hacks and partitioning?
I’m trying this method now, will let you know if it is successful or not! After reading this article it seems too simple doesn’t it?
I know this post is very old but I feel like adding my 2 cents because I initially thought the same thing as you and couldn’t understand why make things harder when they should be easy… And the point is, because in the easy way, it may not work.
Even assuming the installer is generic (not tied to a specific mac model), the installation process knows what hardware it’s running onto and installs files for that specific hardware. So the mac that’s receiving the installation will have a system that was not installed for its hardware. If the macs are identical, there should be no problems. It might work even with different macs but its not granted.
With the steps described in this article, the real installation is done by the same mac that will use the system, thus the problem disappears.
It still stands that the easiest is to use a flash drive. Second to that is partitioning the existing hard drive and utilizing that partition to install Lion. It’s what I did with Snow Leopard (since I lacked a sufficient size flash drive). Worked perfectly and did not destroy my existing file structure.
lol this tips,
all have allready lion know how do…
but I know, It must some for all ;)
You can also use that partition to perform a clean install on your own internal drive.
Anyway, FW and TB are so fast that this is probably the quickest way to do a group install for those with a multiMac household.
QUOTE: All Macs must have FireWire and/or ThunderBolt
jeez people!?
Current MB Air does NOT have an FW nor TB port…
Correct, but all of the Macs you intend to use with this method must have either FireWire or Thunderbolt.
Why FireWire or Thunderbolt? Don’t work with USB?
Target Disk Mode only supports FireWire or ThunderBolt