How to Enable the Root User Account in Mac OS X
The root user is a special user account with high level system-wide access privileges intended for system administration, monitoring, and in depth troubleshooting purposes. By default, root user is disabled in Mac OS X for security purposes, but if you need to enable superuser, this guide will show you how to do so in OS X Yosemite (10.10.X) OS X Lion (10.7), OS X Mountain Lion (10.8+), and OS X Mavericks (10.9+).
If you do not have a specific need to enable root, you should leave it disabled. This is for advanced users only.
Enable Root User in OS X
This process also sets a password for the root account.
- From the Mac OS X Desktop, hit Command+Shift+G to bring up Go To Folder and enter the following path:
- Inside CoreServices folder, locate and launch “Directory Utility”
- Unlock “Directory Utility” by clicking the padlock icon and entering the administrator password
- Pull down the “Edit” menu and select “Enable Root User”
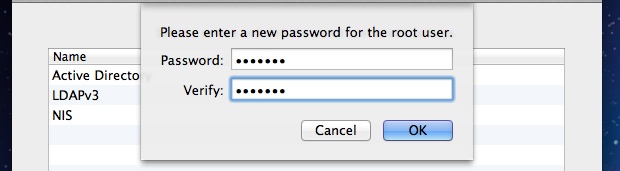
- Enter and confirm a password to set the root users password and to enable the account
/System/Library/CoreServices/

Be sure to set a strong password for the root account. If you’re bad at picking passwords or you just want the security advantages of randomness, generate one randomly from the command line.

With root now enabled, the account can be used freely. It will not appear in the Users & Groups preference pane.
The root account can access, read, and write to all files on a system, even if they belong to someone else. Additionally, root can also remove or replace system files. This is why it’s a potential security risk to leave the account enabled aimlessly, or to use a weak password with the account.
The Directory Utility control panel can also be used to change a set root password through the Edit menu, or that can be done through the command line using sudo passwd, similar to changing the root password in iOS devices.

THANK YOU!!!
I’m getting a bit confused about all these passwords, (which is probably a good reason for leaving them all alone!) – but is the root password the same or different from the firmware password?
Forgot the password – rebooted holding c etc. – changed the password
When i restart now, i can choose my account (for which the new password doesn’t work) and ‘others’ (no idea what name of password could help me here)
And I when I try to reboot holding C of cmd S, I always come to the described window… Installation CD is inserted.
What to do? All apologies for the English…
I bought my MBP barley used from someone and they have set their name as I guess the root user and their name appears next to the little house icon in finder. Also, the app store icon on the dock shows an update available for this users twitter account. It’s driving me nuts! How do I get rid of this fool’s name off my computer entirely?!?!? I have set myself as the admin but can’t seem to get his name out of finder. I don’t want him having any association with this computer. It’s a MBP mid 2011 running Lion thanks!
pull the HDD and smash it with a hammer?
Just joking! Try booting in single-user mode
1. Shut down your Mac if it is on.
2. Press the power button to start the computer.
3. Immediately press and hold the Command (Apple) key and the “s” key for single-user mode. (Command-S)
execute the 2 commands shown at prompt [fsck+mount] to make partition writeable
This should put you in the root account – then reset the root password as shown above:
passwd
enter the new root’s password twice
Then reboot {} and login via GUI as user root, then in Settings/Users+Groups wipe out any user account you don’t want.
Hope this helps!
oops, reboot {just type reboot and hit return}
James: I could only change host file by logging in as root. This file couldn’t be updated from terminal using vi, when I am logged in using my login, though the userid has admin privileges.
There is ZERO reason to enable the “root” account! Any administrator can execute and act as “root” via the sudo command in Terminal. Root is disabled for a very good reason, leave it alone. There is nothing you can’t do as an administrator that requires “root” to be enabled.
James: I couldn’t change host file with logging in as root, though my userid has admin privileges.
Had to be in root to use visudo ;-)
Sorry, I don’t care for using GUIs when doing stuff like this.
You can start the Core Services in the Sysstem Preferences too, head on this way: Apple menu >> System Preferences >> Users & Groups >> authenticate as an administrator >> click Login Options >> click “Edit…” or “Join…” at the bottom right >> click “Open Directory Utility…” >> click the lock >> enter administrator name and password >> choose Enable Root User from the Edit menu >> enter the root password you wish to use and you’re done
The same procedure is for Snow Leopard too…
I did the same in a much easier way:
sudo su
enter your password
passwd
enter the new root’s password twice
done, now I can log in as root (GUI and CLI).
Good to know that still works! Thanks for sharing this.
THANK YOU!!
that worked!!