Create a Contact Sheet of Thumbnails with Automator in Mac OS X
 Contact Sheets, often called Proof Sheets, are essentially columns and rows of image thumbnails, making a bunch of photos very easy to quickly review. Though they’re commonly used by photographers, they have a wide range of uses outside of the pro-photography world, from artists to designers to UI/UX engineers. Rather than creating a contact sheet by hand the hard way in Photoshop or Pixelmator, we’ll show you to instantly generate one that is fully customized, all you’ll need to do is select a group of pictures in the Mac file system and let the excellent OS X app Automator do the hard work. Everything used here is free and bundled into Mac OS X, there’s no need to buy anything else or download any other apps.
The end result will be able to contact sheet PDF file that is a specified paper size with a chosen number of thumbnail columns, saved to where ever you want, and it will look something like this:
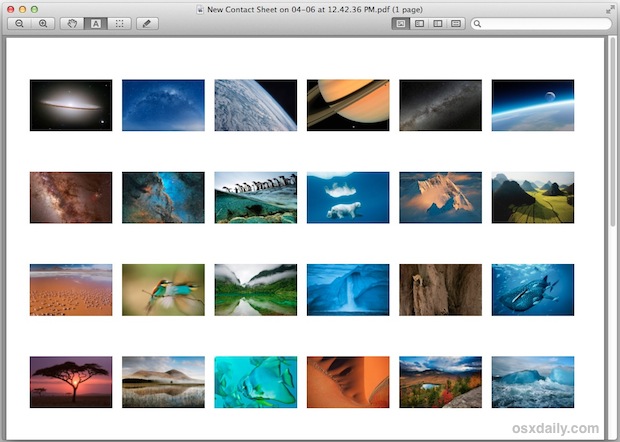
The resulting file is smart enough to not overwrite itself too, and it will automatically append the date and time to the file name like “My Contact Sheet on 04-06 at 2.42.36 PM.pdf” so that you can’t overwrite one proof sheet with another if several have been created. Enough talk, let’s get started!
Create the Contact Sheet Generator Service
This will create a service that generates contact sheets instantly for you:
- Launch Automator, found in /Applications/, and from the File menu choose “New”
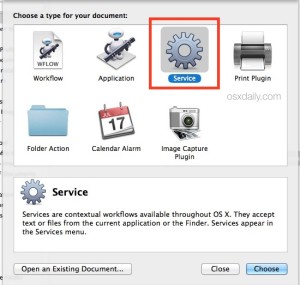
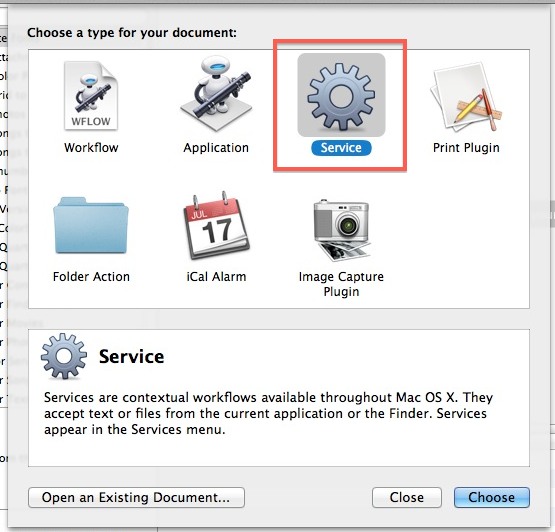
- Choose “Service” from the new menu
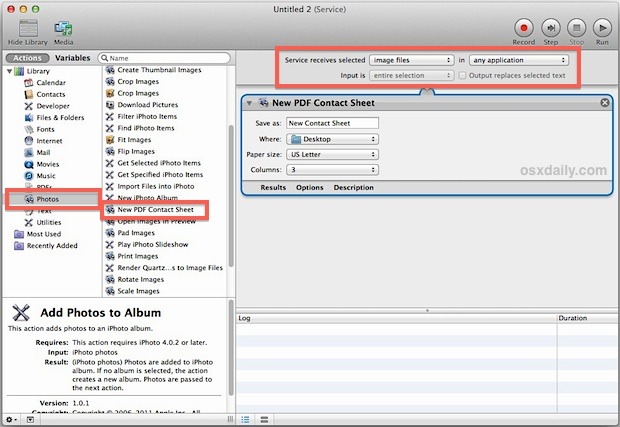
- Look under the “Library” column on the side and select “Photos”, then in the next column find “New PDF Contact Sheet” and double-click it to add to the new service
- At the top, look for “Service receives selected:” and choose ‘image files’
- Set the Contact Sheet customizations under “New PDF Contact Sheet”, including where to default to saving the file to (~/Desktop is standard), the Paper size, and how many columns will be shown
- When satisfied with the customizations, go to File then “Save” and give the automator service a name like “Make Contact Sheet”
Quit out of Automator if you’re satisfied, or leave it open if you want to try out the results and then make adjustments based on what you find.
The hard part is now over, and that wasn’t so tough was it? Now let’s go ahead and make a new contact sheet almost instantly from the OS X Finder.
Make a Contact Sheet by Generating from Selected Images
Now that the Automator Service has been created, making a contact sheet is just a matter of selecting images and letting the generator do the work for you:
- Locate and select any number of images in the OS X Finder
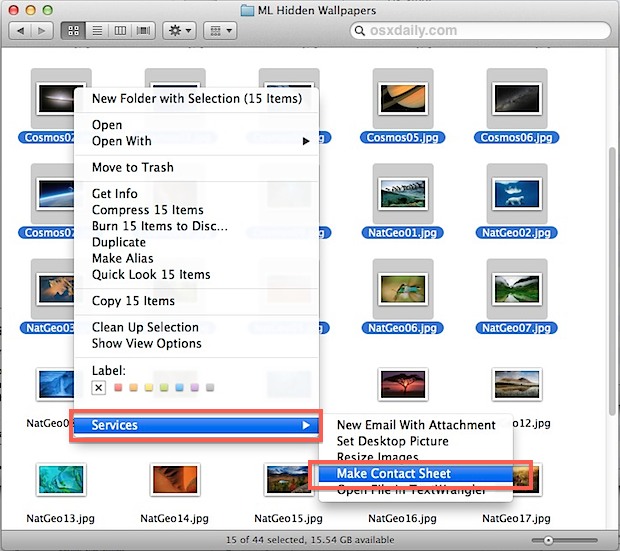
- Right-click any of the selected images and go to the “Services” menu, then choose “Make Contact Sheet” (or whatever the name was that you picked when saving the service)
- Wait a few seconds or a few minutes, depending on if you chose a handful of images or hundreds for the PDF file to generate
- Go to the ~/Desktop (or where ever else the save location was chosen) to find the generated PDF
The file generation is usually extremely fast, though how long it takes is going to partially depend on how fast your Mac is, and of course how many pictures you chose for the sheet. If you used a folder of 500 high resolution images, it will take a couple minutes usually, versus generating the sheet from a collection of 50 lower resolution pictures, which takes only a few seconds. For this reason, it can be a good idea to scale down images before creating a contact sheet from particularly humungous files, but if you find yourself having to perform a ton of image resizing you can also create a simple ‘Batch Resize’ Service with Automator, or just do a manual bulk resizing process on a group of pictures using Preview app, which also comes with every version of Mac OS X.
Open the file in Preview to see how the generated sheet looks, it will have followed the guidelines chosen during your initial setup so if you’re not happy with it make some changes to the Service and just save it again, then generate a new sheet PDF.
Generally speaking, numbers that are consistent multiples of the columns chosen during the creation of the service look best. Meaning, if you picked 6 columns, anything that is a multiple of 6 (12, 24, 36, 600, etc) will tend to look the best, so that each column and row is even. Also, images that are of the same width tend to look best as well, since it creates an even amount of white space between them.
Here’s another example of the output of this Automator Service, this one showing a 3 column layout with wide images:
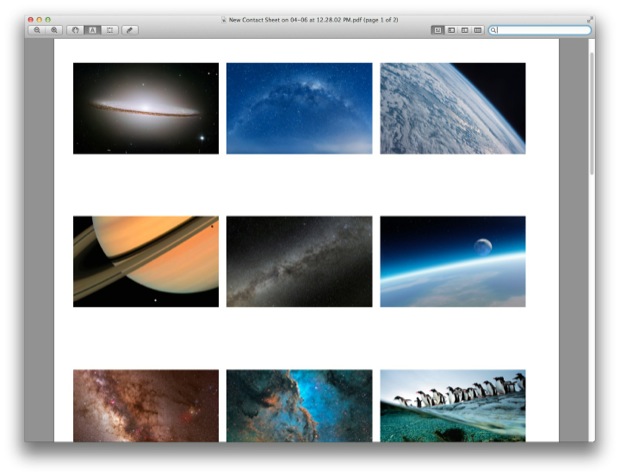
And no the images contained in the example proofs are not my pictures, they are from the hidden wallpaper collection buried in OS X 10.8 and later.
Enjoy!


This worked great for me. The gear isn’t called services anymore, it’s called Quick Action but it works just fine. Everything else is the same.
My initial error was that I didn’t DRAG the “Make PDF Contact Sheet” item into the screen on the left. Just make sure you do that :)
I’ve used this repeatedly for several days now and it works perfectly – so happy. Thank you for this!
*I’m on Monterey 12.0.1
Anyone who happens to see this:
1) The process has changed some for Automator 2021
2) My experience (Quick Action or Workflow) I was only able to get it to work once. Why? I have no idea.
3) There’s an image application (FREE) XNView runs on Mac Monterey (as of this writing). Pick your images, click “Create” in the menu, Select “Contact Sheet” follow the prompts, click “Create” – done. So far has worked every time. Dead simple.
Automator stalls on some images for me. My workaround is to go to MakePDF app in OSX and then open all your images and select a custom layout “contact sheet” (3 columns was the default for my images). I then save it, and reopen in Preview and Export with the Quartz filter “reduce in size”
It seems High Sierra might have broken this script as Jim noted. Automator encountered an error running this workflow: “Couldn’t communicate with a helper application.”
Instructions totally don’t work under High Sierra. I keep getting “can’t communicate with helper app” errors or another cryptic error.
I can’t seem to get the automator to get past choosing service receives selected-image files. After that, there is no option to choose where to save the file, what paper size, columns, etc. It also doesn’t note if there needs to be a recording of the action and/or where and how to save your automation with the name ‘make contact sheet’. Am I totally missing some steps?
Great! Loved this method. Just one issue – seen a query on this earlier but haven’t seen an answer. Can we get the file name printed below each image? Will help “hugely” in managing photos.
did you ever get an answer to this? I’m trying to do the same thing.
This is amazing!!! It worked perfectly for me and is EXACTLY what I needed.
Thank you!!!!
Here’s another way to do this:
Group-select the files you want to print the contact page of. Open them in Preview (within one Preview file).
In the thumbnail view, select all. Go to File/Print. Click the Preview tab and select Layout. Just below that click on how many image you want on each page.
Click print.
This doesnt work anymore…followed all the steps but when I right click on the pictures I want to create a contact sheet with, there is not “services” offer. ****! I hate my mac – It shouldnt be this difficult to create a contact sheet. I used to be able to in Iphoto but apparently thats obsolete now and I cant open it. THANKS.
Hi Karen,
I looked for “services” too but what actually shows is whatever you named the service (the example in this article being “Make Contact Sheet”)– I think Apple probably dropped the “Services” option because any services created you have named anyways, so it was a bit redundant.
For me, I was confused for a moment but then saw “Make Contact Sheet” (I named it exactly as in this article because it works for me,) clicked on it, and everything went smoothly.
I hope that helps for you.
Thank you thank you- Ever since my update, I cannot use my Adobe CS4 Bridge or Photoshop to make contact sheets. So, this is a great option if I am in a pinch!
Hi there, I was able to do this no problem, but the contact sheet doesn’t have the file names listed with each image. Does anyone know how to do this? Thank you!
Did you ever figure this out? Trying to do the same thing.
I installed it and it worked right away, as promised. However, it does not copy all of the selected images. I selected 11 in a file and it copies 9 of them. Any thoughts?
Works well .
Now how to make it bigger and better- is it possible to set the size to B1 (707 x 1000 mm) and more columns. I am hoping to create a PDF to take to the print shop and make a poster with something like 300 individual images.
Thanks
always the same in 10.9.5
automator script “new pdf contact sheet” doesn’t work !!!
something weird is happening to the output of the automator action “new pdf contact sheet” as explained here:
https://discussions.apple.com/message/12848062#12848062
I verified that this is indeed true even in el capitan OSX 10.11.5
With the OS X Daily method I get a blank pdf file even after repeating 3 times.
Just right click on all the images you want to include. Select Open in Preview, from the drop down menu on the far left select “view as contact sheet”.
Then you can export as a pdf-clean
Thanks Janie, but I get a pdf file with only one of the images. I selected several. Couldn’t find a pdf-clean option, or was “clean” a comment?
I get the same problem in 10.9.3.
yep tried everything i could think of. PDF contact sheet always comes up with NO pics inside and only 1k file size. this part of the script isn’t working. i can see it making the file and accessing the photos, but the resulting file, blank…
Have the same issue on 10.9.1 get a blank pdf when I run the service.
On 10.9.1 the result is a blank PDF – tested on 2 laptops, with different images selections. Any clues?
I have the same problem: it creates a blank PDF file.
OSX 10.9.1 and I also get a blank PDF. Tried all combinations of paper sizes, save location and selections of images but still get nothing. Puzzling, but I guess I have company so it’s not just me being dumb again! ;-)
same problem…seems no solution in 10.9
Did this and it works great, however the first time I do it with a set of photos it always opens up an application called MakePDF and I have to go through an extra step of saying file-save etc. But if I just exit out & click make contact sheet a second time it will do it just as you described. Any idea how I can stop it from doing the first thing?
Thanks, There used to be an automator script for creating a poster from a folder of pics, it was really great but it stopped working when 10.7 hit. If anyone knows how to do that trick in 10.7 or 10.8 it would be greatly appreciated. Thanks
Much easier way. Don’t even need to fuss with Automator.
– Enter an image folder.
– Enter full screen.
– CMD+1 for thumbnail view
– Shift+CMD+4 for screen capture
– Space bar to highlight the entire window (which is full screen)
– click the mouse, or tap the magic trackpad.
Voila! You have your thumbnail capture. Now, edit or annotate it if you like in Preview or your favorite image editor.
I could not get automator to work. This worked fantastically and it was easy. Thank you, thank you, thank you!
That does work great. In “View” – “View Options” its very handy to change the size of the icons and the horizontal spacing between them. I couldn’t get rid of the large amount of text label space below the icons.
Many thanks.
How does one find and edit the service after saving it and exiting Automator?
This is a nice tip, but the resulting PDF contact sheet has no file names to reference the images.
Ditto to that. Would love a way to tag each thumbnail with its file name for identification. Hints, anyone…?
If you get the “The action “New PDF Contact Sheet” encountered an error.” message, run it again and it goes away for good.
Any ideas why this happens or how to fix it?
Never mind, I think I made it go away permanently by applying an additional step in the Service:
“Filter Finder Items” > All of the following true > Kind is Image
put that before “New PDF Contact Sheet” and it seems to resolve it!
This is excellent thanks!
Just a tip of my own here, for those with iPad and iPhone… If you’re in a pinch and need to create a quick proof sheet in iOS make a new folder gallery out of a selection of images, then take a screenshot, then use Edit and Crop tool to crop out the iOS elements and you are left with nothing but a thumbnail page. On an iPhone you’re limited to about 20 pages per proof sheet but it works in a bind if you forget or need to send one out to clients real quick!
This does not work if you have a lot of photos. And you can use command+shift+4 and have no need to crop later.