9 Tricks to Ease a Cluttered Mac Desktop & Maintain Focus
 Desktop clutter happens to the best of us, even if we try our hardest to maintain a remarkably simplified virtual workspace. Whether it’s way too many icons thrown all over the desktop from working with files, or just a million and one windows open for various apps, documents, and browser tabs, there are some simple ways to alleviate all of this, even if you’re right smack in the thick of things. The next time you’re inundated with some virtual clutter, use these tricks to maintain focus and get back to work.
1: Focus in Full Screen
 If all you need to do is work in a single app, make use of the newer Full Screen feature of OS X. Send whatever app deserves your unrestrained focus into Full Screen mode by clicking the arrow icons in the corner of the app window or by assigning the feature it’s very own keyboard shortcut.
This helps prevent distractions while also increasing the available workspace for that application itself, which is a win-win in many situations.. Full Screen mode is particularly beneficial for portable Mac users, though admittedly it’s (unfortunately) still fairly useless on dual-screen setups.
2: Use a “Sort” Folder to Overcome Excess Desktop Clutter
Overwhelmed with tons of stuff on your desktop? Create a new folder, name it “To Sort” or “Cleanup”, hit Command+A to select everything, then drag it all into that new directory.

No, those files won’t take care of themselves and you’ll still need to sort them later, but if you just need to quickly start from scratch or reduce the performance drain of having a gazillion icons drawn on the desktop, it works, while still providing access to new files that are saved to the desktop or that end up there. Plus you’ll be able to see your nice wallpaper again.
3: Turn Off the Desktop Display
Disabling the desktop may sound extreme, but when there’s too much icon clutter and distraction sitting about with a million files on the desktop that you just don’t have the time to deal with yet, it’s actually a great option. Unlike quitting the Finder, disabling the Desktop allows the Finder to continue to run, providing easy access to the file system if you do need to access documents quickly. The end result is a blank slate, showing off the wallpaper:

What’s the best way to do this? You can use defaults commands or third party utilities. DesktopUtility is one such useful free utility to serve this purpose (and other uses too), offering a simple menu bar pulldown lets you toggle the desktop on and off when necessary.
Otherwise, use this defaults trick to manually disable the desktop yoursel by entering the following string into the Terminal:
defaults write com.apple.finder CreateDesktop -bool false;killall Finder
Finder will relaunch and all desktop icons will be invisible. Your desktop files will still be accessible by going to the ~/Desktop/ folder, however. Or you can just toggle the desktop on again by switching ‘false’ to ‘true’ in that defaults command, or flipping it back in DesktopUtility.
4: Hide Everything Else with a Keystroke
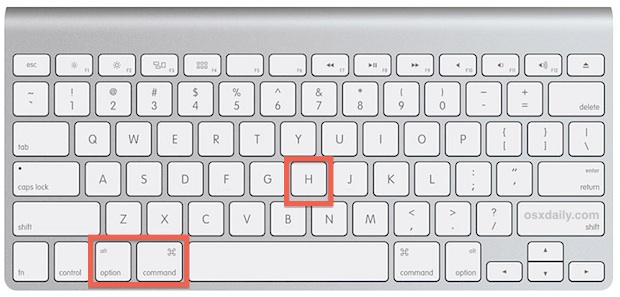
Command+Option+H is the amazing focus keystroke, it hides every other application and their windows, except for the currently active one.

If you want to revert this and see every single window again, pull down the primary app window and choose “Show All”. This trick is generally best used with translucent Dock icons turned on so that you can easily see which apps are hidden, a little-known feature which should probably become a default fixture in OS X.
5: Wrangle Browser Windows & Tabs
Chrome: If you use Chrome as your primary web browser, you’ll be pleased to discover there area a handful of extensions that make Tab and Window management easy. One such item is OneTab, which basically sucks all open windows and tabs into a single window which contains links to the pages you once had open. This has the wonderful side effect of freeing up tons of system resources too, since each browser window takes up a fair amount of RAM. Unfortunately, there’s no such extension for Safari that we’re aware of (hit up @osxdaily on Twitter if you do know of one!), so we’ll stick with the Chrome recommendation for now.

Safari: Not quite as effective as the OneTab extension for Chrome, you’ll find the “Merge All Windows” feature of Safari to be available under the ‘Windows’ menu, and it’s a decent alternative. As the name implies, it pulls all open Safari windows into a single tabbed window, thereby eliminating excess browser clutter. You can even set up a keystroke for this command if you find yourself using it often.
6: Use the iTunes Micro Player for Controlling Music
iTunes has a fairly bulky interface by default, and if all you’re looking to do is control music then take advantage of the Mini or Micro player and allow yourself to ignore all the extraneous information that’s otherwise sitting in the app UI. All you need to do is click the little box corner in the upper right of the iTunes window to set iTunes into mini player:

You can shrink the mini player even smaller by grabbing the windows edge and pulling it inward on itself, making it even smaller:

The iTunes window has always had the ability to shrink into a mini-player, but from iTunes 11 onward that miniaturized playing feature has improved with more controls and options making it even better, and much more usable. Additionally, there’s now a new ability to shrink down the already small mini-player into an even smaller micro player, which is perfect for situations when your desktop is cluttered with a lot of windows, or you just want a super minimalist music player.
7: Make a New Virtual WorkSpace in Mission Control
Got too much going on with one screen and need to start anew? Rather than close all your windows, just create a new workspace and start from scratch. The best way to do this is use a Four-Fingered upward gesture to summon Mission Control, then hover over the upper right corner until the “+” appears, clicking that will create a new desktop that you can then work from.

You can then switch back and forth between virtual desktop spaces easily with a three-fingered sideways swipe.
In order for virtual workspaces to be truly effective though, you’ll have to be conscious of how much RAM and CPU is being used by current apps, because you obviously don’t want to abandon ship on one virtual desktop full of processes pegging the CPU just to struggle with inadequate resources in another virtual desktop. Thus, this is partially RAM and CPU dependent, and if you’re struggling to maintain 2 apps you can’t expect everything to be hunky-dory by creating a new workspace.
8: Quit Unneeded Apps & Trust in Auto-Save & Window Restore
Too much going on in one app and want to deal with it later? Maybe you have a couple apps open you don’t need at the moment? Just flip over to them and hit Command+Q to quit the app, trusting that your documents and data will be exactly where you left off, thanks to auto-save combined with the window restoration features. Before doing this, make sure you do not have these features disabled, particularly auto-save, which is on by default and should be left on. Obviously, if these features are turned off then this entire trick is pointless, because you’d lose your data and windows.
Though the Auto-Save and Window Restore features of OS X caused a bit of a stir when they were first introduced in 10.7, they were heavily refined in OS X 10.8 and have since become both excellent features. Because the auto-save and window restoration features are dependent on modern versions of OS X, don’t try it with Snow Leopard or anything earlier.
9: Go Extreme with Single Application Mode
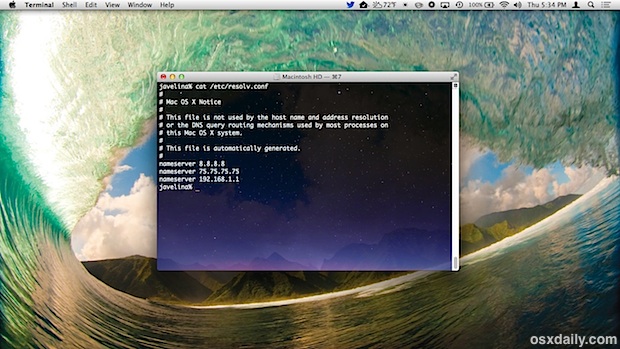
Single Application Mode causes OS X to only display the currently active application, automatically hiding apps that are not in use. Switching between apps causes the focus to change as well as the apps that are hidden, keeping whichever the active app is the only one visible. This gives you an idea what it looks like when combined with an invisible desktop, showing only Terminal as visible, despite about 15 other apps being open:

Rumor has it this feature was built by Apple for presenting older versions of Mac OS X on stage at events, but the Single App feature still works just fine today in Mountain Lion, all you need to do is enable it with a defaults command string entered through Terminal:
defaults write com.apple.dock single-app -bool true;killall Dock
The Dock will refresh and so will on screen windows. Initially you may not see a difference, but click to another app and you’ll discover that the prior app is automatically hidden, adjusting the focus to the new one. This can be fairly stark and a big extreme, so whether or not it’s practical really depends on how distraction prone you are. Turn it off and go back to normal with the same command string, but changing “true” to “false”.
Still Overwhelmed?
If you’re still overwhelmed with an onslaught of information, don’t miss these window management tricks, and also consider creating a separate user account for work than you have for play, which can also help when you really need to concentrate on things without having any baggage from other tasks. If you’ve never made a new user account before then you can read how to do that here.

