How to Set Up Lavabit Secure & Encrypted Email on the iPhone and iPad
 Lavabit is a secure and encrypted email platform that has been getting a lot of attention lately in light of recent news events. Lavabit aims to prevent reductions of privacy, and so not only does Lavabit have excellent antispam and antivirus features along with your standard email niceties like autoresponders, its most relevant feature at the moment is the usage of SSL and asymmetric encryption for incredibly secured email communications. Here’s the brief description of Lavabits security features, but for those truly interested you can read more here:
How does asymmetric encryption protect your privacy? The short description is that for users of this feature, incoming e-mail messages are encrypted before they’re saved onto our servers. Once a message has been encrypted, only someone who has the account password can decrypt the message. Like all safety measures, encryption is only effective if it’s used. To ensure privacy, Lavabit has developed a complex system that makes the entire encryption and decryption process transparent to the end user. This process works by combining three different encryption schemes with Elliptical Curve Cryptography (ECC) as the cornerstone.
If that sounds good to you, or if you’re just interested in having a new email address with more private and secured email communications, we’re going to walk through setting up Lavabit in the default iOS Mail client.
This guide will focus on adding a new secured/encrypted Lavabit email account to be used in conjunction with whatever email is already setup for use on your iPhone, iPad, or iPod touch, meaning it will work alongside any Gmail, Outlook, Yahoo, AOL, whatever account you have configured. This guide works the same on all devices, whether in iOS 6 or iOS 7.
Configure Lavabit Secure Email with iOS Mail
Note that you can use POP or IMAP, we’ll focus on IMAP so that past emails maintain accessibility with another device and/or the lavabit webmail client. Configuration for POP3 is the same with the exception of the port number, which uses 995 rather than 993.
- First, sign up for Lavabit, the two free level mail accounts work fine for this purpose or you can opt for the paid plans – make note of your username and set a strong password, but do not forget this password as there is no reset or recovery option for enhanced security purposes
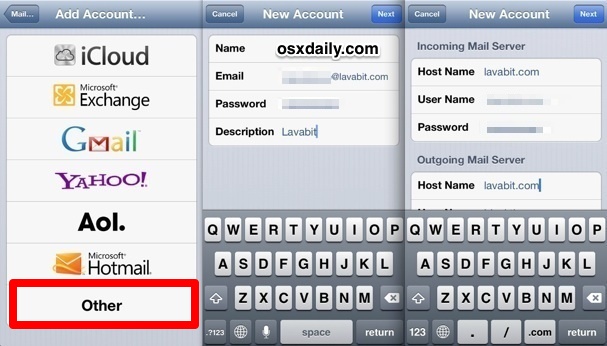
- Open “Settings” in iOS and go to “Mail, Contacts, Calendars” and choose “Add Account…”
- Tap on “Other” and at the “New Account” screen enter your name, the email address (username@lavabit.com), the password, and “Lavabit” as the description, then tap “Next”
- For both “Incoming Mail Server” and “Outgoing Mail Server”, use “lavabit.com” as the host name, and enter your username and password in the respective fields, then tap “Next” again
- Toggle “Notes” to OFF and keep Mail set to “ON”, then choose “Save”
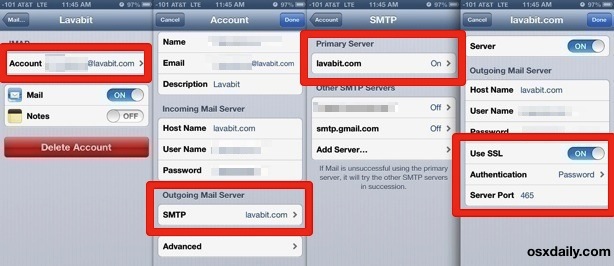
- You’re not done quite yet, you will still need to set specific ports for outgoing and incoming mail servers. Go back to Settings > Mail, Contacts, Calendars > choose your new “Lavabit” account, then tap on your account name
- Look under “Outgoing Mail Server” and tap on the SMTP setting, then tap on “lavabit.com” and under “Outgoing Mail Server” be sure SSL is set to ON, and set the “Server Port” to 465, then tap “Done”
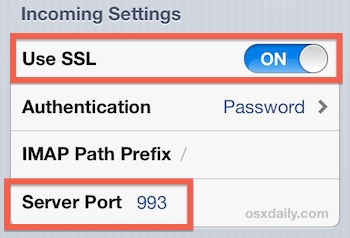
- Now tap back to the “Account” screen, and now choose “Advanced” and look under “Incoming Settings”
- Be sure “Use SSL” is set to ON, and set the “Server Port” to 993
- Exit out of Settings
Now visit Mail app. Do a quick test and send an email to your newly created Lavabit address from another email account. Once that email arrives, send a reply email as well to make sure all is working as intended. Note that if outgoing mail is not working, it’s probably because you did not properly configure the outgoing server port, so jump back to that portion of the walkthrough to set it. If you rushed through the setup process, iOS will configure the Lavabit email as if it was a standard mail account and the ports will not be set properly.
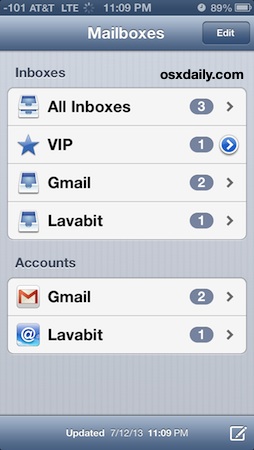
If you’ve never used multiple email addresses in iOS before, you’ll find the default view setting of Mail app is to keep the two inboxes visually merged together. To change that, or to view only messages from a single email account at a time, tap on “Mailboxes” and select “Lavabit” (or whatever other mail).
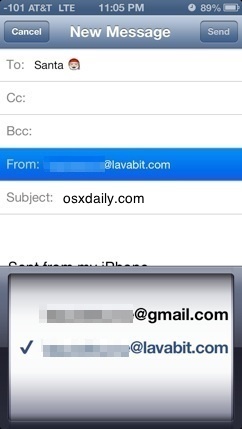
Now that Lavabit is setup, sending mail from your Lavabit address is just a matter of composing a message as usual, then tapping on the “From” field to select the username@lavabit mailing address. Now you can finally send encrypted emails to and from Santa!
Enjoy your ultra-secured email from your iPhone, iPad, or iPod touch, and remember to never forget your lavabit password because they can not be recovered. Also, don’t forget to use a secured passcode on your iOS device so that you can curious eyes won’t be able to gain direct access to your iPhone in the event you lose the device.


Lavabit.com has shut down operations.