Use the Live iPhone Camera Filters to Add Flair to Your Photos
![]() Filtering photos has long been a popular obsession of iPhone users, whether through Instagram, Afterlight, Snapseed, or the Facebook Camera app. Apple took that popularity to heart and built a variety of filters directly into the iOS Camera app, though the feature has gone largely overlooked by many users. Unlike some of the more garish third party iOS filtering apps, most of the bundled iOS 7 filters are fairly subtle, making them reasonable to use to enhance a pictures appearance.
Filtering photos has long been a popular obsession of iPhone users, whether through Instagram, Afterlight, Snapseed, or the Facebook Camera app. Apple took that popularity to heart and built a variety of filters directly into the iOS Camera app, though the feature has gone largely overlooked by many users. Unlike some of the more garish third party iOS filtering apps, most of the bundled iOS 7 filters are fairly subtle, making them reasonable to use to enhance a pictures appearance.
There are two ways to use native filters in iOS: with the live camera, which we’ll cover here, or after the the photo has been taken through the Photos app, which is for another article. Yes, live filters work for the iPad and iPod touch running iOS 7 as well, but our emphasis is going to be with the iPhone since that is what most people use for a point-and-shoot camera.
How to Shoot Photos with Live Filters from iOS Camera App
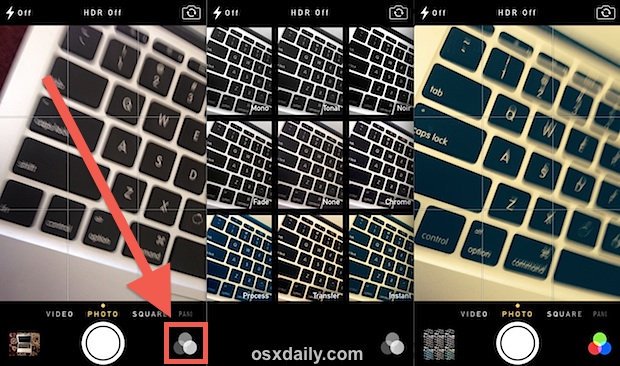
Using live filters is quick and will add that chosen filter to every image taken with the Camera app while it’s set.
- Open Camera app as usual, then tap the three concentric circles in the corner
- Choose a filter from the live preview by tapping on it
- Take the photo as normal
Photos taken with a live filter will be saved to the Camera Roll using that filter. Be aware that this filter becomes the new default setting until you change it again, or set it back to the default “Normal” mode.
The 8 Different Camera Filters on iPhone and iPad
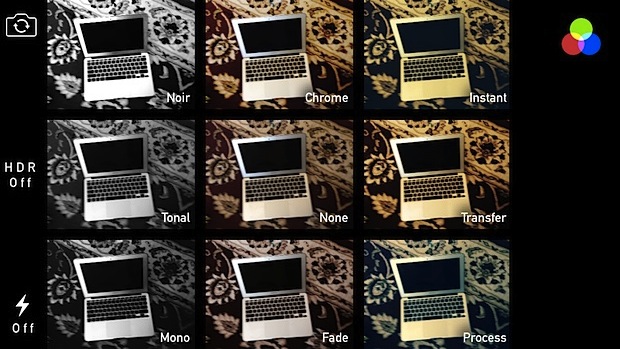
There are eight filters to choose from, and while all are fairly subtle they vary quite a bit. You’ll find they’re generally broken into three groups with distinct filtering effects; black and white, subtle variations (including none), and retro. They’re roughly described as follows, but you’re better off opening the Camera and seeing for yourself:
- Noir – high contrast black and white imagery
- Mono – lowered brightness black and white
- Tonal – basically the default setting but stripped of saturation
- None – no filter, the Camera app default
- Fade – lightened image with lower saturation
- Chrome – brightened image with higher saturation
- Process – semi-washed out image with a blue hue
- Transfer – somewhat over exposed warm hue
- Instant – retro brightened image with a yellow hue
As already pointed out, you’re really better off toggling filters on the live camera, pointing it at a variety of objects, and looking at the differences yourself to see how each filter setting looks.
There’s little harm to taking images with the filters applied through the live camera, but iOS allows you to adjust them after the fact, or even remove the filter entirely by editing the image through Photos app.
Of course filters are just one of may possibilities for the iPhone camera, don’t miss our other iPhone photography tips to learn much more.

The only problem is the filters do not stay when you try to download them into iPhoto, I took over 2000 pictures using the filters at a wedding and when I plugged in my phone non of the filters I shot with stayed… Super super sad & bummed
One little mistake: the three circles are not concentric (they don’t share the same center), rather they overlap.
Paul, there’s a mistake in the last paragraph. Where it says “Ok course filters are”, it should say “Of course, filters are”.
Doh! Thanks for catching that, appreciate it!